
Get more details about this project
What you need
An old, clean white cotton bed sheet
The outlined star and blessing stamps shown in the reference images, using this Amazon stamp link
Ordinary stamp pad in your chosen colour
Acrylic stamping block if required for your stamps
Fabric scissors
Ruler or measuring tape
Plain scrap paper to protect your work surface
A fabric offcut for testing
Scrap cardboard for storing the finished ribbon
Instructions
There’s something lovely about a present wrapped in brown paper and tied with soft, frayed white fabric. Add a few stamped stars and a little blessing, and even the simplest parcel feels personal.
For this homemade Christmas ribbon, we’re rescuing an old cotton sheet and giving it a much prettier job than joining the cleaning-rag pile.
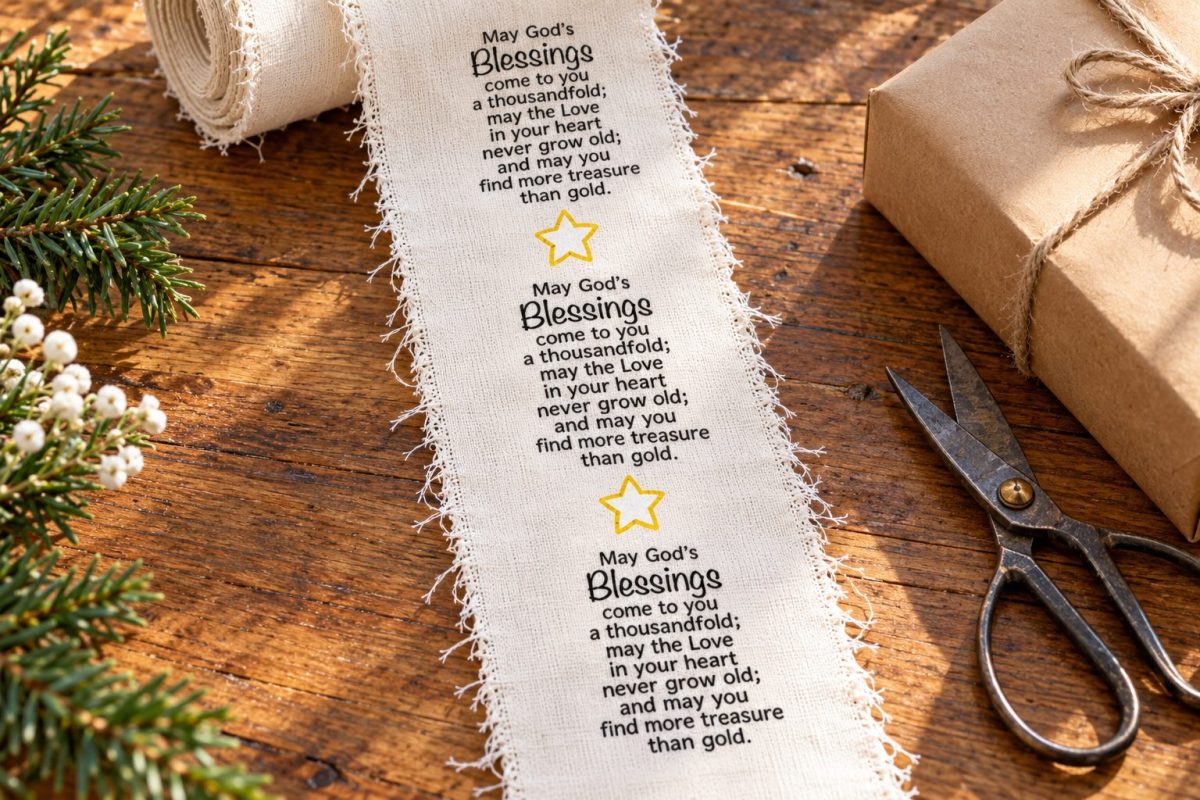
The two stamp designs create slightly different effects. The outlined star makes a repeating pattern along the centre of the ribbon, while the taller blessing design works beautifully on a wider fabric strip with its ends left hanging.
Because this is decorative gift ribbon that won’t be washed, there’s no need to buy specialist washable fabric ink. Start with an ordinary stamp pad from your stash and test it on a scrap first.
Instructions
1. Prepare Your White Sheet
Choose a plain woven cotton sheet with some sound fabric remaining. Smooth cotton is particularly helpful for the blessing stamp because its small lettering needs a reasonably even surface.
Cut away elastic, thick hems and badly worn sections.
If the sheet needs washing, wash and dry it before starting. Smooth out the fabric, giving it a light press if it is heavily creased.
Keep a few offcuts for testing your stamps.
2. Measure the Stamps Before Tearing
Stamp both designs onto scrap paper so you can see their actual printed size.
For the star ribbon, allow enough width for the star, a little white space on either side and the frayed edges. A strip around 5 cm wide may suit, but check your stamp first.
For the blessing strip, measure across the widest part of the printed wording. Add approximately 2–3 cm to that measurement for clear margins and fraying.
Don’t squeeze the blessing onto a narrow strip. The words should sit entirely on the solid fabric, away from the loose threads.
3. Tear the Fabric into Strips
Make a small snip at your chosen width, then tear steadily along the fabric grain.
Test a short section first. If your sheet won’t tear cleanly, cut the strips instead and loosen the edges by hand.
Make long strips for wrapping around parcels, plus a few shorter, wider pieces for the blessing design.
Our primitive Christmas sack tutorial uses a similar torn-fabric technique with flannel if you’d like another rustic wrapping idea.
4. Create the Frayed Edges
Gently pull away several lengthwise threads along each side of the strips.
Aim for a softly ragged fringe approximately 5 mm deep, leaving a strong, solid centre for stamping. Keep some threads slightly longer than others for a relaxed, handmade finish.
Trim away large tangles, but leave the little irregularities. This ribbon should look as though it came from your craft table.
5. Test the Outlined Star Stamp
Lay a fabric offcut on plain protective paper over a firm, flat surface.
Mount the stamp if needed, apply a light, even coating of ink and press straight down. Lift it without rocking.
The star should print as an outline with a plain fabric centre, matching the supplied design.
If the outline spreads or fills in, try using less ink. If sections are missing, check that the fabric is flat and apply even pressure.
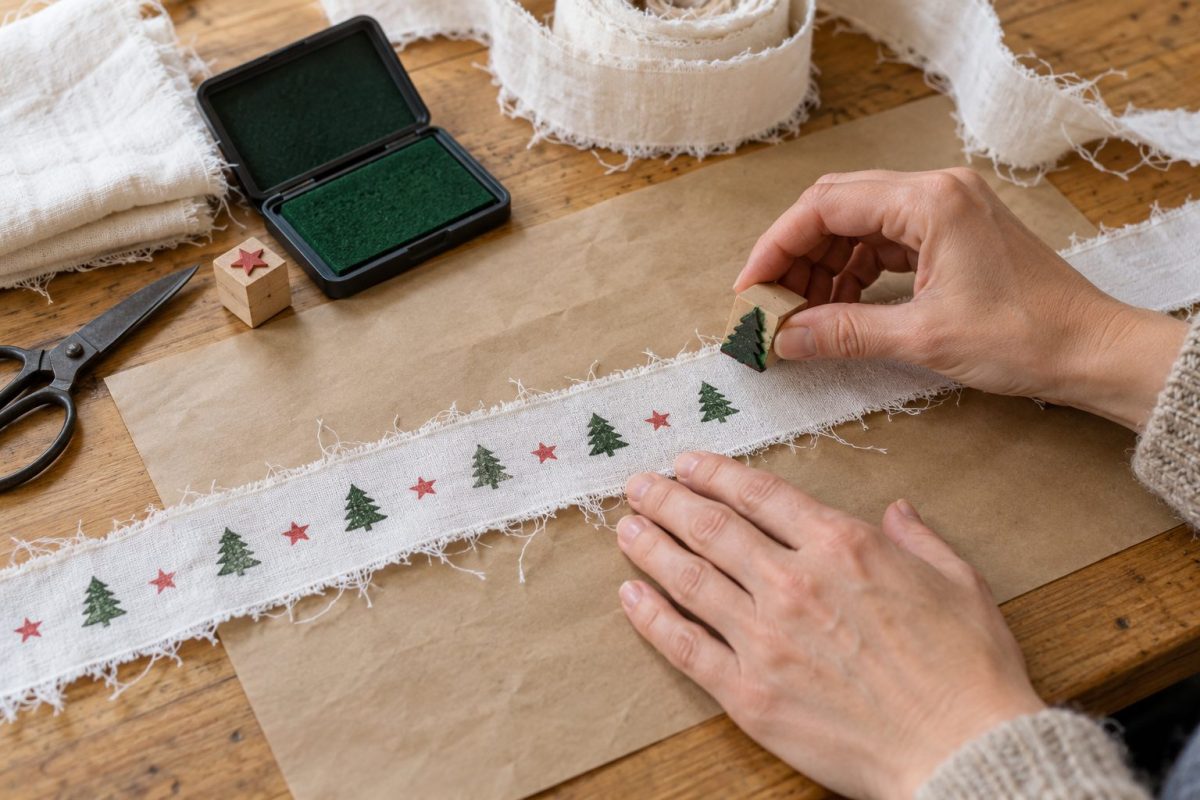
6. Stamp Stars Along the Ribbon
Lay a long fabric strip flat.
Stamp the outlined star along the lengthwise centre, leaving roughly one star-width of blank space between impressions. Adjust the spacing to suit the size of your stamp.
Keep the stars in one row with white fabric visible on both sides.
One colour is enough for a lovely result. Deep green, red or charcoal would all look pretty against white cotton and brown-paper wrapping.
Work in sections and keep wet impressions from folding onto the fabric.
7. Stamp the Blessing onto a Wider Strip
Test the blessing stamp on a fresh offcut before using your prepared strip.
The supplied design reads:
May God’s Blessings come to you a thousandfold; may the Love in your heart never grow old; and may you find more treasure than gold.
Use the stamp as one complete design, keeping its original arrangement of words.
Place the wider fabric strip vertically in front of you. Position the blessing near one end, leaving a clear margin beneath it and plenty of unstamped fabric above for tying.
Press evenly across the stamp, then lift straight up. Check that the small lettering is readable.
If the lettering looks patchy, try a smoother section of the sheet. Adding more ink isn’t always the answer, as too much can make the words blur.
Tip: Keep the blessing away from the section that will become the knot or bow. You want the message visible on the hanging tail.
8. Allow the Ink to Dry
Leave all stamped pieces flat until completely dry.
Gently rub your test scrap against clean white paper to check for smudging or colour transfer before putting the ribbon on a gift.
There’s no heat-setting step for this decorative project. Keep the finished ribbon dry, as ordinary stamp ink may run if it gets wet.
9. Wrap and Finish Your Gift
Wrap the star-stamped ribbon around your parcel and tie it into a loose bow.
For the blessing version, tie the wider strip so the printed end hangs down the front of the gift. Adjust the knot gently until the wording sits flat and can be read.
You can also tuck a blessing strip beneath a separate star-ribbon bow, securing it with a small stitch through the fabric layers if needed.
Plain wrapping paper lets the fabric and stamping stand out. There’s no need to add five more embellishments just because the Christmas craft box is open.
More Ways to Use Your Handmade Ribbon
Use short lengths of star ribbon to tie gift tags or finish the ends of these fabric Christmas crackers. The crackers open by untying the ribbon, so the fabric can be kept afterwards.
For a small extra gift, attach one of our scrap fabric tree ornaments beneath the bow.
The blessing-stamped strips also make thoughtful finishing touches for gifts given to friends, family or members of your church community.
Keep It Simple and Inexpensive
Use the featured stamps for this particular look, or adapt the technique with stamps you already own.
For extra designs, check seasonal selections at Dollar Tree or your local dollar shop. Just a couple of inexpensive stamps can give you plenty of variety. An extra ordinary stamp pad is useful if your existing pad is drying out or you want a second colour.
Wind the finished, dry ribbon around scrap cardboard and save the shorter pieces for smaller parcels.
An old sheet, a few outlined stars and a thoughtful blessing can make simple wrapping feel special. That’s a much nicer use for forgotten linen than leaving it at the back of the cupboard.




What do you think of this project? Let us know!