What you need
Brown and white 8ply/medium/worsted weight yarn
pair of size 6 US (4mm) knitting needles, plus a spare DPN or stitch holder
2 tan pompoms (or knit them as described in pattern)
scrap yarn or embroidery thread in black and white
stuffing for the bunny
ribbon (optional)
small piece of card stock for stabilizing the basket
Instructions
Spring is in the air, and what better way to celebrate the season of renewal and new beginnings than with a handmade Easter Bunny? This adorable knitted bunny is the perfect addition to your Easter décor, with its cute little face and basket full of chocolates. And with its long legs, it’s sure to catch the attention of everyone who sees it.
Although there are quite a few pieces involved in knitting this bunny, the good news is that they all knit up pretty quickly. Plus, this pattern is suitable for knitters of all skill levels, so even if you’re a beginner, you’ll be able to create a cute bunny to brighten up your home for Easter.
One of the things that makes this bunny so special is the attention to detail in the design. From the adorable little nose to the delicate stitching on the basket, every element of this bunny has been carefully crafted to create a beautiful and unique piece of Easter décor.
So why not spend some time this spring season indulging in a little bit of knitting? Not only will you end up with a cute and cuddly bunny to decorate your home, but you’ll also be able to enjoy the therapeutic benefits of knitting. Whether you’re a seasoned knitter or just starting out, this free Easter Bunny knitting pattern is the perfect way to celebrate the season and create a special piece of décor that will bring joy to your home for years to come.
Here is a pattern to help you make this bunny:

Right Leg
Cast on 17 stitches.
Knit each stitch through the back loop.
Purl 1 row.
Knit in the front and back of each stitch. 34 stitches.
Work in Stockinette Stitch for 7 rows.
K4, k2tog 9 times, k to end. 25 stitches.
Purl 1 row.
K4, k2tog 5 times, k to end. 20 stitches.
Purl 1 row.
K4, k2tog 3 times, k to end. 17 stitches.
Work in Stockinette Stitch until leg measures 10 inches (25 cm).
Place stitches on a stitch holder or spare knitting needle.
Left Leg
Cast on 17 stitches.
Knit each stitch through the back loop.
Purl 1 row.
Knit in the front and back of each stitch. 34 stitches.
Work in Stockinette Stitch for 7 rows.
K12, k2tog 9 times, k4. 25 stitches.
Purl 1 row.
K11, k2tog 5 times, k4. 20 stitches.
Purl 1 row.
K10, k2tog 3 times, k4. 17 stitches.
Work in Stockinette Stitch until leg measures 10 inches (25 cm).
Body & Head
K these 17 stitches then pick up and k the 17 stitches from the right leg. 34 stitches.
Purl 1 row.
K16, kfb next 2 stitches, k16. 36 stitches.
Purl 1 row.
K17, kfb next 2 stitches, K17. 38 stitches.
Purl 1 row.
K18, kfb next 2 stitches, K18. 40 stitches.
Purl 1 row.
Continue in this manner until you have 50 stitches.
Continue to purl on wrong side rows, but work 2 k2tog in the middle instead of kfbs until you are back to 40 stitches.
Next right side row, k6, k2tog 5 times, k8, k2tog 5 times, k6. 30 stitches.
Work straight in Stockinette Stitch for 8 rows.
*K1, kfb. Repeat from * around. 45 stitches.
Work straight in Stockinette Stitch for 25 rows.
K3, *k2tog, k4. Repeat from * across. 38 stitches.
Purl 1 row.
K2, *k2tog, k1. Repeat from * across. 26 stitches.
Purl 1 row.
K2tog across. 13 stitches.
Cut yarn, leaving a long tail. Thread yarn onto yarn needle, slip stitches onto yarn and pull tight.
Ears (Make 2)
Cast on 24 stitches.
Work in Stockinette Stitch for 16 rows.
K2tog, k to last 2 stitches, k2tog. 22 stitches.
Continue in Stockinette Stitch, decreasing on each side of each right side row, until 2 stitches remain.
Bind off.
Inner Ear (Make 2)
Using pink, cast on 2 stitches.
Purl 1 row.
Kfb, knit to last stitch, kfb.
Continue in Stockinette Stitch, increasing on each end of right side rows, until you have 24 stitches.
Next right side row, k2tog, k to last 2 stitches, k2tog.
Continue in Stockinette Stitch, decreasing on each end of each right side row, until 10 stitches remain.
Bind off.
Arms (Make 2)
Cast on 10 stitches.
Purl 1 row.
Knit in the front and back of every stitch. 20 stitches.
Work in Stockinette Stitch for 9 rows.
K2tog, k to last 2 stitches, k2 tog. 18 stitches.
Purl 1 row.
Repeat the last 2 rows. 16 stitches.
Work in Stockinette Stitch until piece measures 7 inches/17 cm.
Continue in Stockinette, decreasing at each end of each right side row as above, until 8 stitches remain.
Cut yarn, leaving a long tail. Thread yarn onto yarn needle, slip stitches onto yarn and pull tight.
Cheeks
With tan yarn, cast on 2 stitches.
Purl 1 row.
Knit in the front and back of both stitches. 4 stitches.
Purl 1 row.
Kfb, k to last stitch, kfb. 6 stitches.
Purl 1 row.
K2tog, k to last 2 stitches, k2tog. 4 stitches.
Purl 1 row.
K2tog across. 2 stitches.
Purl 1 row.
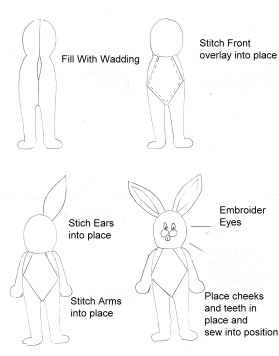
Cut yarn, leaving a long tail. Thread yarn onto yarn needle and slip stitches onto yarn. Gather the edge to make a circle, fill with a little batting and sew closed.
Front Overlay
With white, cast on 2 stitches.
Purl 1 row.
Knit in the front and back of both stitches. 4 stitches.
Purl 1 row.
Kfb, k to last stitch, kfb. 6 stitches.
Purl 1 row.
Continue in Stockinette Stitch, increasing one stitch each end of each right side row, until you have 38 stitches.
Next right side row, K2tog, k to last 2 stitches, k2tog.
Continue in Stockinette Stitch, decreasing one stitch each end of each right side row until 16 stitches remain.
Bind off.
Begin to assemble the rabbit as shown in the diagram above, sewing the front panel to the front of the bunny.
Teeth
With white, cat on 6 stitches.
Work in Stockinette Stitch for 12 rows.
Bind off.
Fold in half longways so the cast on and bind off are touching. Stitch up the sides and down the middle to make it look like two teeth. Stitch onto face.
Basket
Using brown or color of your choice, cast on 10 stitches.
Knit 2 rows.
Kfb, knit to last stitch, kfb. 12 stitches.
Knit 1 row.
Kfb, knit to last stitch, kfb. 14 stitches.
Knit 8 rows.
K2tog, k to last 2 stitches, k2tog. 12 stitches.
Knit 1 row.
K2tog, k to last 2 stitches, k2tog. 10 stitches.
Knit 1 row.
Bind off.
For the side, cast on 50 stitches. Work in k1, p1 ribbing for 14 rows. Bind off.
For handle, cast on 30 stitches. Work in k1, p1 ribbing for 4 rows. Bind off.
Place a piece of card stock in the bottom of the basket. Stitch side panel to the bottom and stitch into a loop. Sew handle to top of basket.


I have been knitting & crocheting for many decades. This is the best, cutest, most wonderful animal/ toy I have ever seen. Can’t wait to make some.
Has this pattern been amended,after reading comments i don’t want to start it and find it all wrong .also how much wool is required it don’t state .many thanks sue
Down loaded pattern but most of it is missing even tho all the pages are there the side of of the instructions on each page are missing. Same with a another rabbit pelattern in the site
I downloaded this pattern for my Mum, who is an experienced knitter. I have to say that the pattern is lacking in a number of key areas – prinicpally the complete lack of sewing up instructions. But the biggest problem we have is that the pattern for the body seems to be incorrect. Stitched up it looks more like a two legged octopus than a bunny. The body seems far too small compared to the head but my Mum says she followed the pattern. Also there are no instuctions on how to get the ears to stand up as shown in the picture.
Would be very grateful for any guidance
Carol, We will contact the pattern maker and get back to you.
This pattern has been completely rewritten and tested. Please let us know if you still find any issues.
3 march 2015
started this pattern last night knitted legs ok. continued with body/ head.
head turned out ok, body did not checked pattern body instructions is not correct you don’t give instructions on how to sew together or what kwise is for beginners. I have been knitting for years. so picture is good instruction bad.
regards kay
Be nice if all the instructions were in the pattern. You don’t say how to sew it up or even to sew it up. To bad you don’t answer questions for people who want to make this pattern. You don’t explain the terms you use like other patterns do. This pattern is very new knitter friendly at all. Love the rabbit. Hate the bad instructions. Off to the trash with this pattern.
How do I pick up the stitches on the spare needle to start making the body?
New knitter question: What does “Kwise” mean?
Rating is before making this. Thanks
I made an Animaniacs Wakko with this pattern! He turned out PERFECT!!!!!!
its fun to do
hi,
Love the bunny!
Just wanted to ask… Where is the overlay you mentioned in the diagram?
Regards,
Alene