
Get more details about this project
What you need
1 lace doily or piece of lace fabric
White PVA craft glue or fabric stiffener
Warm water, if using glue
A mixing bowl or disposable container
A bowl, jar, or rounded form to shape the lace
Plastic wrap or cling film
Foam brush
Scissors
Baking paper or newspaper to protect your work surface
Optional: acrylic paint, glitter, metallic wax, spray sealer, ribbon, beads, or small charms
Instructions
There is something rather lovely about taking an old lace doily — the kind tucked away in linen cupboards, thrift shop baskets, or inherited from someone who clearly had better table-setting habits than the rest of us — and turning it into something useful again.
This easy lace bowl craft is a beautiful way to give vintage lace a second life. With just a lace doily, some glue or fabric stiffener, and a bowl to shape it over, you can create a delicate handmade trinket bowl that looks far fancier than the effort involved. My favourite kind of craft, honestly.
These DIY lace bowls are perfect for holding jewellery, keys, wrapped sweets, sewing clips, buttons, or little handmade gifts. They are also gorgeous for weddings, bridal showers, Mother’s Day gifts, vintage-style home décor, and craft stall makes. Just don’t use them for anything wet or heavy — they are pretty, not heroic.
If you enjoy this sort of vintage-inspired craft, you might also like our tutorial for DIY stamped air dry clay bowls, which uses lace and doilies to create texture in clay. And if you have a pile of old trims and fabric bits slowly taking over your craft room, our CraftBits home crafts section is always a good rabbit hole for using up those odds and ends.
Why Make A Lace Bowl?
A lace bowl is one of those wonderfully forgiving crafts that looks handmade in the best possible way. It does not need to be perfect. In fact, a little uneven edge or soft vintage wobble makes it more charming.
This is a great project if you have:
- old lace doilies
- thrifted table linens
- crochet motifs
- lace scraps from sewing projects
- inherited linens that are damaged or stained in places
- leftover trims from wedding or vintage craft projects
Instead of leaving those pieces sitting in a drawer forever, you can turn them into pretty handmade bowls for gifting, decorating, or organising small bits and bobs.
If you are making several bowls for gifts or craft stalls, it is worth buying a larger bottle of craft glue or fabric stiffener. You can usually find useful basic supplies such as PVA glue, foam brushes, plastic wrap, and small craft bowls on Amazon. For vintage lace doilies, Etsy can be a treasure trove, especially if you want a mismatched shabby chic look without raiding your grandmother’s linen cupboard.
Glue Or Fabric Stiffener: Which Works Best?
You can make a lace bowl using either ready-made fabric stiffener or a homemade glue mixture.
Fabric stiffener gives a slightly more predictable finish and is handy if you are making several bowls. A white glue and water mixture is usually cheaper and works beautifully for light to medium lace.
For a strong homemade stiffener, mix:
2 parts white PVA glue to 1 part warm water
For example:
- 2 tablespoons white glue
- 1 tablespoon warm water
Stir until smooth. If the mixture feels too thick to soak into the lace, add a tiny splash more water. Different craft glues have different thicknesses, so don’t panic if you need to adjust it slightly.
The lace should be fully saturated but not swimming in puddles of glue.
Step 1: Choose Your Lace
Start with a clean lace doily or lace fabric piece. Round doilies are the easiest because they naturally form a bowl shape, but square or oval pieces can look beautiful too.
If you are cutting lace fabric, trim around the pattern rather than chopping straight through the design. This gives your finished bowl a prettier edge. Look for lace with floral shapes, scallops, leaves, or repeating motifs.
Avoid lace that is too flimsy or full of loose threads. Very fine lace can work, but it may need extra stiffener and a longer drying time.
Step 2: Prepare Your Bowl Form
Choose a bowl, jar, or rounded container that matches the shape you want your finished lace bowl to have.
Turn the bowl upside down and cover it tightly with plastic wrap. This stops the glue from sticking to the bowl and makes clean-up much easier. I strongly recommend smoothing the plastic wrap as much as possible, because big wrinkles can leave marks in the lace.
Place the wrapped bowl on baking paper or newspaper to protect your table. This is one of those crafts that starts out looking dainty and then suddenly your fingers are covered in glue. Ask me how I know.
Step 3: Test The Shape Before Adding Glue
Before soaking the lace, drape it over the covered bowl and check the shape.
Look at:
- how far the lace hangs down
- whether the pattern sits evenly
- whether the edge looks balanced
- whether any sections need trimming
This quick dry test saves you fussing later when the lace is wet and sticky.
Step 4: Soak The Lace
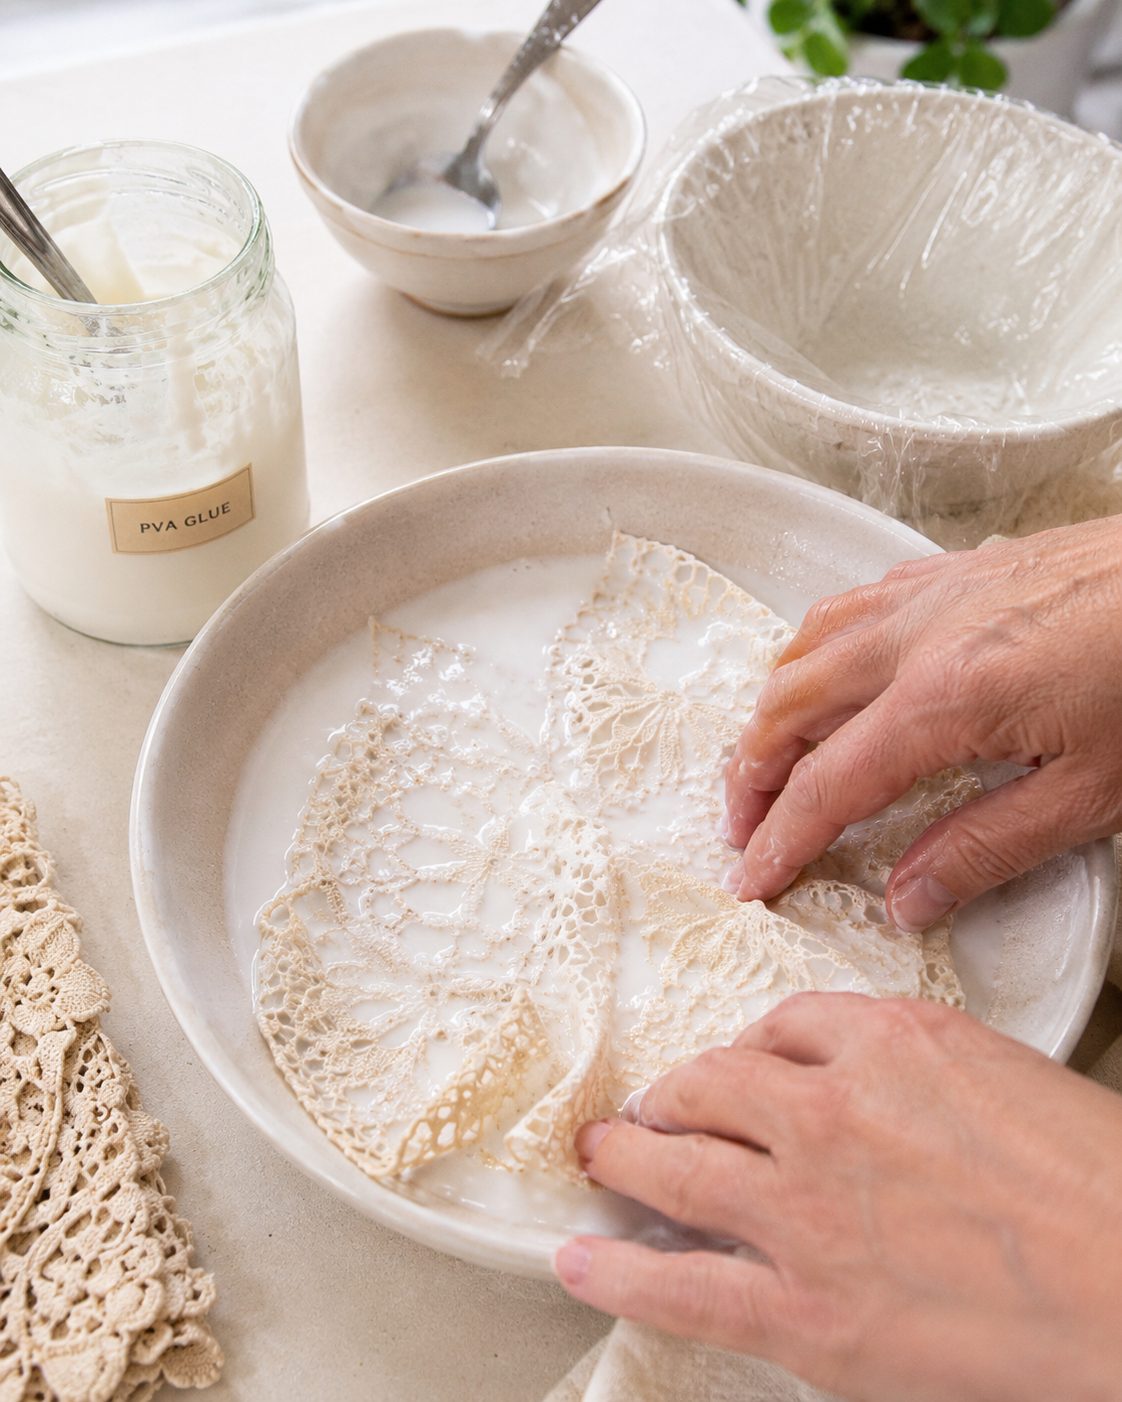
Pour your fabric stiffener or glue mixture into a shallow dish.
Place the lace into the mixture and gently press it down until it is fully saturated. Use your fingers or a foam brush to work the stiffener into the lace, especially if the design is thick or textured.
Lift the lace and let the excess drip back into the bowl. Do not wring it out, as this can distort the lace pattern.
Step 5: Shape The Lace Over The Bowl
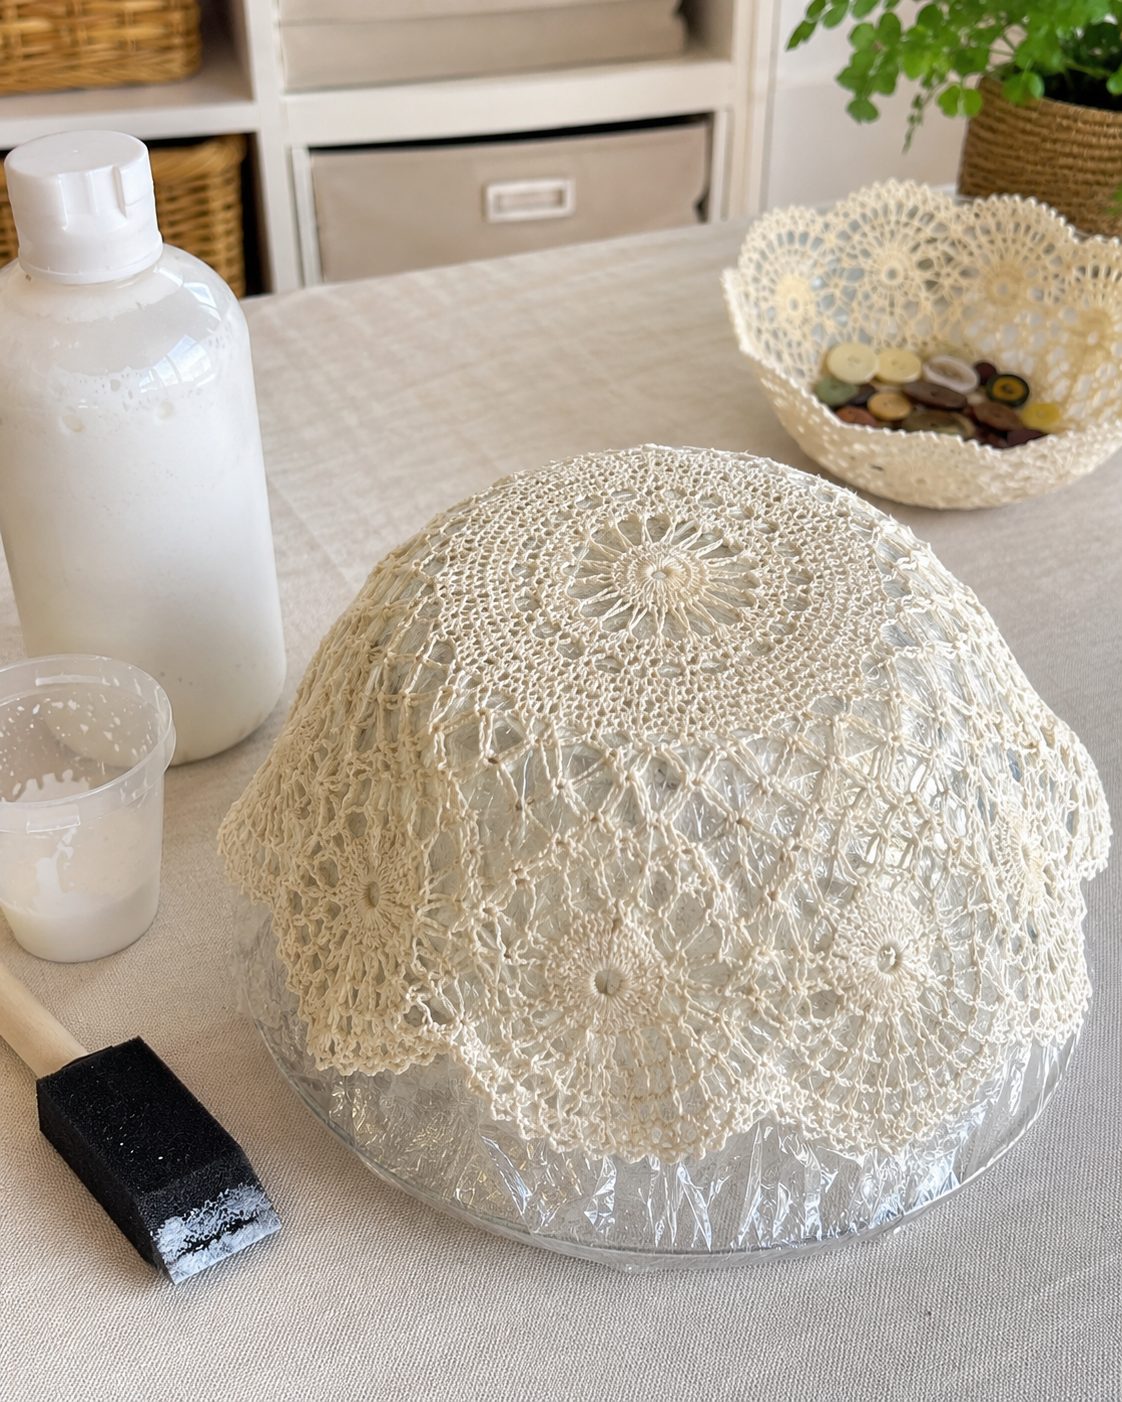
Carefully place the wet lace over your plastic-wrapped bowl form.
Gently smooth it into place, arranging the lace so the edges fall nicely. You can create soft folds, even scallops, or a more organic shape depending on the look you want.
Use a foam brush to dab extra stiffener onto any areas that look dry. Pay attention to the rim and base, as these areas need enough stiffness to hold their shape.
Step 6: Let It Dry Completely
Leave the lace bowl to dry for at least 24 hours.
Thicker lace or humid weather may need 48 hours or longer. If you live somewhere humid, do not rush this step. A lace bowl that feels dry on the outside may still be soft underneath.
Place it somewhere safe where it will not be bumped, squashed, or investigated by pets. Curious cats and gluey lace bowls are not a combination I recommend.
Step 7: Remove The Lace Bowl From The Form
Once the lace feels completely dry and firm, gently lift it away from the bowl form.
Peel away the plastic wrap carefully. If any sections feel damp or flexible, place the lace bowl upright and let it dry a little longer.
Do not force it. Lace can be delicate, especially around fine edges.
Step 8: Fix The Base If Needed
If your lace bowl wobbles, you can gently flatten the base.
Lightly mist only the bottom of the bowl with warm water. Place it on a flat surface and press it gently with a small flat object, such as a coaster or jar lid, until it sits more evenly. Let it dry again completely.
You can also shape the bowl slightly with your hands while it is still just a tiny bit flexible.
Step 9: Decorate Your Lace Bowl
You can leave your lace bowl white or cream for a classic vintage look, or add a little colour.
Try:
- soft blush pink for a bridal shower
- pale blue for a baby shower
- antique gold on the edges
- silver shimmer for Christmas
- tea-stained lace for a rustic farmhouse look
- pastel paint for spring décor
- tiny beads or pearls stitched or glued around the rim
A dry brush of metallic paint over raised lace details can look beautiful. Just go lightly — lace bowls are at their best when they still look delicate.
For more vintage-style handmade inspiration, you may also enjoy the Vintage Sugar Bowl Beaded Doily project on CraftBits, which is another sweet way to use doily-style pieces around the home.
How To Use A Handmade Lace Bowl
These lace bowls are decorative rather than heavy-duty, but they are surprisingly useful around the house.
Use them for:
- rings and earrings
- wrapped sweets
- sewing clips
- buttons
- hair pins
- small soaps
- wedding favours
- table centrepieces
- craft room storage
- gift packaging
- Christmas ornaments
- Mother’s Day gifts
They look especially pretty on a dresser, bedside table, entry table, bathroom vanity, or craft desk. I would not use them for food unless the food is wrapped, and I definitely would not wash them under running water.
Troubleshooting Your Lace Bowl
My lace bowl is still soft
It may need more drying time, especially if the lace is thick or the weather is humid. You can brush on another layer of stiffener and let it dry again.
My lace stuck to the bowl
Next time, use more plastic wrap and make sure the whole bowl form is covered. For now, gently loosen the lace a little at a time rather than pulling hard.
The edge looks messy
Trim loose threads once the bowl is dry. If the edge still looks uneven, add ribbon, thin cord, beads, or a little metallic paint to disguise it.
The bowl is lopsided
That is not always a bad thing. Handmade lace bowls look lovely with a natural shape. If it really bothers you, lightly mist the area and reshape it with your hands.
The lace dried with white glue marks
This can happen if too much glue sits on top of the lace. Next time, let more excess drip off before shaping. You can often disguise cloudy areas with a light coat of paint or metallic wax.
Pretty Variations To Try
Once you have made one lace bowl, you will probably start eyeing every doily in the house.
Here are some variations:
Mini Lace Ring Bowls
Use small crochet motifs or tiny lace circles over small jars or ramekins. These make sweet handmade gifts for jewellery lovers.
Wedding Favour Lace Bowls
Make small bowls in matching lace and fill them with wrapped mints, sugared almonds, or tiny soaps. They are lovely for vintage, cottagecore, or shabby chic weddings.
Painted Lace Bowls
Paint the finished bowl with acrylic paint. White, ivory, dusty pink, sage green, and antique gold all work beautifully.
Layered Lace Bowls
Layer two thin lace pieces together before shaping for a stronger bowl with a more detailed pattern.
Christmas Lace Bowls
Use white lace with silver glitter or gold edging. Fill with wrapped chocolates, mini baubles, or handmade ornaments.
Craft Room Catch-All Bowls
Use small lace bowls to hold buttons, stitch markers, beads, paper clips, or sewing machine bobbins. Pretty and practical — always a win.
Helpful Tips Before You Start
Use lace with a defined pattern. The finished bowl looks much prettier when the lace has strong floral, scalloped, or geometric details.
Do not overwater the glue mixture. Too much water can make the finished bowl floppy.
Let it dry longer than you think. If it still feels cool or flexible, it needs more time.
Use plastic wrap generously. Glue has a way of finding the one uncovered spot.
Make several at once. Once your hands are already gluey, you may as well make a little batch.
Is This A Good Craft For Kids?
Older children and teens can make lace bowls with supervision, especially if you are using non-toxic white craft glue. Younger children may enjoy helping press the lace into the glue, but shaping it neatly can be fiddly.
For group crafting, pre-cover the bowls with plastic wrap and pre-cut the lace pieces. That way, everyone can jump straight into the fun part without a 20-minute battle with cling film.
A Sweet Way To Use Old Lace
This easy lace bowl craft is a lovely reminder that handmade does not need to be complicated. A forgotten doily, a little glue, and a bit of patience can become something delicate, useful, and gift-worthy.
It is also a wonderful way to preserve old family linens that may be too stained or worn to use on a table but still too pretty to throw away. And honestly, any craft that lets us rescue something from the “I’ll use this one day” pile deserves a cup of tea and a little applause.



What do you think of this project? Let us know!