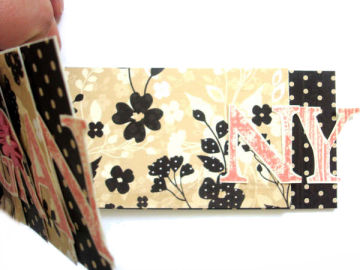
The word bloom album makes a great gift for birthdays, anniversaries, mother's and father's days or any other occasion.
What you need
Scrapbook paper (patterned paper and cardstock)
Paper trimmer
Adhesive (acid-free)
Ribbon
Hole punch
Letter stamps, chipboard letters or letter templates
Ink
Scrapbook accessories (brads, ribbon, paper flowers, die cuts, stickers etc.)
Instructions
Step 1
Stamp large letters on a piece of cardstock and carefully cut out the letters to spell your word. Chipboard letters are another alternative use letters that are 2″-3″ high (the larger letters work best). The mini-album pages (width) will be slightly larger than the height of your letters.
Step 2
Cut your cardstock pages to specific lengths. You determine the length of your pages to fit your needs. Typically you will start with a fairly small first page and then make each additional page just a little longer. For example if you are spelling GRANNY like in the album in the photo then you would cut out six different pages for your word bloom mini-album. Each page is cut into 1″ intervals starting with a 1 1/2″ page and ending with a 7 1/2″ page (this is the length of the pages). There will be a 1 1/2″ page for the top, then 2 1/2″ , 3 1/2″ and so on. You will stack the pages from smallest (on top) to largest. The width of your pages will depend on the size of your letters. You want to make the pages slightly taller than the letters. (The album seen in the picture has pages that are 2 3/4″ wide)
Step 3
Once you have cut the cardstock base pages then you will cover them with your patterned papers. Using a paper trimmer cut your pattern paper the same dimensions as your base pages and then glue it on each page front and back. Attach embellishments and photo mats before you put your album together. Decorate each individual page completely before binding the album. Embellishments can include brads, eyelets, paper flowers, fibers and ribbons. Bulky embellishments like buttons and charms work best when used on the front page so that the album will lay nicely to show the letters.
Step 4
Stack the pages with the longest page on the bottom and then use a hole punch to make three holes in the side of the pages to form your album. Thread ribbon through the holes and tie the ribbons to create a decorative binding. Using more than one color of ribbon adds some pizzazz to your mini-album.
Step 5
Decorate your album as desired and then add your photographs. Cut out photo mats and crop photos for each page. Use creative journaling techniques to tell a story with your photographs. For example you can make an album with a birthday theme and make the album all about a specific birthday like baby’s first birthday. Start at the beginning by using a picture of the child on their birthday and then include photographs detailing the birthday party, blowing out candles and the first taste of cake. Write down how you felt when your baby turned 1 and be sure to record funny things your child did at the party (like stuffy the cake in their mouth, etc.)
Word bloom memory books have so many possibilities. You can make personalized albums that spell out names or create a mini-album of a specific vacation, holiday, etc. Word bloom albums are a quick, inexpensive way to show someone how much they are loved. Use a word bloom album to highlight a specific event or a milestone in your life. Word bloom albums are also basic enough for children to make.

Word Bloom Album open
Tips and suggestions:
Small metal rings 1/8″ to 1/4″ are another item you can use to bind the album. Ribbons can be tied on the metal rings for an attractive appearance or the rings can be left bare. Rings provide an easy avenue for quickly turning the pages.
You can add more photo space to your word bloom mini-album by including tags on the pages that tuck behind photo mats, die cuts or other embellishments.
Photo shop or other photo editing programs are an easy way to crop and edit photos that will fit nicely on small mini-album pages. Fill your photo space with close-ups and highlights of important elements in the photograph.


cool
love it!
cute
I think its very creative.
I love this idea. I will use it for roommate gifts for an upcoming meeting. Thanks.
Thats pretty cute, but since it can be used for several occasions it’s mnot as personal to that special occasion, although you can decorate it that way. Other then that it’s a wonderful project.
This is an absolutely marvelous idea, can’t wait to try it.
Love it!
What a wonderful idea. I csn think of several things to do with these. Going to try one for our Bible study group.
That’s a great idea! I can’t wait to use it in my scrapbook!