What you need
Any type of paper: newspaper, sheet music, copy paper, flyers
White glue
A bamboo skewer, (or other round object to roll the paper onto)
A large paint brush
Craft paint, your choice of colors
Instructions
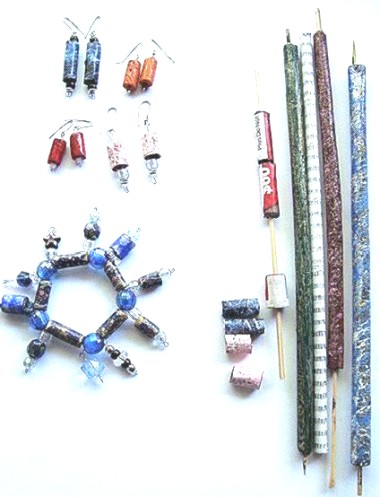
This jewelry making project shows you how to make your own beads using recycled paper and junk mail.
1. Place a sheet of paper on a flat surface, with a bamboo skewer placed on the paper.
Fold the paper over the skewer about 1 inch, and roll the paper for about 2 inches, just to condition the paper.
2. Unroll the paper, and brush white glue over the entire surface of the paper, but not under the 1 inch fold. If you get glue in that area, the roll will be stuck to the skewer, and you will never get it off!
3. Roll the paper into a tight roll. Don’t worry about wrinkles!

4. Once the paper is rolled, roll it back and forth on a flat surface, as you would a rolling pin, to flatten out any wrinkles. But don’t worry too much about wrinkles, it adds character to the beads.
5. If you are using the paper as is, with newsprint words, or music sheets, or decorative papers, allow to dry (or speed in the microwave for about 10 seconds at a time). Once dry, varnish the entire roll.
(To cut the roll into beads, when the roll is only slightly dried, remove the roll from the skewer, and cut with heavy duty scissors into the lengths you desire, then place them back on the skewer, roll again on a flat surface to restore the shape, and allow the beads to dry. If you have left the roll to dry for too long, and it is too difficult to cut with scissors, cut with a razor knife, or a small saw. Sometimes a sharp steak knife or bread knife will also work.)
6. Painting the beads: The best way to paint your beads is to paint them a solid color first. Paint the entire rolled sheet of paper while it is on the skewer.(Or if they are cut out individually, place them back on the skewer to paint multiples of matching beads.) If you are making multiples of beads to have on hand, paint some rolls black and some white, then later you can easily decorate them as dark beads or light beads by spattering them with different colors (or dabbing, or stroking).
Then place them on a protected surface, with a drop cloth, or a plastic grocery bag to catch the spatters.
Load paint onto a paint brush, and spatter, or splash, or dab, or stroke colors of paint onto the roll.
Metallic gold and metallic silver will add shimmer to the beads. It is also attractive to paint a row of metallic paint on the top and bottom edges of the bead. Once dry, varnish, and cut into individual beads. (For great, glossy finish beads, use clear nail polish as a finish coat). A black permanent marker can be used to color the exposed paper on the ends of the beads, or brush the ends with paint.
7. Assemble the beads on a stretch cord, interspersed with purchased beads as shown in this design.
Then if you wish dangles, place beads onto headpins, and attach onto the stretch cord between the beads.
Make earrings to match your bracelet or necklace! String beads onto headpins, and attach to ear wires.
Looking for more Jewelry making tutorials and projects? Check out our DIY Jewelry Making Blog


Beautiful! I knew how to make these, but never thought to make a “bunch” at a time by rolling the whole sheet. Thanks!!
Very cool idea! Thanks!
Thank you so much for sharing a wonderful idea with simple techniques! I most certainly will attempt to do this project and I shall think of your generosity for teaching me how.
I have done this before but that was before I learned to create earrings. I think that you could come up with a lot of creative beads by doing this and no two would be alike. you could also embellish them with fine line sharpees like some people do on their handmade beads.
Linda
-Brook Park, OH
cute!
I finally got to get around to do this project and am actually in the middle of it right now.:) its great so far! and fun too! …just have to let it dry and then paint!…..thanks again!
Great ideas! Thanks! I was trying to make my own beads, but it didn’t exactly work…:) so thanks again for the tips! Time to go try it!
These beads are lovely!! What a novel idea. Good thinking!
thanks for sharing
I have found that if you wrap the skewer with a few layers of foil before you glue and wrap. the glue and paper does not stick to it when you release it. Then always spraying them later with a protective spray while they are still on the skewers after the painting is complete. These are so fun to make. Getting a block of styrofoam to insert the skewers is an easy way to keep them upright until completed—-TY for sharing
I make these all the time using cardstock from scrap booking. A lot of it already has designs on it. It’s quick, easy and makes great gifts!
I love this, what an easy way to make beads!
Very unusual technique. I don’t think I have seen paper beads done as one long roll and then cut into separate beads. Excellent instructions and photos. You get an A+ for creativity!