
What you need
Balloons
Paper Towels
Elmer’s glue
Bamboo tooth picks
Cardboard from a cereal box Acrylic paint or Water color
Spary varnish
Instructions
These balloons come in an assorted bag. You can get these balloons at a party supply store. I sorted 12 balloons out of a bag of 100, about 25 cents for 12 balloons.
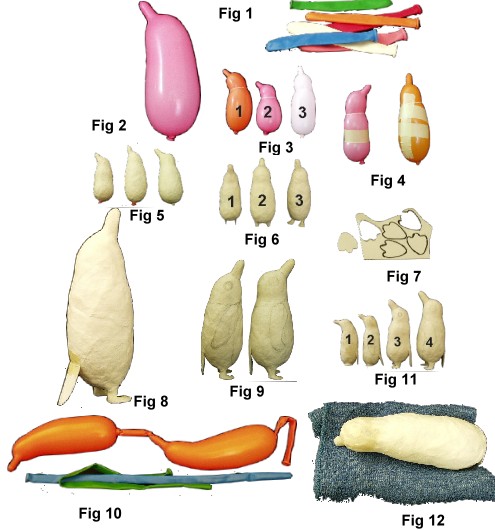
Paper Mache Penguin Pattern
In order to make the penguin shape, do not fill the balloon too full. It will be easier to manipulate the shape with less air in it. Pinch the tip of the balloon to shape a beak. (Figure 2)
I use a thread for the neck area. Tighten the neck area a couple times while manipulating the air distribution between head and body. When it is satisfactory, secure the thread with a piece of tape. (Figure 3)
In order to make a shapelier body, use a strip of masking tape. (Figure 4)
Tear the strips of paper towel. Soak a 50/50 glue and water mix (Equal parts of water and glue). Gently squeeze out the excess glue. Use smaller torn pieces for the beak and head area, larger torn pieces for the body area. Add 5 to 6 layers at one sitting. Let it dry overnight. (Figure 5)
***Do not put in oven or hang outside to dry. The air inside the balloon will expand or shrink, changing the shape of the penguin. On the bottom of the penguin, mark the leg position and puncture the holes to put the toothpicks in.
Put glue around tooth picks, Let it dry. (Figure 6-1)
Use small glued paper to build up the legs. Let it dry. (Figure 6-2)
Using cereal box, draw the feet (make your own shape), cut out the feet. (Figure7) Position the feet and glue them together. Let it dry. Build several layers of glued paper under and over the feet. (Figure 6-3)
After drying several hours, shape the feet to prevent warping.
Cut the cereal box for the tail (half oval shape), position on the back with tape. (Figure 8) Put a couple of layers of glued paper on the tail and underneath. Let it dry.
Ready to Paint: Lightly penciled eyes, fins and any special patterns on the penguin. After the paintings are dry, varnish them. (Figure 9)
Using “The twist and shape balloon” (Figure 10)
1 & 2 are made with the “Twist & shape balloon”. (About 4″-4 1/2″ Height)
3 & 4 are made with assorted balloons (6″ & up height).
***As long as the balloon has a tubular shape, you can make a penguin.
Tips: I use a wet wash towel (not dripping wet, just damp) on a plastic mat, folding the towel and indenting in the middle so the balloon will rest in the space. It will prevent the balloon from rolling while I work on it. It also prevents loose underside layers and frees both hands to work.


I think this looks like a good idea i was on google trying to find a good peper mache penguin and i come across this site which i thought was great from my homework ill report back what my score was to see how good this actually is <3 peacce
Awesome instructions,easy to follow.ThanQ.
how do you make paper mache?
I also making this.
It`s looks as nice as yours.I just want to see example.thank you.
well explained, easy to follow, lovely shape
theres an easier way to make those!!!!!
Awesome instructions!
It’s pretty cute. I love penguins!
the penguin is beautiful when done, and the instructions are fun and easy.
Good job!:]
I Want to see REALISTIC!!! Good jobon the Sulptng but wheres realistic??
liked the way you explained it =D
Explained very clearly, and a unique result.
this is sooooooo weird and gross and funny but well use it anyway
This is a great procdure i am making a papier mache penguin 4 my project on handball
i really like this craft. im making a paper mache penguin 4 feet tall today. ta ta for now!
i really like this craft. im making a paper mache penguin 4 feet tall today. ta ta for now!
I like the way you explained it.