
Get more details about this project
What you need
Wooden Spoons
Orange Paint
Black marker pen
Instructions
This tutorial follows the original decorative method, which covers the spoons with ordinary craft paint and marker.
Standard acrylic craft paint, permanent marker and general-purpose craft sealer should not be assumed to be food-safe. Do not use fully painted spoons for cooking, stirring food, serving or eating unless every product is specifically labelled for that purpose and has been applied and cured according to its instructions.
For functional utensils, leave the spoon bowls and other food-contact areas completely unpainted. Decorate only the upper handles and keep paint away from areas exposed to heat, food or mouths.
Introduction
A few worn or inexpensive wooden utensils can become a cheerful Halloween kitchen display with very little effort.
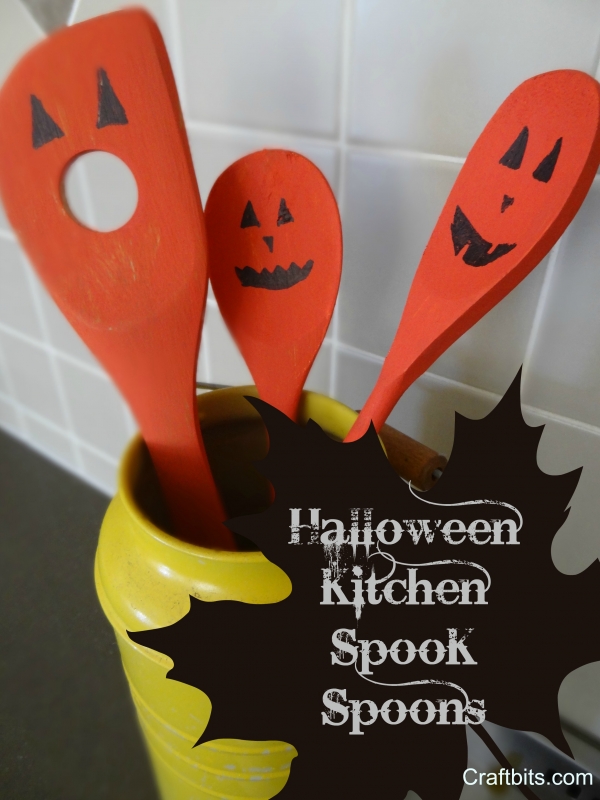
Different utensil shapes naturally suggest different expressions. A broad turner can become a surprised ghostly pumpkin, an oval spoon suits a traditional face and a narrow paddle is perfect for a crooked grin.
Arrange the finished characters in a yellow, black, purple or white utensil crock. They also make an inexpensive hostess gift when bundled with ribbon and clearly labelled as decorative.
Instructions
Step 1: Choose the utensils
Select three wooden utensils with noticeably different head shapes.
A useful combination is:
One broad wooden turner with a round opening
One traditional oval wooden spoon
One long narrow spoon or paddle
New dollar-store utensils work well, but you can also upcycle older wooden spoons that are stained or no longer used for cooking.
Do not use utensils that are split, mouldy or badly warped.
Step 2: Clean the wood
Wash the utensils with mild dish soap and warm water.
Do not soak them, as prolonged moisture can swell or split the wood.
Rinse them quickly and dry them thoroughly. Leave them overnight if necessary so no moisture remains inside the grain.
Step 3: Sand the surfaces
Lightly sand each utensil with fine-grit sandpaper.
Concentrate on rough patches, raised grain and worn areas. Smooth wood will accept the paint more evenly and will be safer to handle.
Wipe away every trace of sanding dust with a clean, dry cloth.
Step 4: Decide whether the spoons will be decorative
For decorative display spoons, the entire wooden utensil can be painted orange as shown in the original project.
For functional spoons, mask off the food-contact head and paint only the upper handle. Do not draw faces on the bowl or turner.
Once ordinary craft paint is applied to the head, treat the utensil as decoration rather than cookware.
Step 5: Apply the orange paint
Place the spoons on wax paper or a protected surface.
Apply a thin, even coat of orange acrylic craft paint. Paint in the direction of the wood grain to minimise visible brush marks.
Allow the first side to dry before turning the utensil over.
Paint the second side and edges.
Apply another thin coat if the natural wood still shows through. Several light coats will dry more evenly than one heavy coat.
Step 6: Allow the paint to dry
Rest the utensils flat or stand their unpainted ends in a suitable holder.
Allow the paint to dry completely between coats.
Check around the sides and inside the turner’s round opening, as these areas can retain wet paint longer than the flat surfaces.
Do not draw the faces while the orange paint still feels cool, soft or tacky.
Step 7: Plan the faces
Arrange the dry utensils in front of you.
Use a pencil to sketch the faces lightly if you are not comfortable drawing directly with a marker.
Adapt each expression to the utensil:
On the broad turner, draw two triangular eyes above the existing round hole so the hole becomes an open mouth.
On the oval spoon, add two triangular eyes, a small triangular nose and a wavy jack-o’-lantern smile.
On the narrow spoon, angle the eyes and add a crooked grin.
Keep the shapes simple so they remain visible from across the kitchen.
Step 8: Draw the black features
Trace over the pencil lines with a black acrylic paint marker or permanent marker.
Fill the triangles and mouths completely.
Work slowly near the edges of the spoon so the marker does not slip onto the sides.
If using black acrylic paint and a detail brush, apply a small amount at a time. Allow it to dry before adding another coat.
Step 9: Correct small mistakes
If a black line smudges, allow it to dry.
Cover the mistake with a small amount of orange paint rather than wiping it across the surface.
Once the orange repair is dry, redraw the feature.
Slightly uneven faces suit the handmade jack-o’-lantern style, so they do not need to match perfectly.
Step 10: Decorate the reverse sides
Leave the backs plain orange or add another face.
If the spoons will be displayed where both sides can be seen, create different expressions on the reverse.
Allow all marker or paint details to dry completely.
Step 11: Add an optional sealer
For decorative spoons, apply a compatible clear acrylic craft sealer if you want additional protection.
Follow the manufacturer’s directions and work in a well-ventilated area.
Allow the sealer to cure fully before handling or displaying the utensils.
A craft sealer does not automatically make the spoons suitable for food contact or cooking.
Step 12: Arrange the spook spoons
Place the three finished utensils upright in a bright utensil crock.
Fan them out so every face remains visible.
Add a Halloween ribbon around the crock if desired, but avoid loose decorations near a cooker, flame or heating element.
Display the arrangement on a cool, dry section of the kitchen counter.
Hostess Gift Idea
Bundle three decorative spoons together with black-and-white gingham ribbon.
Add a tag reading:
“Decorative Halloween Spook Spoons — not intended for cooking or food contact.”
Pair them with a colourful utensil crock for an inexpensive handmade Halloween gift.
Design Variations
Paint the utensils white and add ghost faces.
Use lime green for friendly monster spoons.
Paint one purple and add a simple witch-inspired expression.
Create black cat faces with painted whiskers.
Use only orange and black for a traditional jack-o’-lantern set.
Give every utensil a different expression.
Care and Safety
Keep painted spoons away from direct heat, burners, ovens, candles and open flames.
Do not place decorative spoons in a dishwasher or soak them in water.
Dust them with a soft, dry cloth. If necessary, wipe them gently with a barely damp cloth and dry immediately.
Keep permanent markers and acrylic paint away from young children unless supervised.
Painted utensils are decorative and should not be placed where someone may mistake them for functional cooking tools.



What do you think of this project? Let us know!