
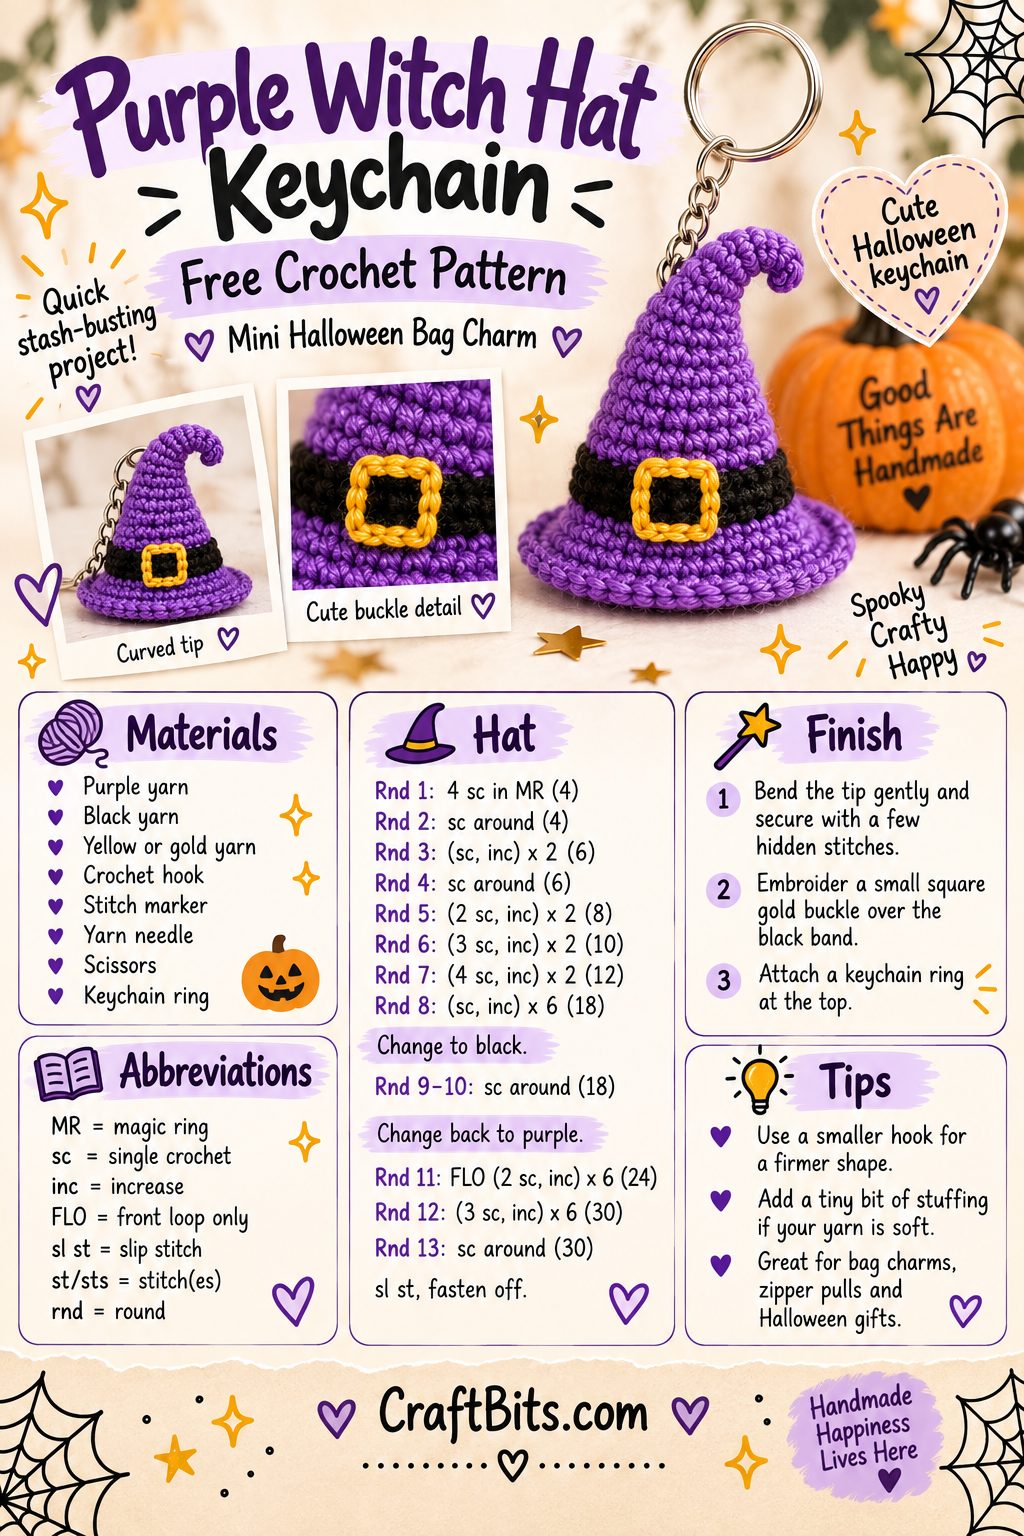
The hat is crocheted from the pointed tip downward in continuous rounds. A black stripe creates the classic witch-hat band, then the purple brim flares gently outward.
Finish it with a tiny embroidered gold buckle and bend the top into that unmistakable crooked witch-hat shape.
Skill level: Easy
Terminology: US crochet terms
Construction: Worked from the point downward
Main stitch: Single crochet
Suggested yarn: Cotton or smooth DK/worsted yarn
Suggested hook: 2.5 to 3.5 mm, depending on yarn
Perfect for: Keychains, bag charms, zipper pulls, Halloween ornaments and handmade gifts
Get more details about this project
What you need
Small amount of purple yarn
Small amount of black yarn
Small amount of yellow or gold yarn for the buckle
Crochet hook appropriate for your yarn
Stitch marker
Yarn needle
Scissors
Metal keychain ring
Small jump ring or attachment ring, optional
For a keychain, I prefer cotton or another reasonably firm yarn rather than very soft acrylic. It helps the hat keep its shape when it spends half its life being thrown into the bottom of a handbag.
A slightly smaller hook than you would normally use with the yarn also gives you a firmer fabric.
Instructions
Abbreviations
MR = magic ring
sc = single crochet
inc = increase, work 2 sc into the same stitch
FLO = front loop only
sl st = slip stitch
st/sts = stitch/stitches
rnd = round
Numbers in parentheses show the stitch count at the end of each round.
How to Crochet a Mini Witch Hat Keychain
Introduction
I have a particular weakness for tiny crochet projects that look considerably more impressive than the amount of yarn they actually use.
This little purple crochet witch hat keychain definitely falls into that category.
You need only scraps of purple, black and yellow yarn, and there are no separate pieces to crochet and assemble. Even the black hat band is created simply by changing colour for two rounds.
Then comes the fun part.
A few hidden stitches turn the straight point into a wonderfully crooked witch hat, while a tiny embroidered buckle gives it that classic Halloween look.
Make one for your handbag, add one to a Halloween gift, or make a handful as inexpensive little party favours.
If you’re working your way through quick Halloween crochet projects, CraftGossip’s Free Halloween Crochet Patterns You Can Make in a Day includes ghosts, pumpkins, bats, candy corn and a mini witch-hat idea too.
Crochet the Pointed Hat
Using purple yarn, make a magic ring.
Work in continuous rounds. Do not join at the end of each round unless instructed.
Place a stitch marker in the first stitch and move it up as you work.
Round 1
Work 4 sc into MR.
4 sts
Round 2
Sc in every stitch around.
4 sts
Round 3
Sc in next st, inc in next st.
Repeat twice.
6 sts
Round 4
Sc around.
6 sts
Round 5
Sc in next 2 sts, inc in next st.
Repeat twice.
8 sts
Round 6
Sc in next 3 sts, inc in next st.
Repeat twice.
10 sts
Round 7
Sc in next 4 sts, inc in next st.
Repeat twice.
12 sts
Round 8
Sc in next st, inc in next st.
Repeat 6 times.
18 sts
The pointed section of the witch hat is now complete.
Crochet the Black Hat Band
Change to black yarn.
Round 9
Sc around.
18 sts
Round 10
Sc around.
18 sts
Change back to purple.
Do not cut the black yarn excessively short. Leave enough to weave in securely because the band is right where the finished keychain will receive plenty of handling.
Crochet the Witch Hat Brim
Using purple yarn:
Round 11
Working in the front loops only:
Sc in next 2 sts, inc in next st.
Repeat around.
24 sts
The unused back loops create a subtle line around the base of the hat and help the brim turn outward.
Round 12
Sc in next 3 sts, inc in next st.
Repeat around.
30 sts
Round 13
Sc around.
30 sts
Sl st into the next stitch.
Fasten off and weave in the yarn end.
Gently flatten the brim with your fingers.
Shape the Curved Witch Hat Tip
The hat will initially have a fairly straight pointed top.
To create the crooked witch-hat shape, gently bend approximately the upper third of the point toward one side.
Thread a short length of purple yarn onto your yarn needle.
Take one or two discreet stitches between the bent tip and the side of the hat.
Pull just firmly enough to hold the curve.
Secure the yarn inside the hat and weave in the end.
Don’t pull the tip completely flat against the hat.
You want a gentle curve rather than a witch hat that appears to have had an unfortunate encounter with a cupboard door.
Embroider the Gold Buckle
Using yellow, mustard or metallic gold yarn, embroider a small square onto the front centre of the black band.
Start with four straight stitches to create the outside of the square.
Then add another stitch over each side if you want a slightly thicker buckle.
Keep the centre open so it looks like a proper belt buckle rather than a yellow square.
For an especially neat result, use embroidery floss rather than full-thickness worsted yarn.
Add the Keychain Ring
There are two easy ways to turn the witch hat into a keychain.
Method 1: Sew-On Attachment
Thread a strong length of purple yarn through the top of the hat.
Pass it through the bottom link of your keychain several times.
Secure firmly inside the hat.
This is probably the easiest method for beginners.
Method 2: Jump Ring
Carefully insert a small metal jump ring through several crochet stitches near the top of the hat.
Attach the jump ring to your keychain ring and close it securely with jewellery pliers.
Make sure the ring passes through more than one strand of crochet fabric so that all the wear isn’t being placed on a single stitch.
Optional Light Stuffing
The original design works nicely without stuffing because the small crochet cone holds its shape reasonably well.
If your yarn is particularly soft, however, you can add a tiny amount of fiberfill before finishing the brim.
Concentrate the stuffing in the lower part of the cone.
Leave the pointed section almost empty so you can still bend it easily.
Witch Hat Colour Ideas
Purple and black give this pattern a classic whimsical Halloween look, but once you’ve made one, it is very easy to start playing with colour.
Try:
Black hat + purple band + orange buckle
Orange hat + black band + purple buckle
Emerald green + black band
Charcoal grey + burgundy band
Cream + dusty rose band for a softer cottage witch look
Or make an entire rainbow of tiny witch hats.
For another Halloween witch project, CraftBits has an older Halloween Witch Free Knitting Pattern with a full witch, cloak and traditionally shaped pointed hat.
Other Ways to Use the Mini Crochet Witch Hat
Leave off the keychain fitting and turn your hat into a:
- Halloween tree ornament
- Zipper pull
- Backpack charm
- Crochet doll hat
- Amigurumi accessory
- Halloween garland decoration
- Gift topper
- Halloween party favour
- Earrings made with finer thread
- Mini witch-hat brooch
You could also crochet several hats in different colours and hang them along a simple chain for a very cute mini witch hat Halloween garland.
And if you have a tiny crochet ghost sitting around looking suspiciously underdressed, this is obviously the answer.
CraftGossip’s recent ghost pattern actually includes its own optional Mini Crochet Witch Hat, although that version is designed as an amigurumi accessory rather than a keychain



What do you think of this project? Let us know!