
Get more details about this project
What you need

Brownie Oven Tray
Spatula
Instructions
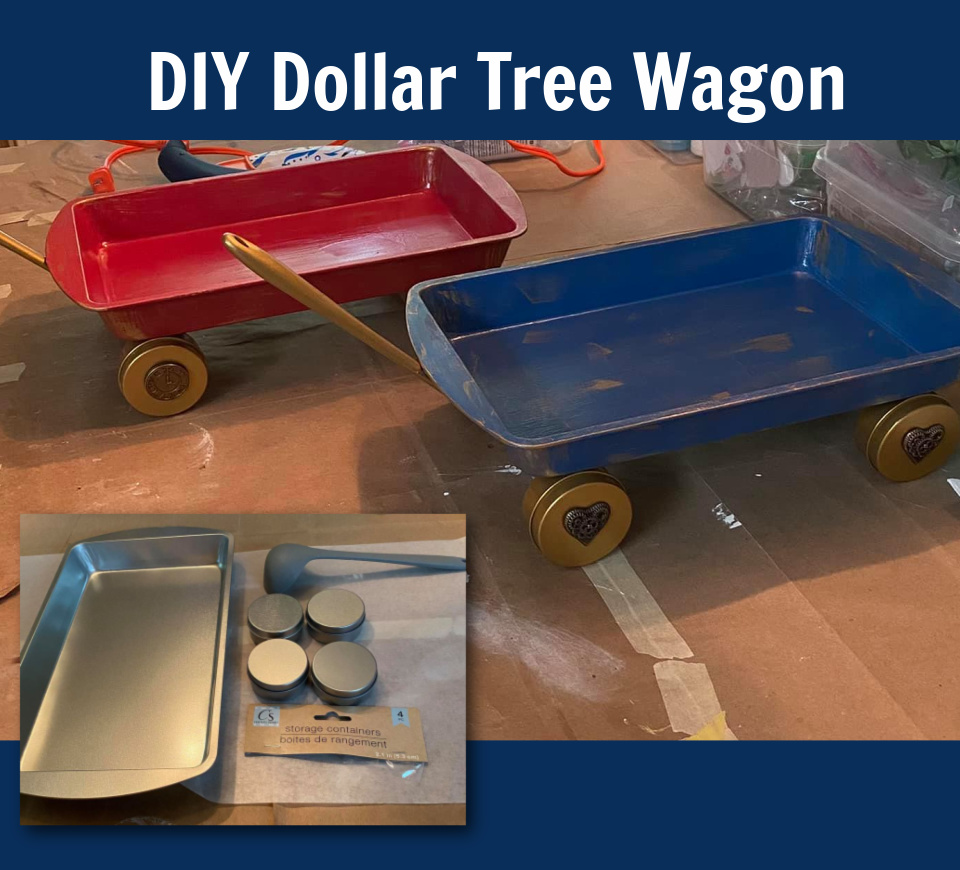
Turn an inexpensive oven tray into a charming decorative wagon using a few kitchen supplies, paint and glue. This Dollar Tree wagon craft makes a lovely tabletop display that you can dress up for Christmas, autumn, Easter or everyday farmhouse decorating.
This project was contributed by Michelle S. Thank you, Michelle, for sharing your creative DIY Dollar Tree wagon hack with us!
I love a craft that makes you look at an ordinary household item differently. A brownie tray might not seem particularly exciting sitting on a shop shelf, but add little wheels and a handle and suddenly it becomes something rather adorable.
The best part is being able to change the contents throughout the year. Fill your wagon with miniature pumpkins, tiny wrapped Christmas presents or pastel Easter eggs. Rather than making a new centrepiece for every occasion, you can bring out the same wagon and give it a quick seasonal refresh.
You can also adapt the colours to suit your home. A distressed red wagon has a nostalgic feel, while cream, blue or soft sage would work beautifully with farmhouse decorating. Gold wheels add a festive touch without tying the finished piece to Christmas alone.
Please note: This is a decorative wagon with fixed wheels. It is not designed to roll, carry heavy items or be used as a child’s toy.
Instructions
1. Clean and Prepare Your Supplies
Wash the oven tray, storage tins and spatula to remove dust, grease and any sticky label residue. Dry everything thoroughly before painting or gluing.
If the surfaces are particularly shiny, lightly scuff them with fine sandpaper where appropriate, then wipe away the dust. Follow your paint manufacturer’s preparation instructions, including whether a primer is needed.
Protect your work surface before you begin. If you are using spray paint, work in an appropriately ventilated area and follow the directions on the can.
2. Plan Your Wagon
Before painting, arrange your pieces to check how they will fit together.
Position two storage tins along each long side of the tray, one towards each end. Keep the wheels level so the finished wagon sits evenly.
Check where the broad end of the spatula will attach at one short end of the tray, leaving its handle pointing upwards and outwards. Choose the position that gives you the best contact between the two surfaces.
A quick photograph of your arrangement can help when you assemble everything later.
3. Paint the Wheels and Handle
Paint your four wheel tins in your chosen colour. Gold looks lovely against red or blue, while black gives a more traditional wagon appearance. White or cream wheels would suit a softer cottage-style display.
Paint the spatula to coordinate with the wheels or the wagon body. Depending on its material, it may need a different primer or paint.
Apply thin coats according to the product directions, allowing the recommended drying time between coats. Avoid building up thick paint on the areas you intend to glue.
4. Paint the Oven Tray
Paint the inside, outside and visible rim of the tray.
Classic red is a cheerful choice for Christmas, but there is no need to stick to one colour. Try navy blue for a country-style wagon or white for a neutral display you can use throughout the year.
For a gently worn finish, lightly sand a few painted edges once the paint is ready for handling. Keep the distressing subtle so it looks naturally aged.
Allow the paint to dry and cure as directed before assembly.
5. Attach the Wheels
Place the tray upside down on a protected surface. Check your wheel positions again, making sure all four tins will sit at the same height when the wagon is upright.
Use an adhesive rated for the actual surfaces you are joining. Follow its instructions for preparation, application and ventilation.
Attach the tins at your marked positions, supporting them as needed so they cannot slip while the adhesive sets. Keep adhesive away from any removable lid seams that could come apart under the wagon’s weight.
Allow the adhesive to cure fully before turning the wagon upright. Drying and curing times vary, so use the product label rather than guessing.
6. Add the Spatula Handle
Glue the broad end of the spatula into your planned position at the short end of the tray.
Support the handle while the adhesive cures. Once assembled, lift the wagon by supporting the tray underneath rather than pulling on the handle.
Check that all the pieces are secure before adding decorations.
Seasonal Wagon Decorating Ideas
For Christmas, fill the tray with small wrapped boxes, shatterproof baubles, faux greenery or a miniature bottlebrush tree. A little ribbon tied around the handle makes a lovely finishing touch.
For autumn, try lightweight faux pumpkins, fabric leaves and a small gingham bow.
For Easter, add shredded paper, decorative eggs and a little bunny ornament.
For an everyday farmhouse display, arrange faux flowers, small yarn balls or fabric carrots inside the tray. Keep the contents light and leave enough of the wagon visible to show off your handiwork.
It is such a fun way to give inexpensive kitchen supplies a second purpose—and a lovely little project to personalise with whatever colours and decorations you already have at home.




Not meant to be a toy, it’s for decoration only.
The wheels don’t turn so not really toy
Looks like fun to make and if you use the right things little kids could play with it to ones that are just at the walking age
I love this. So creative.
I think it is a very cute idea for the holidays