
Whether you're gifting to a sushi-loving teen, making a fun spa basket, or just want a handmade soap that sparks joy on the bathroom sink, this project rolls together creativity, skin-loving ingredients, and pure whimsy.
Get more details about this project
What you need
Cold Process Base Soap:
- 800g Olive Oil
- 300g Coconut Oil
- 200g Rice Bran Oil (very fitting for the theme!)
- 100g Castor Oil
- 380g Distilled Water
- 144g Sodium Hydroxide (Lye)
Colorants:
- Activated Charcoal (black seaweed wrapper)
- Titanium Dioxide (white rice)
- Green mica or French green clay (avocado or wasabi)
- Red, orange, and yellow oxides or micas (salmon, egg, roe)
Fragrance Ideas:
- Lemongrass essential oil
- Sea Salt fragrance oil
- Cucumber mint blend
(Stick to skin-safe fragrance oils—no actual sushi smells, I promise.)
Molds & Tools:
- Silicone sushi mold or small cylindrical/rectangular soap molds
- Plastic wrap or bubble wrap (for “roe” texture)
- Knife for slicing “rolls”
- Small cups for colored embeds
Instructions
Step-by-Step: Making Sushi-Inspired Cold Process Soap
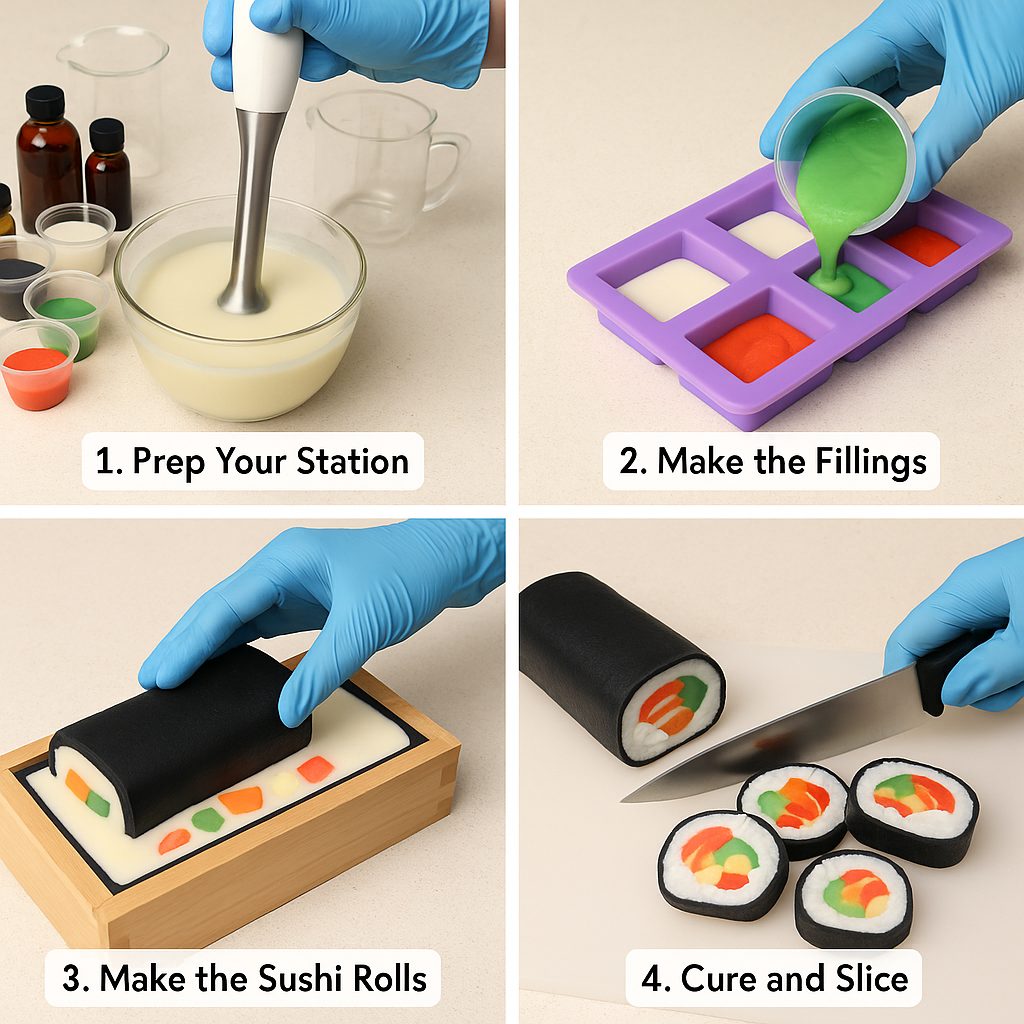
1. Prep Your Station
Safety first—gloves, goggles, and ventilation are essential. Make sure your oils are melted and lye solution has cooled to around 38–43°C.
2. Make the Base Batter
Combine lye and oils. Stick blend until light trace. Split the batter into separate containers for your different sushi “ingredients.”
- White (rice): Add titanium dioxide
- Black (seaweed): Add activated charcoal
- Orange (salmon): Add orange mica or oxide
- Green (avocado/wasabi): Add green mica
- Red/yellow (egg/tuna): Add appropriate colorants
3. Create the Fillings
Pour the bright colors into small cavity molds (silicone mini ice cube trays work well). Let them firm up slightly—just enough to unmold cleanly but still soft enough to slice if needed.
4. Make the Sushi Rolls
Pour a layer of white soap (rice) into a rectangular mold. Arrange your colored embeds like you’re building a sushi roll—think salmon strips, avocado slivers, and roe dots. Top with more white batter.
Once set but still soft, wrap the whole block with a thin sheet of black soap (like a nori seaweed wrap). Use a light touch and trim any overlap.
5. Texture the Tops (Optional)
Use bubble wrap to gently press onto the top of “roe” sushi, mimicking fish eggs. You can also dust the top with mica for a shimmer effect.
6. Cure and Slice
After 24–48 hours, slice your soap into sushi pieces using a sharp knife. Cure for 4–6 weeks on a drying rack before use or packaging.
Tips for Realistic Results
- Don’t Overmix: Keeping some embeds slightly swirled mimics the soft marbling in sushi.
- Play with Shape: Try nigiri shapes using small blocks of soap topped with colored “fish” layers.
- Use Real Sushi Trays: Packaging your soaps in disposable sushi trays adds a professional touch and makes them market-ready.
Storage & Gifting
Wrap each soap piece tightly in cling wrap or shrink wrap to preserve scent and freshness. Add a label with ingredients and curing date if gifting or selling.
These make adorable:
- Spa basket additions
- Birthday gifts for foodies
- Unique handmade Christmas stocking stuffers
- White elephant gift exchange surprises
Melt and Pour Sushi Soap – No-Lye Version for Beginners
If you’re not quite ready to dive into cold process soap—or just want a quicker way to whip up adorable sushi-themed soaps—this melt and pour version is your new best friend. You’ll still get the fun, realistic sushi effect without any curing time or chemical handling.
These are perfect for:
- Last-minute gifts
- Craft fairs and markets
- Kids’ DIY parties
- Stocking stuffers and spa sets
Ingredients & Supplies
Soap Base:
- White melt and pour soap base
- Clear melt and pour soap base
- Black melt and pour soap base (or clear base with activated charcoal or black mica)
Colorants:
- Soap-safe colorants or mica powders (green, orange, red, yellow)
- Optional: biodegradable glitter for sparkle
Fragrance Oils:
- Lemongrass, cucumber melon, or sea breeze
(Use skin-safe fragrance oils at 1–3% of total soap weight.)
Tools:
- Silicone sushi molds or mini loaf pans
- Microwave-safe measuring cups
- Craft knife or soap cutter
- Stirring sticks or spoons
- Small round or rectangular molds for “filling”
Step-by-Step Melt & Pour Sushi Soap
1. Prep Your Station
Lay down parchment paper or a silicone mat to catch spills. Cut your soap base into cubes for easier melting.
2. Make the Fillings
Melt small batches of clear soap base and tint with red, orange, green, or yellow. Pour into mini molds (ice cube trays or silicone candy molds work well). Let set, then slice or shape into small strips.
Tip: Use a pipette for detail work or layering colors.
3. Create the Rice Base
Melt white soap base and pour into a mini loaf mold or sushi tray mold. Let cool slightly, then press in your colorful “filling” pieces. Spray lightly with rubbing alcohol to eliminate bubbles and help layers stick.
4. Wrap with Nori (Seaweed)
Melt black soap base and pour a thin layer on a silicone sheet. Let it cool until pliable but not fully set. Carefully wrap around the rice block like a sushi roll. Trim edges clean with a knife.
5. Slice and Serve (Sort Of)
Once fully cooled, slice into sushi pieces using a sharp knife. You’ll see colorful fillings peeking through like maki rolls!
Creative Sushi Soap Ideas
- Nigiri Style: Pour a block of white soap and top it with an orange or red slab for “fish.” Add a thin black strip across the top to mimic seaweed wrapping.
- Roe Texture: Use orange mica soap poured into tiny spheres (silicone pearl mold) and stack them on a flat sushi base.
- Wasabi & Ginger Add-On: Use green and pink soap slivers to mimic traditional condiments in your packaging!


What do you think of this project? Let us know!