
Get more details about this project
What you need
1 wood crate (Dollar Tree)
2 wood blocks (various sizes)
Peel-and-stick metal tile (Dollar Tree)
Orange acrylic paint
Brown paint for dry brushing
Paintbrush and sponge
Hot glue gun & glue sticks
Twisted paper or kraft paper (for stem)
Faux sunflowers or fall florals
Spanish moss
Scissors or craft knife
Instructions
To begin this charming fall craft, gather your wood pieces: one Dollar Tree crate and two wooden blocks in graduating sizes. Play around with how you want them stacked, placing the crate on the bottom and the smallest block on top to create that classic tiered pumpkin shape. Give them a quick sand if needed, just to smooth out any rough edges.
Next, cut a piece of the self-adhesive metal wall tile to fit the front of the bottom block. These stick-on tiles are perfect for faking an embossed metal look. Peel off the backing and press it firmly onto the block, smoothing it down into the grooves and trimming any overhang with scissors or a craft knife for a clean edge.
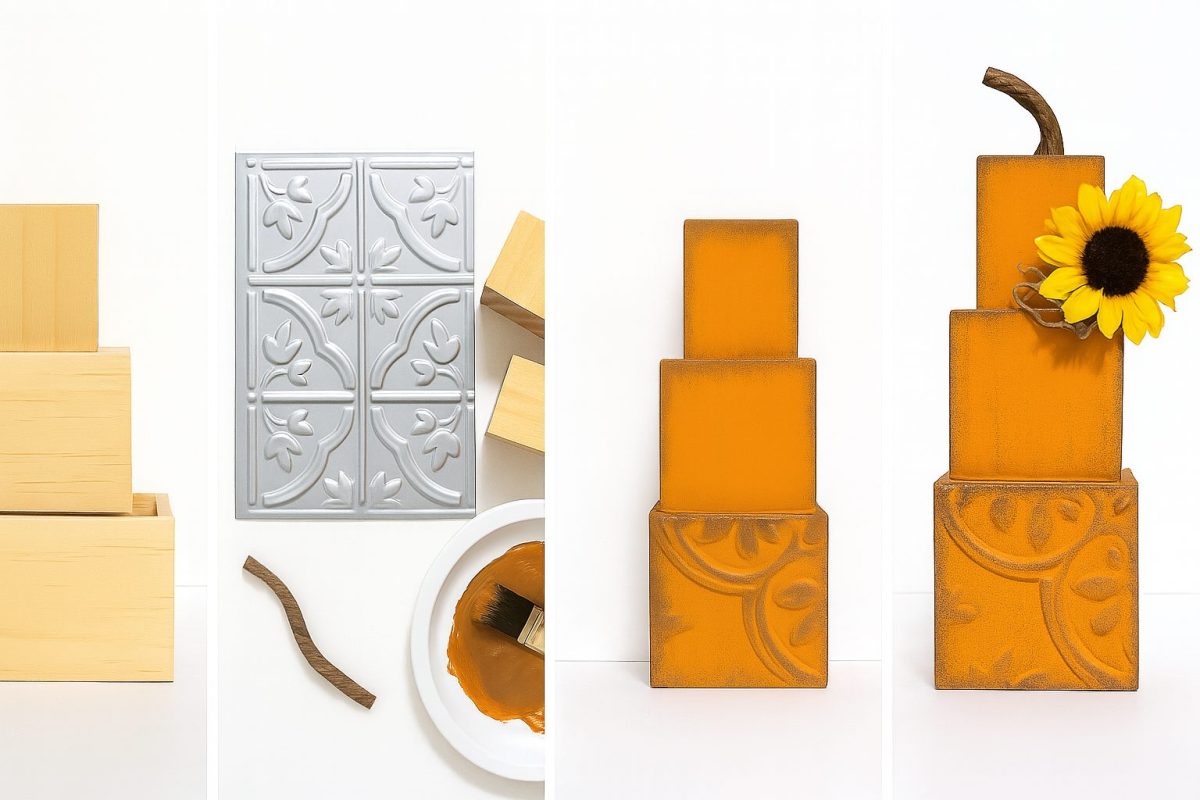
Now it’s time to paint. Cover all three wood pieces—crate, blocks, and even the tile—with a coat of orange acrylic paint. Once the paint has dried, use a dry brushing technique with brown paint to give the entire piece a distressed, vintage feel. Lightly brush the brown over the edges, corners, and raised embossed details so it settles into the texture and brings out that rustic farmhouse vibe.
For the stem, take a strip of twisted kraft paper and curl it into a stem shape. You can make it as whimsical or realistic as you like. Paint it brown, let it dry, then glue it to the top of the smallest block.
With all your painted pieces ready, stack and hot glue the crate and blocks together, holding each one in place for a few seconds to ensure they stick well. This creates the full pumpkin form.
Finally, decorate your pumpkin with little touches of fall. Glue on a couple of faux sunflowers, tuck in some Spanish moss, and maybe even add a twig or two for extra texture. These small accents really bring the whole piece to life.
Display your finished rustic pumpkin on a tray, a riser, or straight on a shelf. It makes a beautiful fall centerpiece and a perfect handmade gift.


What do you think of this project? Let us know!