
Get more details about this project
What you need
- Old Pokémon cards (originals, duplicates, or unwanted ones)
- Duct tape (in any color you like)
- Laminating sheets (or clear packing tape as an alternative)
- Scissors or craft knife
- Ruler and pencil
- Optional: Hole punch or ribbon for handles
Instructions
This DIY Pokémon card purse is more than just a craft—it’s a piece of nostalgia you can carry with you. Whether you’re heading to a convention, gifting it to a Pokémon-loving friend, or just want to show off your fandom, this purse is the ultimate upcycled accessory.
Don’t throw away those old cards—turn them into fashion!
Step-by-Step Instructions
1. Sort & Select Your Cards
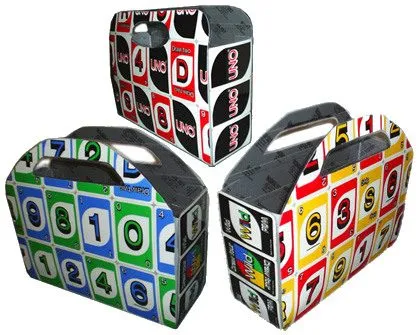
Pick out the Pokémon cards you want to feature. Popular choices include Pikachu, Charmander, Bulbasaur, or even legendary Pokémon for a bold look.
2. Build Your Duct Tape Sheets
Overlap strips of duct tape sticky-side up until you have a sheet large enough to fit your card layout. You’ll need:
- 2 sheets for the front and back
- 2 sheets for the sides
- 1 sheet for the bottom
3. Arrange Your Cards
Press your cards onto each duct tape sheet. A good purse size is:
- Front & back: 6 cards across by 4 rows
- Sides: 1 row of 4 cards
- Bottom: About 3 rows of 1.5 cards
This creates a sturdy structure and a visually balanced design.
4. Shape Your Purse Panels
Cut your large sheets into the desired shape for your purse. Many crafters prefer a rounded rectangle or a tapered top.
5. Add Handles
Cut handle slots at the top of your front and back panels. Alternatively, use a hole punch and thread ribbon or cord for a strap-style handle.
6. Clean the Edges
Trim away any excess tape so no sticky edges are showing.
7. Assemble the Purse
Arrange the front, back, sides, and bottom card panels in mirror image, card-side down. Secure them temporarily with duct tape into a box shape.
8. Laminate for Durability
Take your purse panels to a local copy shop to be laminated, or cover them carefully with wide clear packing tape at home. This gives the cards a glossy finish and protects them from wear and tear.
9. Trim & Fold
Cut away any excess laminate and fold the purse into shape.
10. Reinforce the Structure
Add strips of duct tape inside the purse seams to hold it firmly together. Now you have your finished Pokémon card purse!
Tips & Variations
- Use foil holographic Pokémon cards for a shiny, standout effect.
- Match the duct tape color to your chosen Pokémon theme (yellow for Pikachu, red for Charizard, blue for Squirtle).
- Scale down the design to make a mini Pokémon card clutch.
- Add Velcro or magnetic snaps for closure.
M3361S-3033


What do you think of this project? Let us know!