
Get more details about this project
What you need
One flexible wire coat hanger
One clean, lightweight white or cream bed sheet
One store-bought black fabric witch hat, large enough to conceal the upper frame
Black felt for two oval eyes
Battery-operated LED fairy lights
Faux orange and cream flowers
Faux greenery and small filler flowers
Pliers
Fabric scissors
Measuring tape or ruler
Needle and white and black thread
Small cable ties, optional
Hot glue gun and glue sticks for the flowers
Small scrap of black felt to reinforce the hook opening
Suitable door hook or wreath holder
Instructions
Before that worn-out sheet heads to the cleaning-rag pile, save a section for this cheerful little Halloween ghost.
This DIY ghost wreath gives old bedding a new purpose, using soft fabric strips to create a floaty body beneath a flower-trimmed witch hat. Battery fairy lights add a gentle glow, and two black felt eyes give it plenty of personality without making it too scary.
The frame is an ordinary wire coat hanger bent into a circle. Tie the fabric along the bottom curve, hide the upper wire beneath the hat and let the original hook do the hanging.
Lightweight woven cotton or cotton-blend sheets work best. Choose worn bedding that is still strong enough to hold a knot, and enjoy those slightly frayed edges. They are part of the ghost’s handmade charm.
Instructions
1. Prepare the Recycled Sheet
Wash and completely dry the sheet.
Remove thick hems and any elastic from fitted sheets. Cut around holes, stains and weakened patches, keeping the stronger fabric for your strips.
White, cream and faded ivory all work well. Avoid thick flannel or heavy stretchy fabric, which makes bulky knots and a heavier decoration.
2. Shape the Coat Hanger
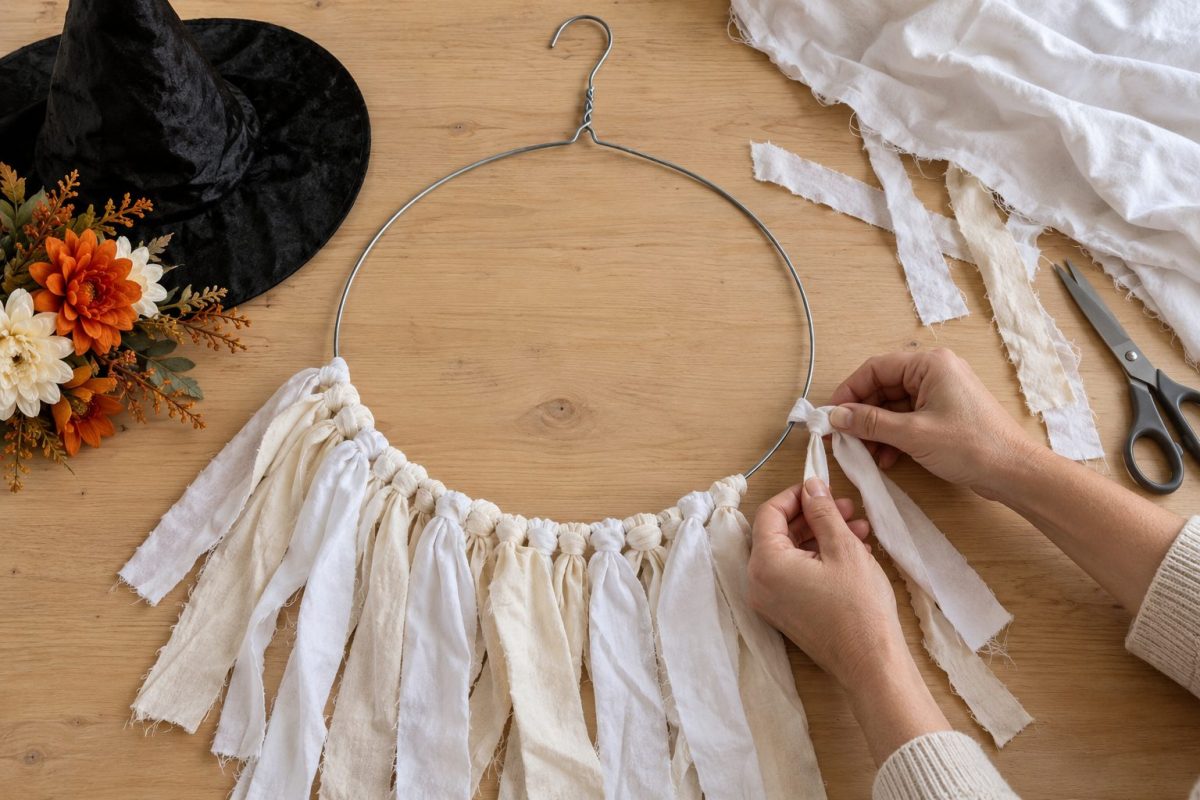
Gently bend the triangular hanger body into a circle, keeping its original twisted neck and hanging hook intact at the top.
Use pliers to ease out the corners. The former straight bottom bar should become part of the circular perimeter, leaving an open centre with no crossbar.
Keep the frame reasonably flat so it sits neatly against the door.
3. Check the Hat Fit
Hold the witch hat over the upper section of the circle.
The crown and brim must conceal the upper wire, with the brim reaching down to overlap the fabric knots on the lower curve.
Adjust the circle size or choose a larger hat before continuing. Check the fit while holding the frame upright.
4. Cut the Fabric Strips
Cut a few test strips approximately 5 to 7 cm wide and 80 to 100 cm long.
Once folded and knotted, these give slightly less than 40 to 50 cm of hanging length. Adjust the length to suit your frame and door.
Start with approximately 20 strips, then cut more as needed.
For gently frayed edges, test tearing the woven fabric from a small snip at its edge. If it tears unevenly, use scissors instead. Remove long loose threads.
5. Tie the Strips Along the Bottom Curve
Lay the frame with the hook pointing upwards.
Begin at the lowest point, directly opposite the hook:
- Fold one strip in half.
- Place its folded loop behind the wire.
- Feed both loose ends through the loop.
- Pull gently to form a snug knot.
Continue on either side, covering approximately the lower third of the circle, between roughly four o’clock and eight o’clock.
Keep the strips on the bottom curve, away from the hook. Leave the upper wire bare for the hat to cover.
Slide the knots together without pulling so tightly that the fabric tears or the frame bends. The loose tails should hang below the circle.
6. Shape the Ghost Body
Hang the frame temporarily and separate the fabric tails.
Keep the centre strips longest and trim the outer strips slightly shorter for a softly tapered shape. Stagger the ends rather than cutting a straight hem.
Leave small gaps between the strips for movement and to let the lights show through. If the body looks too heavy, remove a few strips or cut some narrower.
7. Fit the Witch Hat
Position the hat over the bare upper frame, with its brim overlapping the fabric knots.
If necessary, carefully open a small section of the rear seam so the hat fits over the wire.
Mark where the hanger hook meets the crown. Remove the hat, stitch a small black felt patch behind that spot and make a small opening through both layers.
Feed the original hook through the opening and settle the hat into place.
Secure the hat to the frame with discreet black stitches or small cable ties. Leave the curved hook exposed above the hat for hanging.
8. Add the Fairy Lights
Test the lights before attaching them.
Weave the strand loosely between the fabric tails, leaving individual bulbs visible through the gaps. Sheet fabric is opaque, so lights hidden behind several layers will barely show.
Secure the strand with small loops of white thread, leaving enough slack for the fabric to move.
Attach the battery pack behind the hat or to the rear of the frame. Support it separately from the light wire and keep the switch and battery compartment accessible.
Use LED lights suitable for your display location.
9. Attach the Eyes
Cut two vertical oval eyes from black felt, approximately 4 to 6 cm tall, adjusting their size to suit your ghost.
Position them below the hat brim. Stitch each eye onto a broad fabric strip or through several overlapping strips using small black stitches.
Check their position while the ghost hangs so both eyes face forwards.
10. Decorate the Hat
Arrange orange and cream faux flowers along the front brim. Tuck greenery behind them and add a few small filler flowers.
Attach with hot glue, adding discreet stitches to support heavier pieces.
Keep the floral cluster light enough that it does not pull the brim down over the eyes. Leave off the bats for this simple floral version.
11. Hang Your Ghost Wreath
Hang the decoration using the original coat-hanger hook on a suitable door hook or wreath holder.
Check that the hat hides the upper wire, the battery pack is secure and the fabric clears the door handle.
Adjust the strips so the lights peek through, then switch them on.
12. Display and Store
Display indoors or on a sheltered door. Cotton absorbs rain, and indoor lights must remain indoors and dry.
After Halloween, remove the batteries and make sure the fabric is completely dry before storing.
Lay the ghost in a roomy box, supporting the hat and flowers with tissue. Loosely fold the fabric tails so your recycled ghost is ready for another Halloween.




What do you think of this project? Let us know!