
What you need
Fabric Scrap of your choice
Jar with lid and band
Cotton balls or fiberfill
Card Stock
Glue gun
Instructions
Use modern fabrics for a contemporary feel.
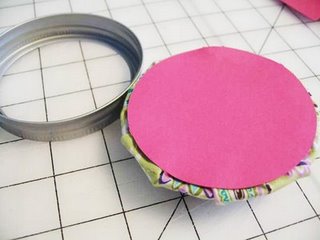
Step 1: Using the lid of the jar, cut out a circle of the same size from the card stock.
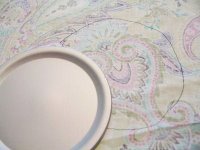
Step 2: Using the lid of the jar, trace around it on the wrong side of your fabric. Increase that circle’s radius about 1” and cut out the larger circle.
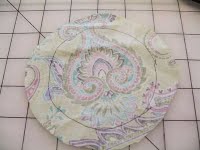
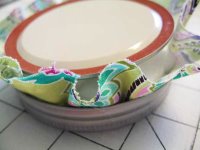
Step 3: Layer the fabric, cotton balls, and lid then place the “sandwich” inside the band.
Step 4: Press the lid down so that the cotton balls and fabric form the pincushion on the opposite side of the band. Check to see if you need to move the fabric to avoid creases. Make any necessary adjustments and then fold in the fabric and hot glue it to the underside of the lid.

.
Step 5: Trim away any excess fabric and hot glue the cardstock over the fabric edges.
Step 6:
Line the band with a small bead of glue and insert the pincushion into it, pressing firmly. Add the lid to the jar and YOU HAVE A NEW PINCUSHION!
This project was contributed by Suzanne Cotney.


I had the same problem as the first person who commented…the lid won’t screw onto the jar now 🙁
How will u get the lid on? The threads on the lid are covered up by the fabric and the card stock I tried this project and it is fun and cute but there is that one problem that I don’t like 🙁
This how to guide is a $$$ saver for me. I love shaby cheq and making new things out of old things. I went to our thrift store got enough jars for 4 christmas gifts 4/gift. picked 4 diffrent cotton shirts and a old pillow. I am super pumped about this cuz I just don’t have the $ to buy wonderful gifts that I would want to. So this is my way of trying to give a fun gift that people will enjoy with little of $ spent. I took the neat hint from one of the comments and I will add the steel wool to the cusion.
What a cute idea!
Thank You I used this for a Recycling School Project
Such a cute gift idea! Thank you!
Cute!
This is exactly what I was looking for! “Sew” easy and fun…..thanks!
I love thios craft idea, but could you please explain step 3 & 4 a little clearer please?!?!
This has always been a great project. Try using a sponge, cotton batting or steel wool (keeps needles and pins sharp) in place of cotton balls. This is also a great way to use up the cotton that comes in medicine/supplement bottles. Your use of fabric brings this old fashion idea right up to date. great job!
This makes a GREAT gift for the sewers in your life!!!