
Get more details about this project
What you need
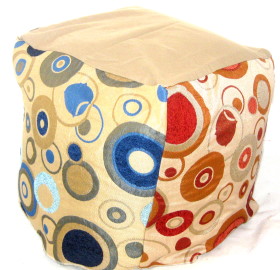
60’s Circles upholstery fabric
Downlite pillow form
Sewing machine
Velcro
Instructions
There is something so wonderfully cheerful about retro fabric, isn’t there? Those bold 60’s-style circles, warm upholstery textures, and slightly mismatched colours have a way of making even the simplest sewing project feel full of personality. This pillow form cover is one of those quick home décor makes that instantly adds a pop of vintage charm to a sofa, reading chair, craft room corner, or teenager’s bedroom if they are in their “retro is cool again” era.
Using upholstery cloth gives this project a lovely sturdy feel, which makes it ideal for cushions that will actually be used, squashed, leaned on, and tossed around the lounge room rather than just admired from afar. The cube-style shape is a fun change from the usual flat cushion cover too, and it is a great way to show off different panels of fabric, especially if you have coordinating prints or leftover decorator fabric in your stash.
This DIY pillow cover is perfect if you love sewing projects that are practical, a little bit nostalgic, and don’t require a complete room makeover to make an impact. It is also a clever way to use those smaller pieces of bold fabric you love but never quite know what to do with. A little cutting, a little stitching, and suddenly you have a handmade retro pillow that looks like it wandered straight out of a groovy 1960’s sitting room, in the very best way.
Step 1: Measure the panels on the sides and top of your pouffe. Ours was 14″ or 36 cm square.
Step 2: Place the 4 side panels together and sew into place. Wrap it around your pouffe inside out and add the top piece, secure to the side panels with pins, remove and sew.
Step 3: Add the bottom piece as a flap by only sewing to one side, this allows you to open and close the bottom.
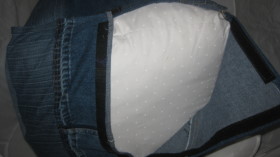
Step 4 (Optional): Because our pouffe is so large we added a large opening at the bottom so it could be easily removed for cleaning. You can add a zip or as we did used Velcro pieces to secure the flaps closed when in use (see denim example below). If you did not want to remove the cover you could simply hand sew the bottom closed.
If you have access to a eyelet punch you can use this on (3) sides and machine sew the last side of your work.


What do you think of this project? Let us know!