
A circular cardstock base helps the pumpkin stand upright, while a small twig and two burlap leaves complete the rustic design.
Get more details about this project
What you need
At least two empty cardboard toilet paper rolls
Scissors
Fine dry glitter powder
Small tray or sheet of folded paper for catching glitter
String or strong thread
Large blunt needle, optional
Cardstock for the base
Pencil
Small circular template, optional
Small twig
Burlap fabric
Paintbrush or foam brush
Protective table covering
Clear craft sealer, optional
Instructions
Empty toilet paper rolls are one of those simple craft supplies that can become almost anything with a little imagination. In this project, narrow cardboard rings are transformed into the curved ribs of a small pumpkin.
Applying glitter only to the outward-facing part of each cardboard loop creates plenty of sparkle without covering every surface. The visible kraft-cardboard edges, natural twig stem, and burlap leaves keep the finished pumpkin rustic rather than overly polished.
Gold glitter gives the project a glamorous farmhouse appearance, but the same construction can be used with orange glitter, craft paint, patterned paper, or washi tape.
Instructions
Step 1: Prepare the cardboard rolls
Make sure the toilet paper rolls are clean, dry, and free from loose paper.
You will need at least two standard cardboard rolls for one pumpkin. Using more rings will produce a fuller, more closely ribbed shape.
Flatten the first roll gently with your hand. Press along the two folded edges so it remains flat while cutting.
Step 2: Mark the strips
Use a ruler and pencil to mark evenly spaced cutting lines across the flattened roll.
Strips approximately 1–1.5 cm wide work well. The exact measurement is flexible, but every strip should be approximately the same width.
Repeat with the second cardboard roll.
Step 3: Cut the cardboard rings
Cut along the marked lines while the rolls are still flattened.
Each cut section will be a closed cardboard ring rather than two separate strips.
Continue until both toilet paper rolls have been cut into evenly sized rings.
Step 4: Restore the rounded shape
Pick up one flattened cardboard ring and gently press the two folded edges outward.
Work around the cardboard until the ring returns to a rounded or oval shape.
Repeat with all the rings. Avoid creasing the cardboard in new places, as smooth loops will produce a more even pumpkin.
Step 5: Decide which surfaces will face outward
Arrange the rounded rings together temporarily so you can see which half of each loop will form the outside of the pumpkin.
Mark the inner-facing half lightly with a pencil if necessary.
Only the outward-facing half needs to be glittered. This preserves the natural cardboard on the inside and reduces the amount of loose glitter required.
Step 6: Apply the glue
Cover the work surface and place a tray or folded sheet of paper underneath the first ring.
Use a paintbrush or foam brush to apply an even layer of craft glue to the outward-facing half of the cardboard loop.
Take the glue to the edges without allowing it to form thick drips.
Step 7: Add the glitter
Hold the glued ring over the tray and sprinkle dry glitter generously across the wet glue.
Gently tap away the excess and set the ring aside to dry.
Repeat with every cardboard ring, keeping the glittered sections consistent.
When finished, fold the paper beneath the project and pour the unused glitter back into its container.
Step 8: Let the rings dry
Place the glittered rings on a protected surface and allow the glue to dry completely.
Do not begin assembling the pumpkin while the glue is still wet, as the rings can stick together and the glitter may rub away.
Apply another small amount of glue and glitter to any bare patches if needed, then let those areas dry.
Step 9: Prepare the string
Cut a length of string long enough to pass through every cardboard ring with extra length remaining at both ends for tying.
If the string is difficult to guide through the rings, thread it through a large blunt needle.
Do not pierce the cardboard. The string passes through the open centre of each ring.
Step 10: Thread the cardboard loops
Slide the first cardboard loop onto the string, keeping its glittered half facing outward.
Continue adding the remaining loops in the same direction.
Align the loops neatly as you work so the glittered sections stay on the outside of the bundle.
Step 11: Tie the centre
Bring the two ends of the string together and pull them firmly.
Tie a secure double knot so all the cardboard loops are held together at the centre. The knot should be tight enough to hold the pieces but not so tight that the cardboard buckles.
Trim away excessive string while leaving a short tail if additional tightening may be needed.
Step 12: Shape the pumpkin
Stand the tied bundle on the work surface.
Begin spreading the cardboard loops around the centre, turning each one slightly so the pieces form a complete circle.
Continue adjusting the spacing until the pumpkin appears full and evenly rounded from every direction.
Make sure every glittered surface faces outward.
Step 13: Make the base
Place the shaped pumpkin on a piece of cardstock and trace around its lower opening.
Remove the pumpkin and draw a slightly smaller circle inside the traced line. Cut out the smaller circle so it will be mostly concealed beneath the cardboard ribs.
Glue the cardstock circle to the bottom of the pumpkin.
Press the lower edges of the loops gently against the base and allow the glue to dry.
Step 14: Add the twig stem
Choose a small twig that suits the size of the pumpkin.
Insert the twig into the centre opening at the top. Apply a small amount of glue around its base to hold it securely.
Keep the twig upright while the glue dries.
Step 15: Cut the burlap leaves
Draw or cut two simple pointed leaf shapes from burlap fabric.
The leaves can be different sizes for a more natural appearance. Apply a thin line of glue around the cut edges if the burlap frays excessively.
Allow the glue to dry before attaching the leaves.
Step 16: Attach the leaves
Position the two burlap leaves beside the twig stem.
Glue the lower end of each leaf to the cardboard loops or directly around the base of the twig.
Arrange one leaf toward the front and the other slightly toward the side so both remain visible.
Step 17: Finish the pumpkin
Check the spacing of the cardboard loops one final time and adjust any uneven sections.
A clear craft sealer can be applied to the glitter if desired. Follow the product directions and use spray sealers only in a well-ventilated area.
Display the finished pumpkin on a mantel, shelf, fall table, or Thanksgiving centrepiece. Keep it away from candles, open flames, moisture, and other sources of heat.
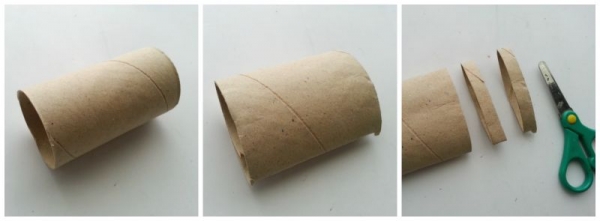
Step-1: Take a tissue paper roll and flatten it so that you can cut it neatly. Cut the flattened tissue paper roll into strips.
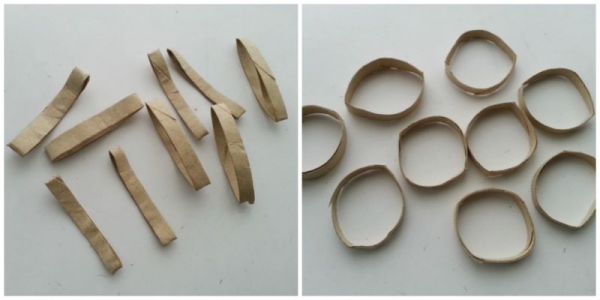
Step-2: Now that the strips are flattened you will have to bring them to the round shape. Press them on the folds to make them round. You will need at least 2 tissue paper rolls to complete one pumpkin. Cut more strips similarly.
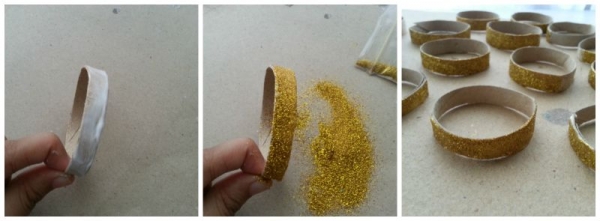
Step-3: Apply glue on the half on the cut out rolls and sprinkle glitter on the glue. You can apply glitter on the other half but it won’t be necessary. Similarly apply glitter on all the other roll strips.

Step-4: Take a string and thread all the glittered round pieces into the string. Keep the glittery sides facing out. Pull the string from both sides and tie knots. After tying knot arrange the roll pieces nicely to create a round shape.
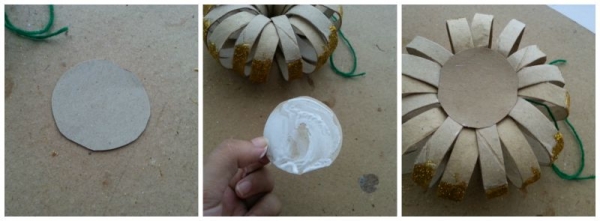
Step-5: Cut a round piece from a cardstock and glue it on the bottom of the tied roll pieces.
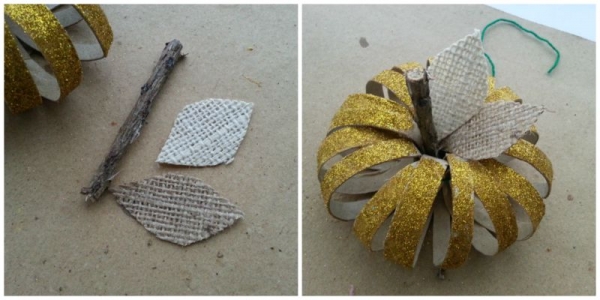
Step-6: To complete the pumpkin you will need a small twig and burlap fabric. Cut out 2 leaf shaped pieces from the burlap fabric. Insert the twig in the center of the tied roll pieces and glue the burlap leaves with the twig.
All done!



Great project!
why not simply glue glittered scrapbooking paper to the outside of the toilet paper roll, then cut into strips, fluff out the circles, tie and voila – done. All that glitter makes this a messy project. In my stash I have silver, gold and white glitter paper. Seems so much simpler.
It’s a waste of good glitter. Dont make me come take your hot glue gun away.
I want to try this without the glitter. Spray paint I guess.
I’m using Washi tape instead of the glitter.
I am going to try this one with my kids..seems easy and not alot of work..
ThaNks, love it!