
Known for his jaw-dropping red-carpet looks and starring roles in hits like Dune and A Complete Unknown, Timothée is the ultimate Gen Z style icon.
Whether he’s turning heads in couture or sparking dating rumors, Chalamet is the leading man everyone’s obsessed with.
From Crochet Your Celebrity Crush by Lee Sartori
Get more details about this project
What you need
Measurements
13″ (33 cm) tall x 5″ (12.5 cm) wide
Gauge
40 sc x 44 rounds = 4″ (10 cm) in sc worked in continuous rnds
To Create Your Own Timothée, You Will Need:
YARN
★ Fingering weight (#1), such as WeCrochet Palette Yarn, 231 yds (211 m), 1.75 oz (50 g), 100% Peruvian Highland wool shown here: 1 ball Oyster (A), 1 ball Black (B), 1 ball Mauve (C), 1 ball Bittersweet Heather (D), 1 ball Bouquet Heather (E)
HOOK
★ US size No. 7 (1.5 mm) steel crochet hook
OTHER SUPPLIES
★ Polyester stuffing
★ 8-mm safety eyes
★ Small amount of plastic mesh
★ White felt
★ Pink embroidery thread
★ Yarn needle
★ Stitch marker
★ Scissors
Instructions
How to Make Timothée
HANDS
Make 2 with A
FINGER (Make 4)
Rnd 1: Ch 2, 4 sc in 2nd ch from hook; do not join, work in continuous rnds (spiral)—4 sc. Rnds 2–5: Sc in each st around. Fasten off. Set aside to join to Thumb and continue Hand.
THUMB
Rnd 1: Ch 2, 4 sc in 2nd ch from hook; do not join, work in continuous rnds (spiral)—4 sc. Rnds 2–4: Sc in each st around.
Fasten off.
JOIN FINGERS AND THUMB
Rnd 1: Join with a sl st to any st of first Finger, ch 1, sc in next 2 sts of same Finger (leave rem 2 sts of first Finger unworked), sc in next 2 sts of 2nd Finger (leave rem 2 sts of 2nd Finger unworked), sc in next 2 sts of 3rd Finger (leave rem 2 sts of 3rd Finger unworked), sc in next 4 sts around 4th Finger; working in unworked sts of first 3 Fingers, sc in next 2 sts of 3rd Finger, sc in next 2 sts of 2nd Finger, and sc in next 2 sts of first Finger—16 sc for Hand.
Rnds 2–3: Sc in each st around.
Rnd 4: With Thumb held against Hand, sc in next 4 sts around Thumb, sc in each st around Hand—20 sc.
Rnds 5–8: Sc in each st around.
Rnd 9: [Sc in next 3 sts, inv-dec] around—16 sc.
Rnd 10: [Sc in next 2 sts, inv-dec] around—12 sc.
Fasten off. Stuff lightly.
ARMS
Make 2 with A.
Leaving a long tail for sewing, ch 12, join with a sl st in first ch to form a ring.
Rnd 1: Ch 1, sc in each ch around; do not join, work in continuous rnds (spiral)—12 sc.
Place a marker in last sc made to indicate end of rnd. Move marker up as each rnd is completed.
Rnd 2: [2 sc in next st, sc in next 2 sts] around—16 sc.
Rnd 3: [2 sc in next st, sc in next 3 sts] around—20 sc.
Rnds 4–23: Sc in each st around.
Stuff lightly.
Row 24: [2 sc in next st, sc in next 4 sts] around—24 sc.
Rnds 25–35: Sc in each st around.
SHAPE SHOULDER
Note: Shoulder is shaped by working back and forth in rows for 2 rows then returning to working in rnds. This makes the piece curve for the shoulder.
Row 36: Sc in next 10 sts, TURN; leave rem 14 sts unworked—10 sc.
Row 37: Ch 1, sc in next 10 sts, turn.
Rnd 38: Ch 1, sc in next 10 sts, sc in next 14 unworked sts of Rnd 35—24 sc.
Rnds 39–40: Sc in each st around.
Row 41: Sc in next 12 sts, TURN; leave rem 12 sts unworked—12 sc.
Row 42: Ch 1, sc in next 12 sts, turn.
Rnd 43: Ch 1, sc in next 12 sts, sc in next 12 unworked sts of Rnd 40—24 sc.
Rnd 44: [2 sc in next st, sc in next 3 sts] around—30 sc.
Row 45: Sc in next 15 sts, TURN; leave rem 15 sts unworked—15 sc.
Row 46: Ch 1, sc in next 15 sts, turn.
Rnd 47: Ch 1, sc in next 15 sts, sc in next 15 unworked sts of Rnd 44—30 sc.
Rnd 48: [2 sc in next st, sc in next 4 sts] around—36 sc.
Row 49: Sc in next 18 sts, TURN; leave rem 18 sts unworked—18 sc.
Row 50: Ch 1, sc in next 18 sts, turn.
Rnd 51: Ch 1, sc in next 18 sts, sc in next 18 unworked sts of Rnd 48—36 sc.
Rnd 52: Sc in each st around.
Fasten off, leaving a long tail for sewing.
Stuff Arm and top of shoulder.
FEET
Make 2 Pointed Shoes with B.
Feet (Shoes) (Make 2)
POINTED SHOE
Note: You’ll need a small amount of plastic mesh.
Pointed Shoe Sole (Make 4)
Rnd 1: Ch 9, sc in 2nd ch from hook, sc in next 6 ch, 3 sc in next ch; rotate to work on the underside of ch, sc in next 7 ch, 3 sc in last ch (this is the ch that was skipped at the beg of rnd)—20 sc.
Place marker in last sc made to indicate end of rnd. Move marker up as each rnd is completed.
Rnd 2: Sc in next 7 sts, 2 sc in each of next 3 sts, sc in next 7 sts, 2 sc in next 3 sts—26 sc.
Rnd 3: Sc in next 7 sts, [2 sc in nextst, sc in next st] 3 times, sc in next 7 sts, [2 sc in next st, sc in next st] 3 times—32 sc.
Rnd 4: Sc in next 11 sts, sc in next st, ch 4, sc in 2nd ch from hook, sc in next 2 ch, sc in same st, sc in next 11 sts, [2 sc in next st, sc in next 2 sts] 3 times—39 sc.
Rnd 5: Sc in next 12 sts, sc in underside of next 3 ch, 3 sc in last ch, sc in next 27 sts—45 sc.
For Each Shoe:
Fasten off the first Pointed Shoe Sole. Place first Pointed Shoe Sole atop plastic mesh and trace shape.
Cut out shape. Do not fasten off 2nd Pointed Shoe Sole. Stack first Pointed Shoe Sole, plastic mesh insert, and 2nd Pointed Shoe Sole, and holding 3 pieces together, crochet next round through both thicknesses of Shoe Soles.
Rnd 6: Working in BLO, sc in each st around.
Rnds 7–8: Sc in each st around.
Fasten off.
Pointed Shoe Top
Row 1: Ch 2, 3 sc in 2nd ch from hook, turn—3 sc.
Row 2: Ch 1, sc in first st, 2 sc in next st, sc in last st, turn—4 sc.
Row 3: Ch 1, 2 sc in first st, sc in next 2 sts, 2 sc in last st, turn—6 sc.
Row 4: Ch 1, [2 sc in next st, sc in next st] 3 times, turn—9 sc.
Rows 5–8: Ch 1, sc in each st across, turn.
Fasten off, leaving a long tail for sewing. Mark out 26 sts of Pointed Shoe Sole for the back of the Shoe (13 sts on either side of heel). Sew the Pointed Shoe Top to the top of the Pointed Shoe Sole across the remaining 19 sts (1 st for tip of toe, 9 sts for each side of toe, do not sew into the sts of Row 8). Weave in ends. Join to first st of Rnd 8 of Pointed Shoe Sole.
Rnd 1: Ch 1, sc in 8 sts of Shoe Sole, sc in next 9 sts of Row 8 of Shoe Top, sc in next 18 sts of Shoe Sole—35 sc.
Rnd 2: Sc in next 8 sts, inv-dec, sc in next st, sc3tog, sc in next st, invdec, sc in next 12 sts, inv-dec, sc in last 4 sts—30 sc.
Fasten off.
LEGS
Make 2 with C.
Join with sl st to back center of heel.
Rnd 1: Sc in each st around; do not join, work in continuous rnds (spiral)— 30 sc.
Place a marker in last sc made to indicate end of rnd. Move marker up as each rnd is completed
Rnds 2–25: Sc in each st around.
Remove marker and mark back center of Leg. Sc in each st to marker. Place marker in last st made to indicate new end of rnd.
KNEE
Rnd 26: Sc in next 12 sts, [2 sc in next st, sc in next 3 sts] 2 times, sc in last 10 sts—32 sc.
Rnd 27: Sc in next 12 sts, [sc in next 2 sts, 2 sc in next st, sc in next 2 sts] 2 times, sc in last 10 sts—34 sc.
Rnd 28: Sc in next 12 sts, [2 sc in next st, sc in next 5 sts] 2 times, sc in last 10 sts—36 sc.
Rnds 29–32: Sc in each st around.
Rnd 33: Sc in next 12 sts, [sc in next 5 sts, inv-dec] 2 times, sc in last 10 sts—34 sc.
Rnd 34: Sc in next 12 sts, [sc in next 4 sts, inv-dec] 2 times, sc in last 10 sts—32 sc.
Rnd 35: Sc in next 12 sts, [sc in next 3 sts, inv-dec] 2 times, sc in last 10 sts—30 sc.
Rnd 36: Sc in each st around.
Rnd 37: [2 sc in next st, sc in next 4 sts] around—36 sc.
Rnds 38–60: Sc in each st around.
Fasten off. Stuff Legs. Continue to Lower Body.
LOWER BODY
Make with C.
To create the lower body, we first join the legs together. The lower body is worked in the same yarn color as the legs.
Hold Legs together with toes facing forward, place a marker in middle st of inner thigh of each leg.
Rnd 1: With back of Legs facing, draw up a loop of yarn in marked st of first leg, beg in same st, sc in each st around first leg, ch 3; beg in marked st of 2nd leg, sc in each st around 2nd leg—72 sc and 1 ch-3 sp.
Remove both markers. Place end of rnd marker in last sc made to indicate end of rnd. Move marker up as each rnd is completed.
Rnd 2: Beg with back of Legs facing, sc in next 3 ch, sc in next 36 sts, sc in underside of next 3 ch, sc in next 36 sts—78 sc.
Rnd 3: 2 sc in next st, 3 sc in next st, 2 sc in each of next 2 sts, sc in each st around to last st, 2 sc in last st—84 sc.
Rnds 4–26: Sc in each st around.
Fasten off and stuff.
UPPER BODY
Make Regular Shirt with A.
Join yarn to center of back with a sl st.
Rnd 1 (RS): Working in BLO, ch 1, sc in each st around; join with a sl st in first sc, turn—84 sc.
Rnds 2–11: Sc in each st around; do not join, work in continuous rnds (spiral).
Place a marker in last st made to indicate end of rnd. Move marker up as each rnd is completed.
Rnd 12: [Sc in next 12 sts, inv-dec] around—78 sc.
Rnds 13–35: Sc in each st around.
Rnd 36: [Sc in next 11 sts, inv-dec] around—72 sc.
Stuff, continue stuffing as work progresses.
Rnd 37: [Sc in next 5 sts, inv-dec, sc in next 5 sts] around—66 sc.
Rnd 38: [Sc in next 9 sts, inv-dec] around—60 sc.
Rnd 39: [Sc in next 4 sts, inv-dec, sc in next 4 sts] around—54 sc.
Rnd 40: [Sc in next 7 sts, inv-dec] around—48 sc.
Rnd 41: [Sc in next 3 sts, inv-dec, sc in next 3 sts] around—42 sc.
Rnd 42: [Sc in next 5 sts, inv-dec] around—36 sc.
Rnd 43: [Sc in next 2 sts, inv-dec, sc in next 2 sts] around—30 sc.
Fasten off.
Part 2 (Exterior Shirt Rnds)
Join to BLO of marked st at center front of Rnd 19 of Part 1.
Do not join remaining rounds to create an open shirt.
Rows 20–35: Ch 1, sc in each st across, turn.
Row 36: Ch 1, [sc in next 11 sts, invdec] across, turn—72 sc.
Stuff, continue stuffing as work progresses.
Row 37: Ch 1, [sc in next 5 sts, inv-dec, sc in next 5 sts] across, turn—66 sc.
Row 38: Ch 1, [sc in next 9 sts, invdec] across, turn—60 sc.
Row 39: Ch 1, [sc in next 4 sts, inv-dec, sc in next 4 sts] across, turn—54 sc.
Row 40: Ch 1, [sc in next 7 sts, inv-dec] across, turn—48 sc.
Row 41: Ch 1, [sc in next 3 sts, inv-dec, sc in next 3 sts] across, turn—42 sc.
Row 42: Ch 1, [sc in next 5 sts, invdec] across, turn—36 sc.
Row 43: Ch 1, [sc in next 2 sts, inv-dec, sc in next 2 sts] across, turn—30 sc.
Row 44: Ch 1, working in FLO, sc in each st across, turn.
Rows 45–49: Ch 1, sc in each st across, turn.
Fasten off, weave in ends. Turn collar down.
NECK
Make with A.
Join yarn to center of back with a sl st.
Rnd 1: Working in BLO, sc in each st around—30 sc
Rnds 2–5: Sc in each st around.
HEAD
Make with A, leaving space for Nose 1.
Further instructions: Stuff head very lightly to create cheekbone indents.
Rnd 1: [Sc in next 2 sts, 2 sc in next st, sc in next 2 sts] around—36 sc.
Rnd 2: [2 sc in next st, sc in next 5sts] around—42 sc.
Rnd 3: [Sc in next 3 sts, 2 sc in next st, sc in next 3 sts] around—48 sc.
Rnd 4: [2 sc in next st, sc in next 7 sts] around—54 sc.
Rnd 5: [Sc in next 4 sts, 2 sc in next st, sc in next 4 sts] around—60 sc.
Rnd 6: [2 sc in next st, sc in next 9 sts] around—66 sc.
Rnds 7–12: Sc in each st around.
Rnd 13: [Sc in next 5 sts, 2 sc in next st, sc in next 5 sts] around—72 sc.
Rnd 14: Sc in each st around.
NOSE
Make Nose with A.
With 2 locking stitch markers, mark center 3 sts of front of Head for base of Nose opening.
Rnd 15: Sc in each st to first marker (but do not work into the marked st), ch 6, sk next 3 sts (Nose opening made), sc around—69 sc and 1 ch-6.
Rnd 16: Sc in each st to first marker, sc in first ch and move first marker to sc just made, sc in next 4 ch, sc in last ch and move 2nd marker to sc just made, sc in each rem st around—75 sc (6 Nose sts, 4 sts between markers.
Continue to move markers up as work progresses.
Rnds 17–19: Sc in each st around.
Rnd 20: Sc in each st around increasing 3 times evenly around back of head (not in Nose sts between markers)—78 sc.
Note: To make an increase, work 2 sc in the same st.
HEAD, CONTINUED
Rnd 21: Sc in each st around.
Rnd 22: Sc in each st around, increasing 6 times evenly around back of Head (not in Nose sts)—84 sc.
Rnd 23: Sc in each st around.
Rnd 24: Sc in each st to first marker,
(inv-dec) 3 times, sc in each rem st around—81 sc.
Rnd 25: Sc in each st around to first marker, inv-dec, sc in each rem st
around—80 sc.
Remove Nose markers
Rnd 26: [2 sc in next st, sc in next 19 sts] 4 times—84 sc.
Rnds 27–29: Sc in each st around.
Pinch Nose to shape it in place, starting from the small opening in Rnd 15 to the top where there are decreases made in Rnds 24–25. Cut 2 small pieces of white felt into an approx. 1/2″ (12 mm) circle. Cut a small hole in the middle of each circle to insert a safety eye. Trim the white felt into the shape of an eye using the photo as a guide . Insert one eye on each side of Nose opening, between Rnds 22–23 of Head, approx. 1/2″ (12 mm) away from edge of Nose.
Rnd 30: [Sc in next 6 sts, inv-dec, sc in next 6 sts] around—78 sc.
Rnd 31: [Inv-dec, sc in next 11 sts] around—72 sc.
Stuff Head, ensuring not to stuff the Nose, and continue stuffing as work progresses. Use a regular amount of stuffing for the Head unless the instructions for your doll call for stuffing lightly or firmly.
Rnd 32: [Sc in next 5 sts, inv-dec, sc in next 5 sts] around—66 sc.
Rnd 33: [Inv-dec, sc in next 9 sts] around—60 sc.
Rnd 34: [Sc in next 4 sts, inv-dec, sc in next 4 sts] around—54 sc.
Rnd 35: [Inv-dec, sc in next 7 sts] around—48 sc.
Rnd 36: [Sc in next 3 sts, inv-dec, sc in next 3 sts] around—42 sc.
Rnd 37: [Inv-dec, sc in next 5 sts] around—36 sc.
Rnd 38: [Sc in next 2 sts, inv-dec, sc in next 2 sts] around—30 sc.
Rnd 39: [Inv-dec, sc in next 3 sts] around—24 sc.
Rnd 40: [Sc, inv-dec, sc] around—18 sc.
Rnd 41: [Inv-dec, sc] around—12 sc.
Rnd 42: Inv-dec around—6 sc.
Fasten off. Sew rem 6 sts closed, weave in ends.
NOSE continued
Row 1: Ch 2, 3 sc in 2nd ch from hook, turn—3 sc.
Row 2: Ch 1, 2 sc in each st across—6 sc.
Fasten off, leaving a long tail for sewing. Sew the Nose to the bottom of the Nose opening at Rnd 15 of Head, match the 6 sts to the 6 chains, and the row ends to the skipped 3 sts of Rnd 14. Weave in ends .
EYELIDS
Make with A.
UPPER EYELID (Make 2)
Leaving a long beg tail, ch 7.
Fasten off, leaving a long tail for sewing. Sew upper eyelid to
LOWER EYELID (Make 2)
Leaving a long beg tail, ch 6.
Fasten off, leaving a long tail for sewing. Sew upper and lower eyelids around eye.
EARS
Make 2 with A.
Row 1: Ch 2, 3 sc in 2nd ch from hook, turn—3 sc.
Row 2: Ch 1, 2 sc in each st across, turn—6 sc.
Row 3: Ch 1, [2 sc in next st, sc in next st] across, turn—9 sc.
Row 4: Ch 1, sl st in each st across—9 sl sts.
Fasten off, leaving a long tail for sewing.
HAIR CROWN
Make with D.
Rnd 1: Ch 2, 6 sc in 2nd ch from hook; do not join, work in continuous rnds (spiral)—6 sc.
Place marker in last sc made to indicate end of rnd. Move marker up as each rnd is completed. Work all sts of Rnds 2–13 in BLO.
Rnd 2: 2 sc in each st around—12 sc.
Rnd 3: [2 sc in next st, sc in next st] around—18 sc.
Rnd 4: [Sc in next st, 2 sc in next st, sc in next st] around—24 sc.
Rnd 5: [2 sc in next st, sc in next 3 sts] around—30 sc.
Rnd 6: [Sc in next 2 sts, 2 sc in next st, sc in next 2 sts] around—36 sc.
Rnd 7: [2 sc in next st, sc in next 5 sts] around—42 sc.
Rnd 8: [Sc in next 3 sts, 2 sc in next st, sc in next 3 sts] around—48 sc.
Rnd 9: [2 sc in next st, sc in next 7 sts] around—54 sc.
Rnd 10: [Sc in next 4 sts, 2 sc in next st, sc in next 4 sts] around—60 sc.
Rnd 11: [2 sc in next st, sc in next 9 sts] around—66 sc.
Rnd 12: [Sc in next 5 sts, 2 sc in next st, sc in next 5 sts] around—72 sc.
Rnd 13: [2 sc in next st, sc in next 11 sts] around—78 sc.
Begin working in turned rows.
Row 14: Working in BLO, sc in next 56 sts, TURN; leave rem sts unworked— 56 sc.
Row 15: Ch 1, working in FLO, sc2tog, sc in next 52 sts, sc2tog, turn—54 sc.
Row 16: Ch 1, working in BLO, sc2tog, sc in each st to last 2 sts, sc2tog, turn—52 sc.
Row 17: Ch 1, working in FLO, sc in each st across, turn.
Row 18: Ch 1, working in BLO, sc in each st across, turn.
Row 19: Ch 1, working in FLO, sc2tog, sc in each st to last 2 sts, sc2tog, turn—50 sc.
Row 20: Ch 1, working in BLO, sc2tog, sc in each st to last 2 sts, sc2tog, turn—48 sc.
Rows 21–22: Rep Rows 19–20—44 sts in Row 20.
Row 23: Ch 1, working in FLO, [sc-
2tog] 2 times, sc in each st to last 4 sts, [sc2tog] 2 times, turn—40 sc.
Row 24: Ch 1, working in BLO [sc- 2tog] 2 times, sc in each st to last 4 sts, [sc2tog] 2 times, turn—36 sc.
Rows 25–28: Rep Rows 23–24 for 2 more times—20 sts in Row 28.
Row 29: Rep Row 23—16 sc.
Fasten off, leaving a long tail for sewing.
Follow the project instructions to attach the hair crown and add the strands of hair.
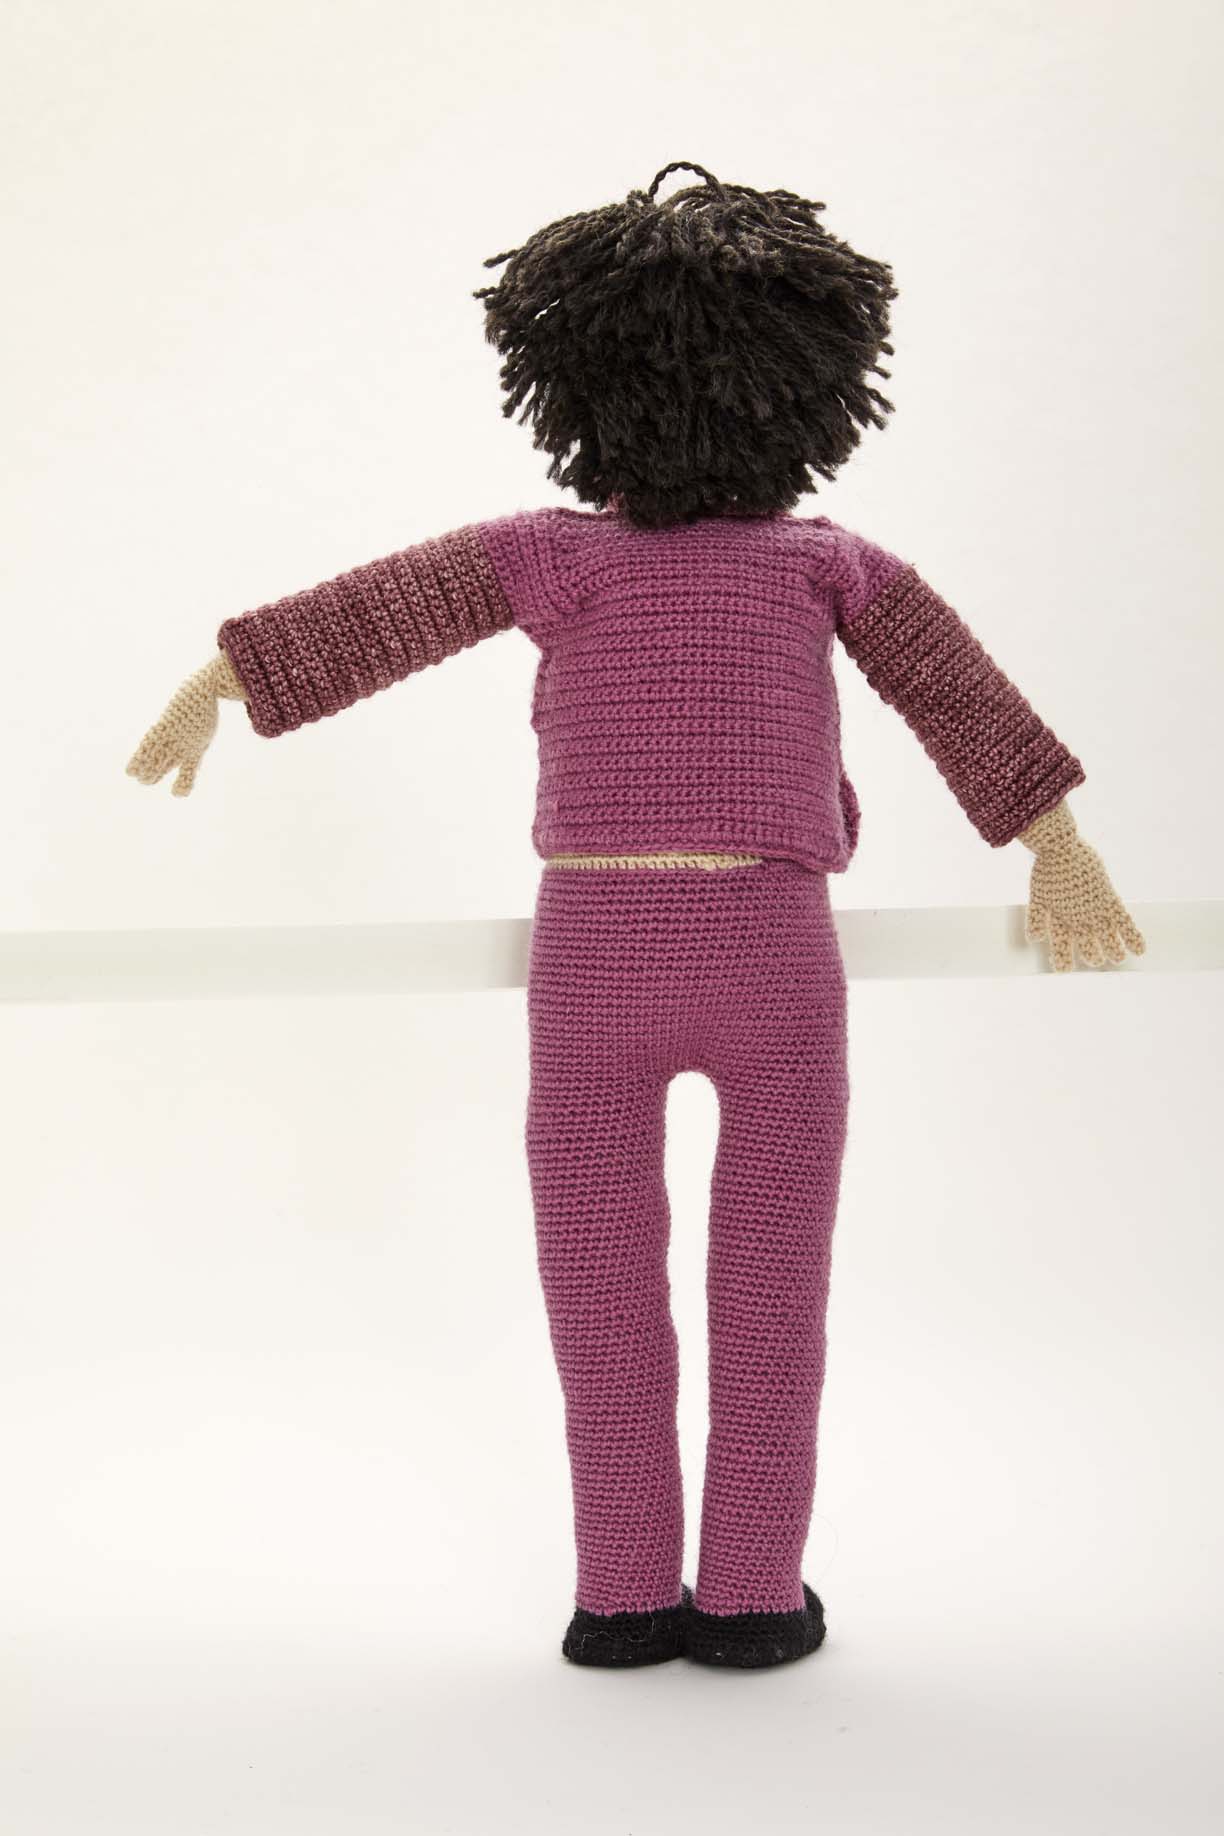
JACKET
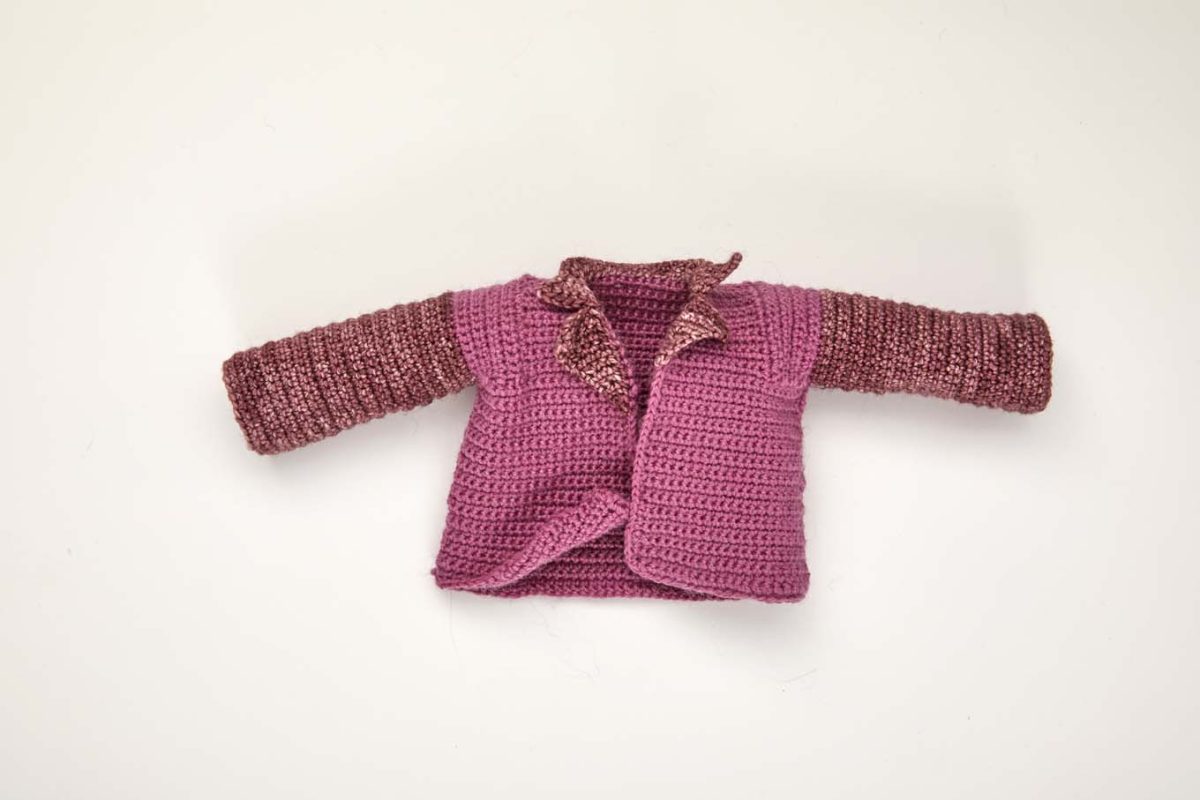
Make with C.
Back Panel
Row 1: Ch 43, sc in 2nd ch from hook and in each ch across, turn— 42 sc.
Rows 2–28 (60, 96): Ch 1, sc in each st across, turn (27 (59, 95) rows).
SHAPE ARMHOLE
Fasten off, sk first 8 sts, draw up a loop in next st.
Row 1: Ch 1, sc in each st across to last 8 sts, TURN, leaving last 8 sts unworked, turn—26 sc. Place a marker in each edge of this row for working Sleeves later.
Rows 2–15: Ch 1, sc in each st across, turn (14 rows)—26 sc.
Fasten off, weave in ends.
Front Panel (Make 2)
Row 1: Ch 22, sc in 2nd ch from hook and in each ch across, turn— 21 sc.
Rows 2–28 (60, 96): Ch 1, sc in each st across, turn (27 (59, 95) rows).
SHAPE ARMHOLE
Row 1: Ch 1, sc2tog, sc in each st to last 8 sts, leave remaining 8 sts unworked, turn—12 sc.
Row 2: Ch 1, sc in each st across, turn.
Row 3: Ch 1, sc2tog, sc in each st across, turn—11 sc.
Rows 4–15: Rep Rows 2–3—5 sc in
Row 15.
Fasten off, leaving a long tail for sewing.
Jacket Assembly
With WS facing, sew shoulder seams of Front Panel to Back Panel. Sew seam from bottom hem to armhole on each side.
Sleeve (Make 2)
With RS facing, draw up a loop of yarn in one of the marked row ends of one armhole.
Row 1: Ch 1, working in ends of rows around armhole edge, work 14 sc evenly spaced along back edge of armhole, work 14 sc evenly space along front edge of armhole, sl st in next 2 unworked sts of underarm, turn—28 sc (sl sts not included in count).
Rows 2–8: Ch 1, sk the 2 sl sts, sc in next 28 sc, sl st in next 2 unworked sts of underarm, turn—28 sc (not counting sl sts).
Begin working in joined rounds.
NOTE
The directions include options for short, medium, and long variants. Look for the directions with parentheses showing additional row counts, for example Row 1 of the Back Panel. The short version has 28 rows, the medium version has 60 rows, and the long variation has 96 rows.
Rnd 9: Ch 1, sc in each sc across, 2 sc in small gap between panels at center of underarm; join with a sl st in first sc, turn—30 sc.
Rnds 10–37: Ch 1, sc in each st around; join with a sl st in first sc, turn.
Fasten off, weave in ends.
Jacket Edging
Join to bottom right corner of Front Panel.
Rnd 1: Ch 1, working in ends of rows up front edge, sc in end of first 27 (59, 95) rows, place a marker in the last sc made, sc in end of next
16 rows; work 16 sc evenly spaced across back neck edge; working in ends of rows down front edge, sc in end of next 17 rows, place a marker in last sc made, sc in end of next 26 (58, 94) rows to lower edge, ch 1, work 84 sc evenly spaced across bottom edge of jacket, ch 1; join with sl st in first sc.
Fasten off, weave in ends.
Further Instructions: For Sleeves: Work Rnds 1–9 with C and Rnds 10–37 with E.
JACKET COLLAR
Make Jacket Collar with E.
Row 1: Ch 2, sc in 2nd ch from hook, turn—1 sc.
Row 2: Ch 1, sc in each st across, turn.
Row 3: Ch 1, 2 sc in next st, turn—2 sc.
Row 4: Rep Row 2.
Row 5: Ch 1, 2 sc in next st, sc in next st, turn—3 sc.
Row 6: Rep Row 2.
Row 7: Ch 1, 2 sc in next st, sc in next 2 sts, turn—4 sc.
Row 8: Rep Row 2.
Row 9: Ch 1, 2 sc in next st, sc in next 3 sts, turn—5 sc.
Row 10: Rep Row 2.
Row 11: Ch 1, 2 sc in next st, sc in next 4 sts, ch 7, turn—6 sc.
Row 12: Sc in 2nd ch from hook, sc in next 5 ch, turn; leave rem sts unworked—6 sc.
Row 13: Ch 1, sc in next 4 sts, sc- 2tog, turn—5 sc.
Row 14: Ch 1, sc2tog, sc in next 3 sts, turn—4 sc.
Row 15: Ch 1, sc in next 2 sts, sc- 2tog, turn—3 sc.
Row 16: Ch 1, sc2tog, sc in next st, turn—2 sc.
Rows 17–40: Ch 1, sc in next 2 sts, turn.
Row 41: Ch 1, sc in next st, 2 sc in next st, turn—3 sc.
Row 42: Ch 1, 2 sc in next st, sc in next 2 sts, turn—4 sc.
Row 43: Ch 1, sc in next 3 sts, 2 sc in next st, turn—5 sc.
Row 44: Ch 1, 2 sc in next st, sc in next 4 sts, ch 7, turn—6 sc.
Row 45: Sc in 2nd ch from hook and in next 5 ch, turn—6 sc.
Row 46: Rep Row 2.
Row 47: Ch 1, sc2tog, sc in next 4 sts, turn—5 sc.
Row 48: Rep Row 2.
Row 49: Ch 1, sc2tog, sc in next 3 sts, turn—4 sc.
Row 50: Rep Row 2.
Row 51: Ch 1, sc2tog, sc in next 2 sts, turn—3 sc.
Row 52: Rep Row 2.
Row 53: Ch 1, sc2tog, sc in next st, turn—2 sc.
Row 54: Rep Row 2.
Row 55: Ch 1, sc2tog, turn—1 sc.
Row 56: Rep Row 2.
Fasten off, leaving a long tail for sewing. Sew Jacket Collar 1 between markers on Jacket Edging.

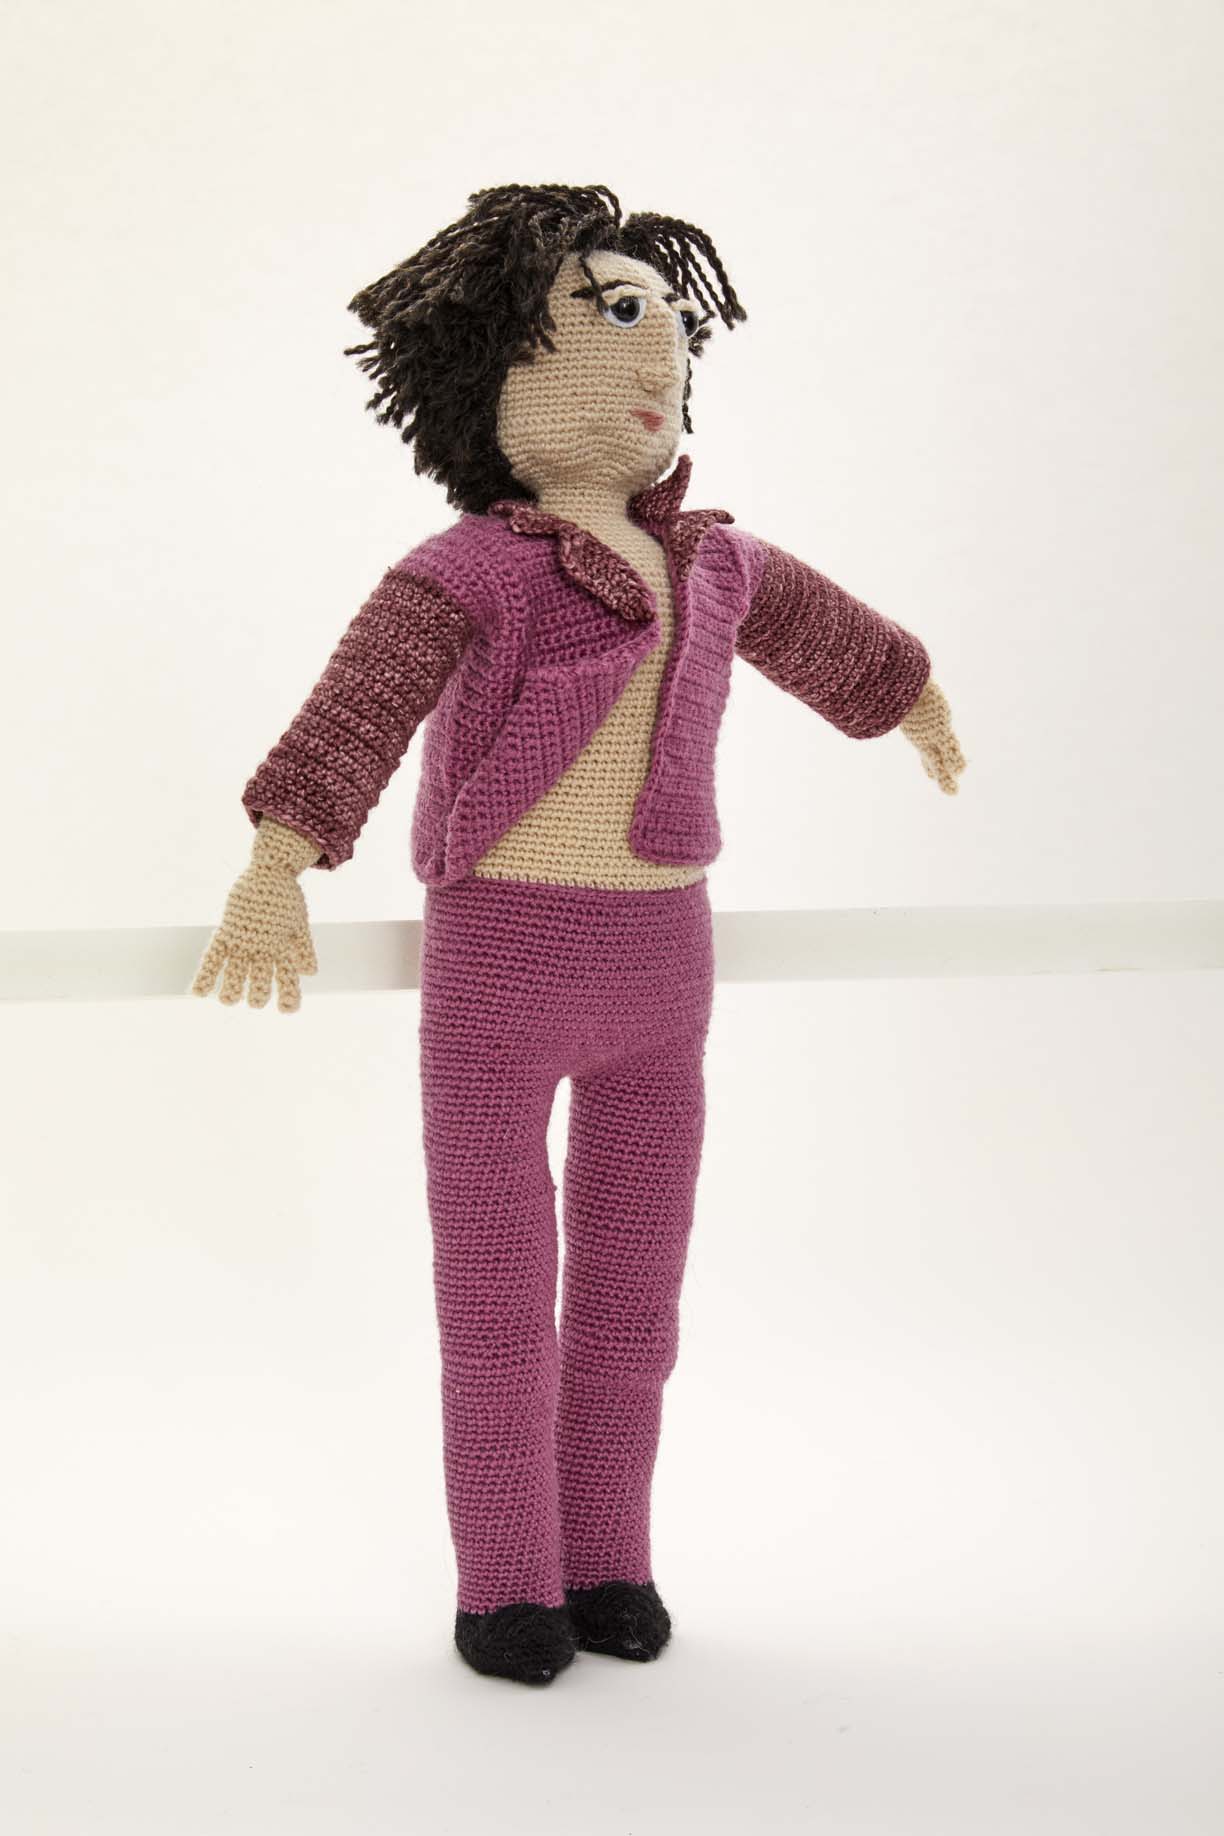
FINISHING
1. Sew Arms to sides of Upper Body. Sew Hands to bottom of Arms. Sew Upper Eyelids above eyes.
2. Sew Hair Crown to Head. Using D, cut approximately fifty 4″ (10 cm) strands and loop them through the Hair Crown to create the hair. Trim hair using photo as a guide.
3. Sew Ears to sides of Head. Using a long strand of D yarn held double, sew eyebrows close to edges of eyes using photo as a guide. With a small amount of pink thread, embroider mouth under Nose.
4. Add Jacket.

Reprinted with permission from Crochet Your Celebrity Crush by Lee Sartori, published by Quarry Books. $24.99. Publishing this September and available to preorder online and wherever fine books are sold. Find your copy at https://geni.us/crochetyourcelebcrush


What do you think of this project? Let us know!