
What you need
1 (or more) metal bottle caps
drill
small/medium drill bit
jump rings (2-small, 1-larger)
craft pliers
scissors
magazines, fabric, other knick-knacks
casting resin
measuring tools
disposable mixing bowl or cup
Ddisposable tools
suitable mold
cooking spray
straw
items for embedding
necklace chain


Instructions
Learn to cast epoxy resin via our tutorial first if you want to know the basics.
1. Make sure your bottle cap is clean!
2. Use your drill to drill a small hole.
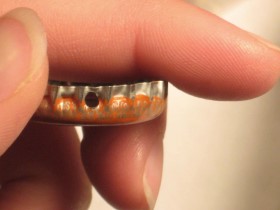
Go through the outside ridge of the cap and all the way through this one side. You will need to use some pressure to do this. This is probably the most difficult part of the project, be careful not to get your hand or make too big of a hole.
3. Use the small jump rings. You are going to put one through the hole in the cap and tighten it and then put another one through that (this is because the first one won’t move once the resin is in place).
4. Pick out what you want in your bottle tops.
Cut out a small circle that fits in the cap and you can go through magazines and any other type of paper or fabric and use it to cut circles of patterns you want to lay in as the background. You can leave it as only that background in the bottle top of look for other small trinkets to add in.
5. Put in the resin & other chosen materials.
I chose to use Loctite 2-part Epoxy Resin (I found it at Lowe’s) it worked pretty well, I might try to find one with a longer hardening time next time, because this was TOO fast. (This stuff cost about $12.. but I didn’t even use half of it while making the 20 necklaces I made).
Put one shallow layer of resin into the empty cap and let it begin to harden then put the background & other items into the cap on top of this first layer or resin. Then you will fill the rest of the top up with the resin make sure you get it to all of the edges without bubbles. {To put the resin in I mixed it in a paper cup that I had cut in half, only put in small amounts at a time of it will harden! Then I used a popsicle stick to scoop the resin into the bottle cap}
6. Let it sit for the time noted on the resin you buy.
7. Attach the larger jump ring (to the small ones that were already on it) and put it on your necklace chain. Voila!
(I got my chains at a local craft store for $.89 – $1.29)


is this impossible to do with a regular hole puncher?
Ive been making bottle cap jewelry for about 2 years now, and if your really serious about it there are a few tricks to make it LOADS easier.
1. invest in a europunch. its a tiny hole punch for metal, takes about 1/2 a second to punch the hole verses the minute or so to drill the hole. i drilled for about a year, then found the euro punch and its much easier.
2. Glosst accents embellisment glue. you can buy it at hobby lobby or joanns for $5. you just squeeze it in, and let it dry. it dries fast and completely %100 clear.
When you add your resin mix does it pour out the hole that you drilled first? How do you keep it from doing that?
i think its a great idea, just started this type of craft,but think i got wrong resin,as its not in same sized bottles like i wanted,but a large tin,, and small essential oil sized bot of hardener, i live in WEST CORK,but difficult to get proper resin,as i dnt like the smell of this resin,and was told when i got it ,that its the one i was looking for,, but was not,,love crafts and i make my own beaded jewelery, as well as fimo craft ,and realy want to try jewelery ,making with ,,,,the PROPER resin! thanks for any help,
You can use that resin, but you will need to know how much catalyst you will need.
these are verey pretty and i will need them thx….
thank you! I think this is really cool. I have a question, though…how do you put such a tiny hole with a drill? What size of bit should I use? Is there any other way to make the hole? Thanks so much!
I have never tried it but you can probably use crazy glue to glue the first jump ring on and then attach the rest
I cannot WAIT to try this out!!


THAT IS AWSOME!!! It is very different. I’m so making one. I think it would be a cool thing to do for Relay for Life that I do very year. (I am running out of ideas ^-^)
super cool!!
I am doing this craft at Bible camp this summer, but we are using magnets on the back to avoid the drilling. The magnet will be glued to the cap and the other side of the magnet will be hot glued to the nylon stretchy necklace loop. (the weaving loops that you make pot holders with)
i made some items very similar to this. but yours are so much cooler!
i will definitely try this!
I’ve had quite a bit of success using Mod Podge to seal various projects without the unsightly bubbles and blemishes in the sealant. You may want to give it a try instead of the Loctite (which I have never used.)