
Get more details about this project
What you need
iron-on vinyl
a zipper (7 – 9″ works well)
two pieces of fabric for lining (each should be the size of your candy wrapper).
thread, sewing machine, zipper foot, iron, X-acto knife
Instructions
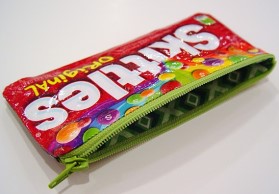
Turn an empty candy wrapper into something bright, useful, and surprisingly sturdy with this fun recycled Skittles pouch tutorial. This clever upcycled sewing project takes a colorful candy packet and transforms it into a lined zipper pouch that is perfect for holding small toys, pencils, coins, makeup, earbuds, library cards, or little everyday treasures.
This is a great project for anyone who loves recycled crafts, quick sewing ideas, and creative ways to reuse packaging instead of throwing it away. The candy wrapper becomes the outside of the pouch, while iron-on vinyl helps protect and strengthen it so it can be sewn into a usable little bag. Add a zipper and lining fabric, and you have a practical handmade pouch with a fun novelty look.
Kids and teens will love the bright Skittles packaging, but adults can have just as much fun making these too. Try using different candy wrappers, snack packets, or colorful treat bags to create a whole collection of upcycled zipper pouches. They make fun party favors, stocking stuffers, back-to-school pencil cases, or small handmade gifts.
This recycled candy wrapper pouch is a wonderful way to combine sewing, sustainability, and a little bit of sweet-tooth fun. Once you make one, you may find yourself saving every colorful wrapper that comes through the house.
We don’t normally have a lot of candy in the house. Well, the Halloween candy (at least nothing with chocolate – because that’s all eaten within hours) is still in a jar in the kitchen cupboard.
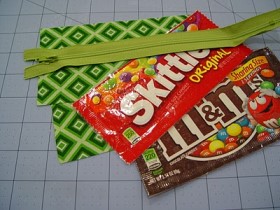
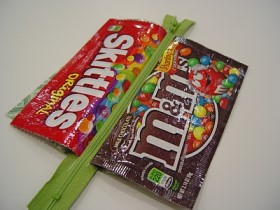
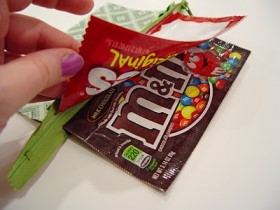
You’ll need two candy pouches – I used Skittles and M&Ms. You could use candy bars too (you just might need more than one per side to make it a bit bigger).

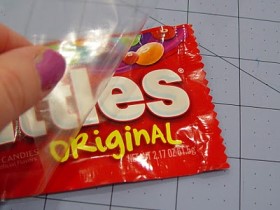
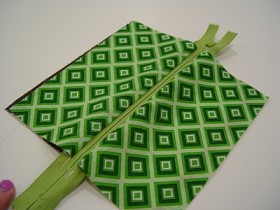
First, we’ll put the vinyl onto our candy wrappers. Carefully remove the back of the candy wrapper leaving the top piece fully intact.
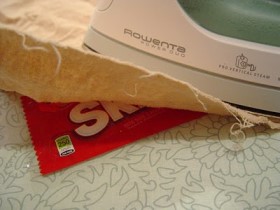
Cut two pieces of vinyl slightly larger than the wrapper. Peel off the paper backing and stick to the front of the wrapper, smoothing out with your fingers.
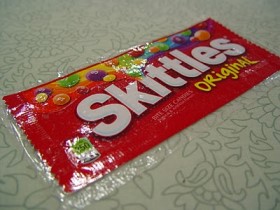
Using a clean rag (or ironing cloth), iron the vinyl for 8-10 seconds on medium heat. Repeat for the other side. Trim any excess vinyl. Repeat for the other wrapper.
Now that you have your wrappers covered in vinyl, we’ll assemble the pouch.
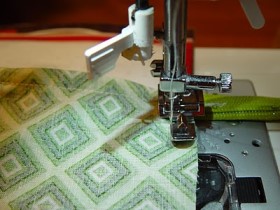
Place your lining fabric right side up and then place the zipper on top matching the edges. Zipper should be facing up, as in the photo.
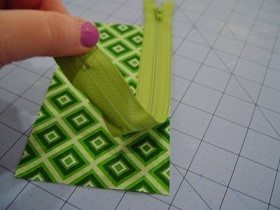
Place the wrapper on top (right side down).
Increase your stitch length and using a zipper foot, sew along the length of the zipper.
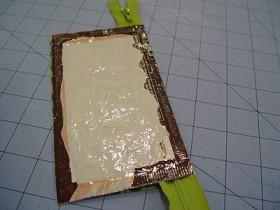
Fold over the front and lining (so wrong sides are now touching) and add the other piece of lining and wrapper to the other side of the zipper.
Now the top looks like this:
and the other side looks like this:
Now fold the bag so the the lining is touching and the wrappers are touching (right sides together) like this:
Starting with the lining, sew around the bag.
Make sure you pull the zipper partway open so you can turn it inside out later.
When you get to a zipper, make sure it’s “pushed” toward the lining.
Continue around the bag, leaving a large opening at the bottom for turning. A large opening is best (even larger than pictured below). The vinyl wrapper is a bit stiff and difficult to fit through a small opening.

Trim the extra zipper bits and trim the corners (turning points)
Carefully turn the bag right side out. Sew up the bottom of the lining (by hand or machine) and tuck it into the pouch.
Don’t forget to have your little one fill it with treasures – a favorite car, a new library card and of course, a frog.
This project was contributed with permission from Vanessa http://punkinpattern.blogspot.com


Could I laminate the bags??
Awessssuuuuummm! 😀
I use sticky clear shelf liner instead of iron on less steps. thanks this is a great project.
I like the easy to follow instruction and illustrated pictures. I am thinking of teaching this to my students. Will let you know how it goes! Thx a lot.
Oh so cute!
where can i get iron on vinyl??
Love this project and just in time for school I’ll whip up a couple for my kids pencil holders. Thanks for this idea!
adorable!
good idea
This project is looks great and easy instructions to follow deffinately going to try this thanks for the great idea 🙂
love the pictures-definetly making 🙂 thanks for the fabulous project!
Ahh LOVE IT!! (: I love me some skittles, too (;
I can’t wait to do this! My nieces and nephews will LOVE it!
pretty creative!
Very cute!
Excellent instructions! This is a great project. Thank you for sharing!