What you need
1 – Envelope (a leftover envelope from a package of holiday greeting cards works well)
1 – Piece of scrapbook cardstock or heavy construction paper (either 8 1/2 x 11 or 12 x 12 paper will work)
2 – Heart-shaped paper doilies (if you can’t find heart-shaped doilies, you can simply cut a heart shape out of a regular round paper doily)
1 – Paper brad (heart-shaped brads are nice for this project, but you can also use a standard round brad)
12 inches of crochet thread, yarn or string
Adhesive squares, tape runner or craft glue
Paper scraps (used to cut out smaller hearts and other embellishments)
Scissors
Paper trimmer/scorer (optional)
Ruler
Yarn needle
Various embellishments as desired (such as rubber stamps, decals or paper flowers)
Instructions
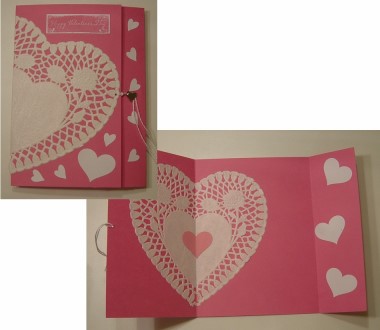
You can make a beautiful card using a simple piece of scrapbook or construction paper, a paper lace doily, plus a few accessories and decorative embellishments. Although this is a great card to send for Valentine’s Day, it also makes a nice card for anniversaries or any time you’d like to send a sentimental note to someone you love.
1. Your finished card size should be determined by the envelope you will be using. Measure the envelope, then subtract approximately a quarter inch from the length and width. The resulting measurement should be the finished dimension of your card. You could also choose to make a handcrafted envelope to match your card. If this is the case, you can make the card any size you desire. Measure the paper and cut to size, using either scissors or a paper trimmer.
2. Lay the paper on the table. Fold the two longer ends towards the center, forming the front of the card on the left-hand side and a smaller flap on the right-hand side. Using a paper scorer will create neater folds. These two folded areas should overlap by approximately one inch. You can adjust these folds so that you end up with the correct size of card for your envelope. As an example, the card in the photo was made from an 11 x 7 piece of paper. The larger front flap measures 4 inches and the smaller flap measures 2 inches, resulting in a 5×7 inch finished card.
3. Fold the heart-shaped paper doily so that it can be placed on the front of the card, wrapping around to the back. Affix the doily to the card using craft glue.
4. Fold the card to the closed position. Mark a small pencil dot on the smaller flap, so that you know where to insert the brad. Then, make another small mark on the larger flap, marking where you will punch the hole for the cord tie. Punch holes into the card at these two marks with a yarn needle.
5. Insert the brad, spreading the back tabs to secure (you will be covering the exposed brad tabs with a heart shape or other embellishment on the inside of the card, so that they will not be visible)
6. Loop the embroidery thread, string or yarn through the hole and knot. Wrap around the brad. Trim the ends neatly to the desired length.
7. Decorate the card with other embellishments as desired, using paper cutouts, rubber stamps, decals or other materials. You can also write a message on the inside of the card.
8. Let the glue dry. Then, insert the card into the envelope and give it to the lucky recipient.

Senior staff writer for Metal-Wall-Art.com, Alyssa Davis, offers design advice on decorating with Mexican metal wall art and wolf metal wall art.


this is very pretty!