
What you need
Fat 1/8 of mohair or scraps to fit 2cm set of disks Locknuts or cotter pins to suit 5mm glass eyes Nose thread
Instructions
Hello & welcome to the world of bear making.
Please take the time to read & fully understand the instructions before you start your bear.
Note: You will need to print and resize your bear patterns
You will need a basic sewing kit including small pointy scissors & pins with heads .
Straight steel pins may get lost in the fur. Make sure you have all the materials & you are ready to go.
This bear is very easy as it has no paw pads and no footpads.
It is a great bear for a beginner or to accompany a doll or larger bear. Marking of Fabric: Paste your pattern onto card to make it not only last longer BUT it will make it easier to draw around. Lay out your fabric in the most economical way possible This of course will depend on the width of the fabric. Make sure all arrows point in the same direction & that you have all the reverses laid out.
Mark around the pieces with a felt tipped pen that will NOT run or a biro, making sure you mark all the joints etc.
I recommend you then use fray stopper around all pieces.
Cutting Out: Using small pointy scissors cut around all pieces making sure to cut only the backing, not the fur This takes some practise so use the scraps & do not proceed until you are confident you can do it. All seams are 2-3mm wide.
Stitching : Pin all pieces together first then: – Using a double thread & a whip stitch Stitch .Around the arm making sure you leave the opening as marked .Around the leg making sure you leave the opening as marked .
Around the body as marked leaving open the neck edge & the stuffing hole in the back. .Around the ears leaving the bottom undone . From the nose tip to the neck on the side headpieces A – Z. .
Then sew all these pieces on your machine or by hand using a tiny backstitch.
Second Stage: Using the centre point on the head gusset A, match up to the tip of the nose A & the eye point B on both the head & gusset Whip stitch in between these points easing as you go.
Turn through the nose & make sure before you backstitch that it is perfectly centred. I can not stress how important this step is as if the nose is off centre the bear will be spoilt.
Stitch the rest of the gusset into the head points B – D using first a whipstitch & then either your machine or a small backstitch.
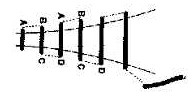
Jointing: With an awl or a knitting needle make joint holes for the joints & joint your bear’s limbs with either cotter pins or nuts & bolts as per the diagrams.
Stuffing: Using good quality stuffing & a wooden spoon or stuffing stick to fill up the limbs. Make sure to get right down into the ends of the paws & stuff tightly & evenly .
You may use beads. Use a ladder stitch & double dental floss sew up the openings as per the diagram. I usually wait until I have nearly finished the ladder stitch & then I put some more stuffing in to make in even. Take your time with this stage as it is important to get it even & tightly filled. Tie off with three knots & sink the knot into the limb.
If when you have stuffed & closed the openings you find it is not even take a long doll needle & move the stuffing around by inserting the needle into the offending lump & pushing the stuffing around.
Do not stuff the tummy at this stage. Stuff the head taking very special care to get into the nose & make this hard as when you sew the nose it will be very difficult if you have left a hole in the stuffing.
Once again you can move the stuffing around inside with a big doll needle. Put the loaded joint into the bear’s head & using a double dental floss or a strong thread gather around the neck edge of both the body & the head. Using a loaded joint & cotter pin, join the head to the body as per the diagram.
Ears: Using double dental floss & a long needle ladder stitch the bottom of each ear leaving a long tail on the end. Position the ears on the head & make sure they are symmetrical.
Using the long tail of floss ladder stitch each ear to the head from the back & starting at the top making sure it is very secure.
Cross each of the long threads to the opposite side of the head & then bring one back to its original side using the exact same holes as the other thread is coming from. Tie three knots & sink them into the head.
Body: Stuff the body using plastic toy pellets making sure to stuff firmly around both the shoulders & bottom. Glass or plastic pellets give a really nice feel to the bear. Please do not use lead, as it is dangerous although I know it is still sold in some stores. Ladder stitch the opening closed & tie three knots before sinking them.
Nose: Using a perle cotton & a satin stitch make a nose as per the photo on the front of this pattern. You will only need to do about three stitches each side of the centre & then build up two or three layers deep.
Eyes: Thread each eye onto a long piece of double dental floss & knot to form two equal pieces Using an awl make a hole in the eye position & thread the eye through he hole to come out the back of the head as close as possible to the disc.
Repeat for the other eye & pressing firmly on the eyes knot at the back of the head using a reef knot Sink the knot. Mouth: Using nose thread & the diagram again thread up the needle & coming in from a point in the nose stitch a mouth. I like to take a piece of thread & play around with different shapes until I get the mouth that suits
Finishing: As per the picture of your bear personalise him or her using ribbons patches etc At this stage you can trim the fur as per the picture using small pointy scissors.
Proceed slowly as the fur will not grow back once it is cut and always cut in the direction of the fur.
Give him a big hug & name him.


The pattern links aren’t working
Thank you this is the one I was looking for
This pattern is perfect for making a bear in a short amount of time. I make a lot of stuffed teddies and this pattern will be used frequently. Thanks!
it’s great!
i loved it .very simple and straight forward
its cute and pretty for a bear i did it and it came out great
Its very creative and cute but i suggest putting pictures next time it may help make it easier for people to follow! Other than that its perfect! (in my opinion)
Is this easy to make, because I’m new at this.
made one and it looks good…except i stitched the smile a tad too wide, that made my grandma laugh when she sees it. lol!
Seeing how I am completely new at this, it is a bit tricky but the bear is too cute to not make. It’s an excellent challenge!
It’s soooooooooo cute!!!!!!!!!
Cute Teddy!
It works and is very good. Its soo cute. I’ve never made ateddy bear before. It’s simple but the result is fantastic.
Thanks, Veronica
love it
Adorable. Great directions.
nice and simple, they way a teddy should be.
mine came out retarded! it only took about 2 days. i made it really tiny. now i am about to make another one.
I reawlly enoyed makin this bear – i love making bears please send me more patters thank you. shawhein@hotmail.com
looks hard to make
sooo cute im making it for my mum for a christmas prezzie
it is so cute I love it