
It’s part art piece, part conversation starter, and it’s so satisfying to make.
Get more details about this project
What you need
- Canvas or wood panel – any size, but 12×16″ or larger lets the details shine
- Lightweight joint compound or plaster – this gives your tree its raised texture
- Palette knife or plastic spreader – for applying and shaping the plaster
- Pencil and eraser – to sketch your tree before committing with plaster
- Black acrylic paint – deep and opaque
- Yellow acrylic paint – for the eerie eyes
- Yellow, orange, and red acrylic paints – for your sunset background
- Wide flat paintbrushes – for blending the background
- Fine detail brush – for painting the eyes and finer branches
- Sandpaper (optional) – to smooth any overly rough plaster edges
- Clear acrylic sealer – matte or satin finish to protect your work
Drop cloth or old table covering – plaster can be messy
Instructions
1. Prepare Your Workspace
This part might seem boring, but it will save you grief later. Lay down a drop cloth, pour your paints into a palette, and keep a damp cloth nearby for cleaning brushes. Plaster can dry on tools quickly, so you want everything ready to go.
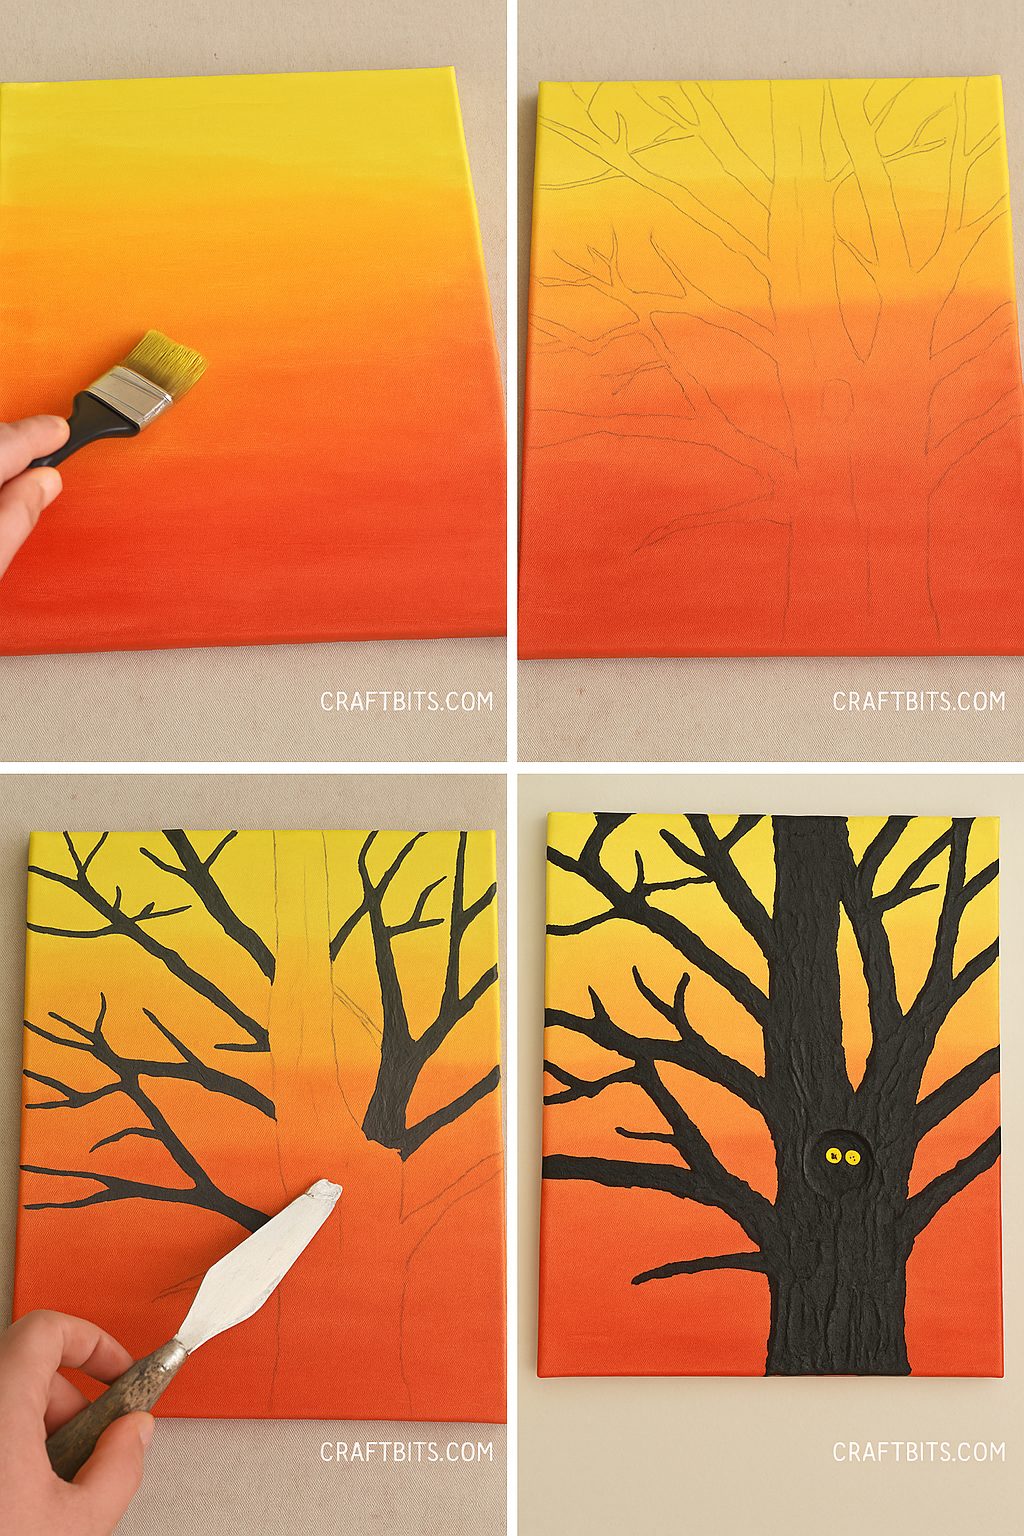
2. Paint the Sunset Background
- Starting at the top of your canvas, apply bright yellow in wide horizontal strokes.
- Blend into a deep orange about halfway down the canvas.
- Finish the bottom third with a rich, autumn red.
- Work quickly so the colors blend smoothly into each other — think glowing October sky just before night falls.
- Let the background dry completely before moving on.
3. Sketch Your Spooky Tree & Eye Placement
- Using a pencil, lightly draw the outline of a large, gnarled tree.
- Place the trunk slightly off-center for a natural composition, or keep it central for a bold, symmetrical look.
- Choose one thicker branch and draw a small oval “hollow” where your yellow eyes will peek through.
Tip: Use reference photos of bare winter trees to get realistic angles for your branches. The more twists and forks, the eerier the silhouette.
4. Apply the Plaster for Texture
- Scoop a small amount of joint compound onto your palette knife.
- Starting at the base of the trunk, spread the plaster upward along your pencil lines.
- For thicker branches, layer more plaster; for smaller twigs, use just the edge of the knife.
- When you get to your “eye hollow,” work the plaster around it, leaving it open.
- Don’t aim for perfection — rough, bark-like texture is the goal.
- Allow to dry overnight.
5. Refining Your Texture
- Once dry, run your hand over the surface. If there are overly sharp edges, lightly sand them down.
- Be careful not to flatten too much — the texture is what makes this tree pop.
6. Paint the Tree & Add the Eyes
- With a fine brush, paint the entire plastered tree black.
- Be sure to get into all the nooks and crannies — you don’t want white plaster showing through.
- Paint the inside of the hollow black as well, to create depth.
- Once dry, paint two oval yellow eyes inside the hollow.
- Let the yellow dry fully, then add small black pupils.
- Slit pupils feel menacing (cat or reptile vibe).
- Round pupils feel softer (owl or woodland creature vibe).
7. Seal Your Artwork
- Once all the paint is dry, spray or brush on a thin coat of clear acrylic sealer.
- This will protect the paint and make the colors more vibrant.
Styling & Display Ideas
- On the Porch: Place it next to pumpkins and lanterns for a nighttime surprise.
- By Candlelight: The texture will cast tiny shadows, making the tree look even more alive.
- As a Set: Create two or three canvases with different shaped trees for a gallery wall effect.
Crafty Tips & Variations
- For extra spook factor, use glow-in-the-dark yellow paint for the eyes.
- Add tiny bats in silhouette on the branches with a fine brush.
- Use metallic copper or bronze paint to lightly dry-brush the bark for a magical shimmer.
- Swap the background for a full moon instead of a sunset for a completely different vibe.


What do you think of this project? Let us know!