
And honestly, tie dye is one of those crafts where the little surprises are half the fun. You can plan your folds, you can carefully place your rubber bands, and the dye will still do its own thing. That’s not a mistake — that’s tie dye being tie dye.
This project is great for summer crafting, backyard parties, scout groups, camp activities, family reunions, or a casual Fourth of July outfit that doesn’t involve buying yet another themed shirt you’ll only wear once. If you already love experimenting with fabric dye, you might also enjoy our older CraftBits guide to different tie dye effects, which is a handy companion if you want to play with spirals, bullseyes, stripes, or scrunched designs.
Get more details about this project
What you need
Plain white cotton T-shirts
Red fabric dye
Blue fabric dye
Squeeze bottles
Rubber bands
Plastic gloves
Plastic table covering or garbage bags
Cooling rack or wire rack
Plastic wrap or sealable plastic bags
Paper towels
Warm water
Washing machine access
Optional:
Soda ash, if required by your dye brand
Aprons or old clothes
Star stickers or vinyl shapes for resist designs
A tie dye kit from Amazon if you want everything bundled together
Extra plain cotton shirts for testing — because someone always wants “just one more”
Best Shirts To Use For Tie Dye
For the brightest red, white, and blue results, use shirts that are 100% cotton or mostly cotton. Polyester blends can still work, but the colors usually turn out softer and less bold.
Pre-wash the shirts first without fabric softener. This removes sizing and factory finishes that can stop the dye from soaking in properly. I know, it is one more step, but it really does make a difference. Skipping the pre-wash is one of those beginner tie dye mistakes that seems harmless until the color looks patchy later.
If you’re making these for a group, buy a multi-pack of plain white cotton shirts. Amazon is usually handy for bulk T-shirts, gloves, squeeze bottles, and plastic table covers. If you’re crafting with kids, I’d also suggest grabbing extra gloves, because somehow one glove always vanishes right when the dye bottles come out.
Instructions
Step 1: Prepare Your Workspace
Cover your table with plastic, garbage bags, or an old wipe-clean tablecloth. Tie dye has a sneaky way of getting everywhere, especially when children are involved. Work outside if possible, or choose a laundry, garage, or craft area where a few splashes won’t cause a family emergency.
Place a cooling rack or wire rack over a tray or plastic-covered surface. This helps the dye drip away instead of pooling under the shirt.
Put on gloves before mixing or applying dye.
Step 2: Pre-Wash And Dampen The Shirts
Wash the shirts before dyeing and leave them slightly damp. Damp fabric helps the dye spread more easily and gives a softer blended effect.
If your dye instructions say to soak the fabric in soda ash first, follow the packet directions. Some tie dye kits include soda ash already mixed into the dye powder, while others require a separate soak.
Step 3: Choose Your Tie Dye Pattern
There are several easy ways to fold your Fourth of July tie dye shirts.
For a firework scrunch design, lay the shirt flat, scrunch it randomly from the center outward, and secure it with rubber bands.
For a classic spiral, pinch the middle of the shirt and twist until the whole shirt forms a flat spiral. Wrap rubber bands across it like pizza slices.
For a patriotic stripe design, fold the shirt accordion-style from the bottom up, then add rubber bands every few inches.
For a bullseye design, pinch one section of fabric and pull it upward into a cone shape. Add rubber bands down the length of the fabric to create rings.
If you want to experiment with different folds, our CraftBits tie dye effects tutorial is a good place to start, especially if you’re crafting with a group and want everyone’s shirt to look a little different.
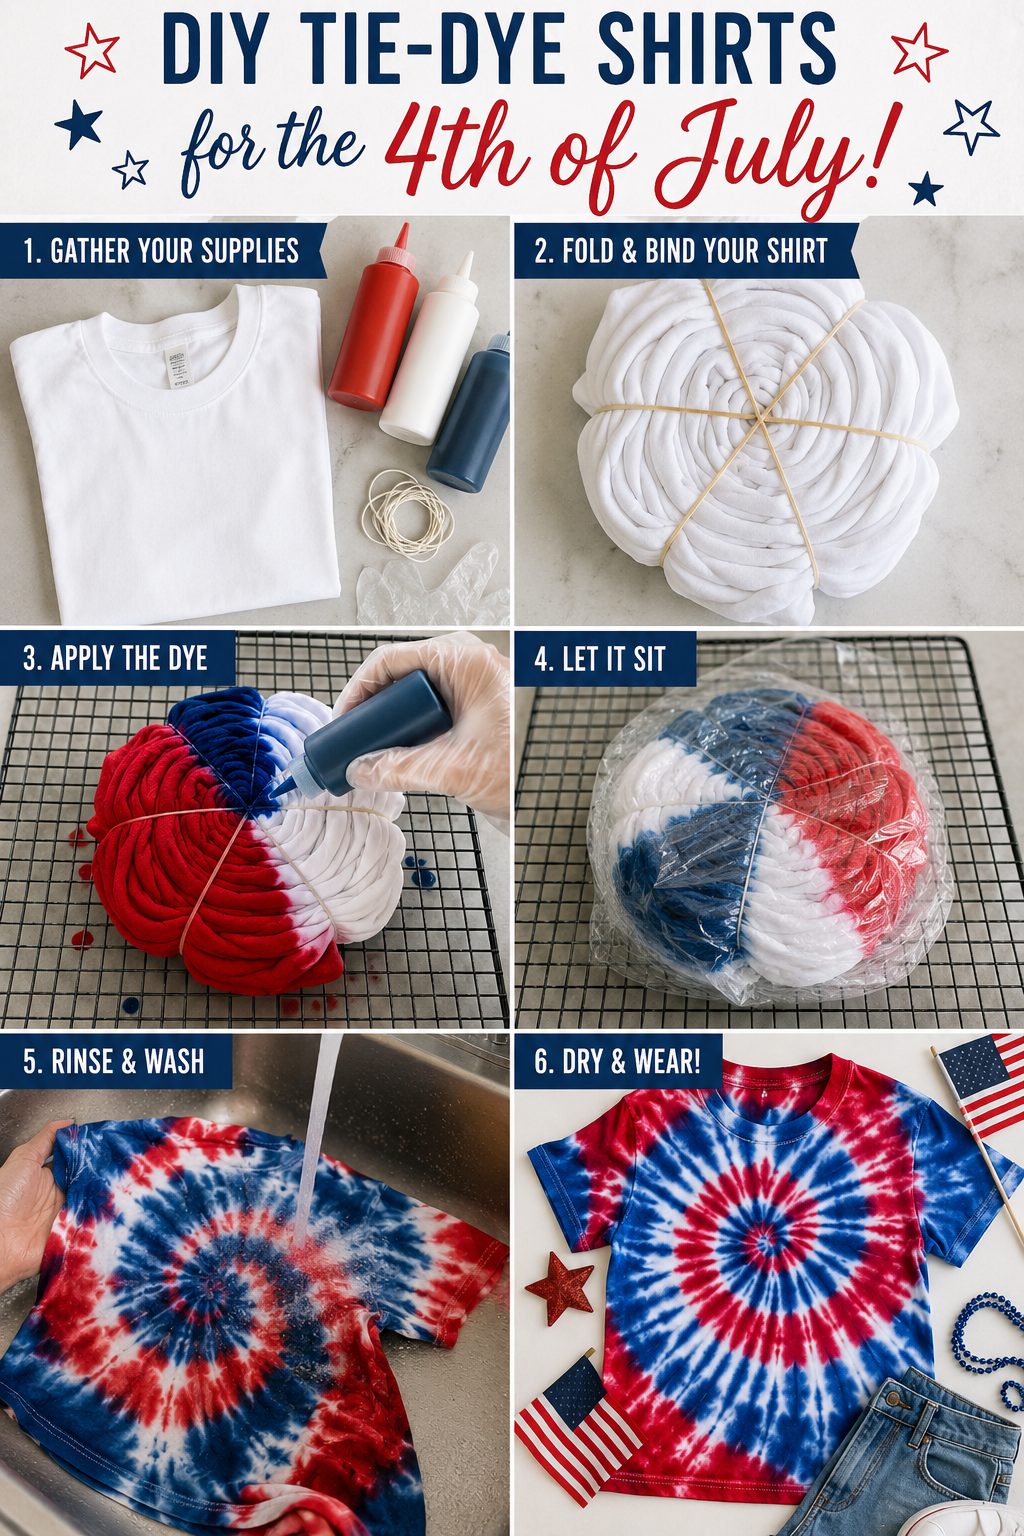
Step 4: Apply The Red And Blue Dye
Mix your dye according to the packet instructions.
Apply red dye to some sections of the folded shirt and blue dye to others, leaving a little white space between colors where possible. This is what gives the shirt that crisp red, white, and blue patriotic look.
Try not to oversaturate every inch of fabric. A bit of white space makes the finished shirt look brighter and more intentional. If red and blue mix too much, you may get purple areas, which can still look pretty, but it won’t have that classic Fourth of July feel.
For spiral shirts, alternate red and blue sections and leave one or two white sections untouched.
For scrunch shirts, add small bursts of red and blue across the top, then flip the shirt over and repeat on the back.
Step 5: Wrap And Let The Dye Set
Once the shirt is dyed, wrap it in plastic wrap or place it inside a sealable plastic bag. Let it sit according to your dye packet instructions. Most tie dye projects need several hours, and many work best when left overnight.
This is the part where impatient crafters suffer a little. I say that with love, because I am absolutely the person who wants to peek too early.
Step 6: Rinse The Shirt
Wearing gloves, remove the rubber bands and rinse the shirt under cold running water until the water starts to run mostly clear.
Then wash the shirt separately in the washing machine using cold water. For the first few washes, keep it away from light-colored laundry, unless you fancy giving your white towels a patriotic makeover too.
Step 7: Dry And Wear
Dry the shirt according to the dye instructions. Once dry, your Fourth of July tie dye shirt is ready to wear for fireworks, BBQs, parades, summer parties, or just lounging around feeling crafty and festive.
Creative Variations
Add star-shaped stickers or vinyl shapes to the shirt before dyeing to create a subtle resist effect. Press them firmly onto the fabric, dye around them, and remove them after the dye has set.
Use navy dye instead of bright blue for a more vintage Americana look.
Try cropped T-shirts, tank tops, toddler shirts, or even white cotton tote bags.
Make matching family shirts but use a different fold for each person. This gives you a coordinated look without everyone being exactly the same.
Use leftover dye on socks, bandanas, napkins, or pillowcases. CraftBits has a tie dye pillowcase project if you want to keep the fabric-dye fun going.
Tips For Better Red, White And Blue Tie Dye Shirts
Use less dye than you think you need. Too much dye can muddy the colors.
Leave white space between red and blue areas.
Pre-wash shirts before dyeing.
Use 100% cotton for the strongest color.
Let the dye set long enough before rinsing.
Rinse each shirt separately.
Wear gloves unless you want patriotic fingers for several days.
Keep paper towels nearby, but accept that tie dye is not a tidy craft. That’s part of the charm.
Can Kids Make These?
Yes, this is a great summer craft for kids and teens, but younger children will need help with the dye bottles and rinsing. Set up the shirts ahead of time, pre-fold them if needed, and let children choose where the colors go.
For a party or group activity, write names on shirt tags before dyeing. Once everything is wrapped in plastic, it is surprisingly easy to forget which scrunched-up blob belongs to which child.
FAQ
Can I use regular food coloring for tie dye shirts?
Food coloring is not ideal for cotton T-shirts because it usually washes out quickly. Fabric dye or a proper tie dye kit will give better, longer-lasting results.
How do I stop red and blue dye from turning purple?
Leave white space between the red and blue sections and avoid soaking the shirt too heavily. A little purple may still happen where the colors touch, but careful dye placement helps keep the design looking red, white, and blue.
Do I need soda ash?
It depends on the dye you are using. Some kits include soda ash in the dye mixture, while others require a separate soak. Always check your dye instructions before starting.
Can I make these shirts ahead of time?
Yes. These are perfect to make a few days before the Fourth of July. Wash and dry them before wearing so any excess dye is removed.
What else can I tie dye for Fourth of July?
Try cotton tote bags, bandanas, socks, pillowcases, cloth napkins, or picnic tea towels. Smaller projects are especially good if you’re crafting with kids or using leftover dye.
More CraftBits Ideas To Try
If you enjoyed this Fourth of July tie dye shirt project, have a look at our CraftBits tie dye effects guide for more folding ideas and fabric dye patterns. You can also try our bleach tie dye tutorial if you like reverse-dye techniques, or make a colorful tie dye pillowcase for a fun handmade bedroom update.


What do you think of this project? Let us know!