
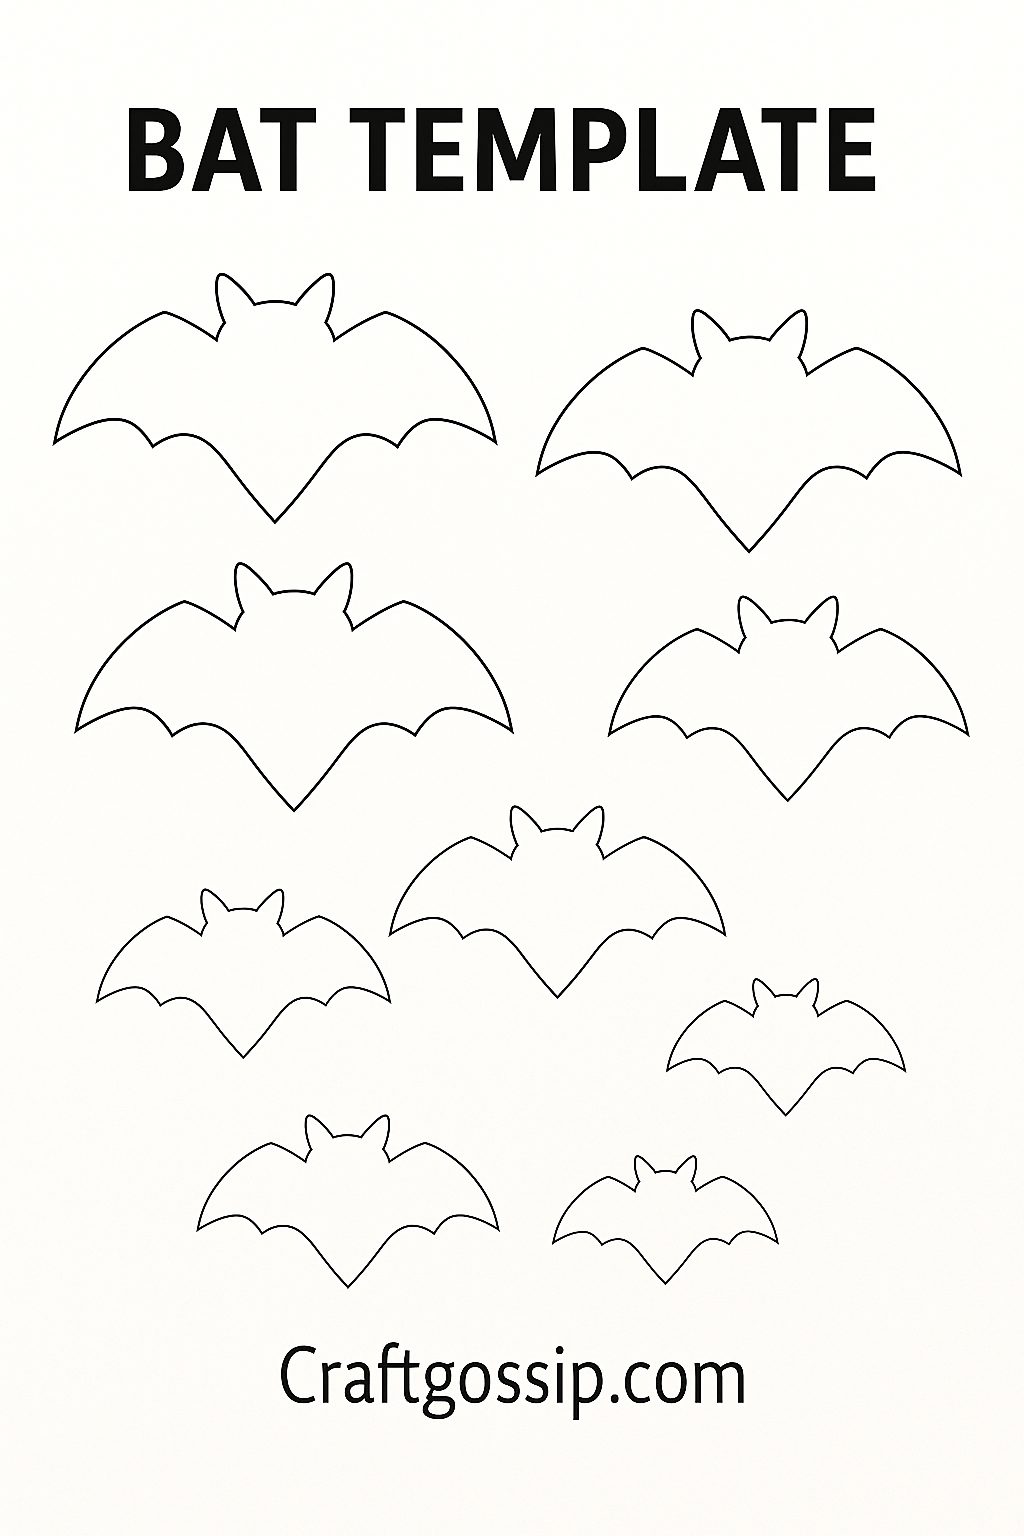
The best bit? It’s cheap, quick, and oh-so-fun to make. Plus, I’ve included a free printable bat template to take the guesswork out of cutting perfect wings.
Get more details about this project
What you need
- Branches or twigs — dried, curly branches look fantastic
- White acrylic paint (matte works best)
- Paintbrush or sponge applicator
- Black craft foam or thick black cardstock
- Scissors
- Googly eyes or stick-on gems/beads for eyes
- Hot glue gun (or craft glue if little ones are helping)
- Flower pot, vase, or bucket
- Floral foam or stones to anchor the branches
- Moss, shredded paper, or fabric scraps to hide the base
- Mini pumpkins or small Halloween props for extra flair
Instructions
Step-by-Step Instructions
Step 1: Gather and Paint Your Branches
Head outdoors and hunt down a few sturdy branches. Look for ones with multiple offshoots so you’ll have plenty of “perches” for your bats. Give them a shake to remove dirt and bugs, then let them dry out completely.
Paint the branches white with acrylic paint. You can go for a full coat for a polished look, or dry-brush lightly so some natural wood peeks through for a rustic vibe. Let them dry thoroughly before moving on.
Step 2: Create the Bats
This is where your free bat template comes in handy. Print, cut, and trace the bat shapes onto black craft foam or cardstock. Snip them out neatly.
Glue on googly eyes or gems for a cheeky expression. If you want a little dimension, fold the wings slightly inward at the body line so they look mid-flight.
Step 3: Assemble the Tree
Pop your floral foam or stones into your chosen container and stick the branches in firmly. Arrange until you’re happy with the shape. Cover the foam with moss, shredded paper, or a piece of fabric so it looks polished.
Step 4: Attach the Bats
Using hot glue or even tiny clothespins, attach your bats to the branches. Cluster some together and let others “fly solo” to mimic a real bat colony.
Step 5: Style the Centerpiece
Set your bat tree in the middle of the table and scatter a few pumpkins or spooky props around the base. If you want an evening glow, add a string of fairy lights woven through the branches, or tuck battery-operated tea lights around the pot.
Tips & Variations
- Glitter Wings: Add a bit of sparkle by brushing the wings with black glitter glue.
- Colored Bats: For a kid-friendly version, let little ones make bats in fun neon colors.
- Multi-Holiday Tree: After Halloween, remove the bats and reuse the branches. Add ornaments for Christmas, hearts for Valentine’s Day, or eggs for Easter.
- Outdoor Option: Use a larger bucket and taller branches for a porch decoration.
Why You’ll Love This Project
- Budget-friendly — Most materials can be scavenged from your backyard and craft stash.
- Kid-approved — Children can help paint, cut, and glue bats.
- Reusable — Swap out the decorations for different holidays.
- Impactful — It looks high-end, but takes less than an hour to put together.




What do you think of this project? Let us know!