
The autumn socks shown feature orange, cream and brown colours, with stripes, hearts and maple leaves. Using the sock legs keeps the non-slip grips on the soles out of your finished pumpkins.
Get more details about this project
What you need
Fuzzy fall socks like the orange, cream and brown designs shown
Polyester toy stuffing or clean stuffing reclaimed from an old cushion
Strong sewing thread
Sewing needle
Smooth, strong yarn or soft cotton twine for shaping
Scissors
Ruler
Small dry twig for each stem, approximately 4 to 7 cm long
Hot glue gun and glue sticks
Faux autumn leaves or felt leaves
Optional jute twine for decorating the stem
Instructions
Fuzzy socks are lovely for keeping your toes warm, but they also make surprisingly cute little pumpkins. Their soft texture gives the finished decoration a cosy look without needing to knit, crochet or cut out a complicated sewing pattern.
For this version, we are using autumn socks in orange, cream and brown. The stripes, hearts and maple leaves add interest, so you can make a small collection that coordinates without every pumpkin looking identical.
The socks shown also have non-slip grips underneath. Those are useful on your feet but less attractive on the side of a pumpkin, so this tutorial uses the leg section above the heel.
You only need a little basic hand sewing to close the bottom. After that, it is mostly stuffing, wrapping and adding a stem. A slightly wonky pumpkin is absolutely welcome here. Real pumpkins rarely look as though they were measured with a ruler.
Instructions
1. Choose Your Sock Design
Select the sock you want to use.
The solid orange sock gives a traditional pumpkin look, while the cream leaf and heart designs make pretty patterned versions. The striped sock adds another texture to a grouped display.
Check that the leg section is long enough to form a small stuffed pouch. Shorter socks will make smaller pumpkins.
If using previously worn socks, wash and completely dry them first. Check for holes or weakened fabric.
2. Cut Off the Leg Section
Lay the sock flat and locate the heel.
Cut straight across just above the heel, keeping the leg and cuff as one open-ended tube. Set the foot section aside for another project.
Check that the piece you are keeping has no non-slip grips on it.
If you prefer a completely orange pumpkin from the colour-blocked sock, you can also remove the contrasting cuff, provided enough orange fabric remains to form the pouch.
3. Sew the Bottom Closed
Turn the tube inside out.
Using strong thread, sew a running stitch around the cut edge, approximately 1 cm in from the edge. Catch the knitted fabric beneath the fuzzy surface rather than just the loose pile.
Pull the thread gently to gather the opening. Secure with several stitches and a firm knot, then stitch across any remaining gap.
Turn the tube right side out. The gathered seam will become the bottom of the pumpkin.
4. Add the Stuffing
Fill through the remaining opening with small pieces of stuffing.
Distribute it evenly and shape the pouch into a rounded ball. Aim for a plump but compressible shape rather than packing it hard.
Too much stuffing makes it difficult to create the pumpkin grooves and can stretch the knitted fabric enough to reveal the filling.
Press the gathered bottom slightly inward so the pumpkin has a flatter base.
5. Close the Top
Gather the open end above the stuffing.
Tie it securely with strong yarn or thread, then add a second knot. Check that the stuffing cannot escape.
Trim excess fabric, leaving approximately 2 to 3 cm above the tie. Do not cut close to the knot.
Fold this small fabric tuft down towards the centre. It will be covered when you add the stem and leaves.
6. Create the Pumpkin Sections
Cut a generous length of smooth yarn or soft cotton twine. It needs to wrap around the pumpkin four times, with extra length for tying.
Leave a tail at the top and take the yarn down one side, across the centre of the base and up the opposite side.
Bring it back to the top and repeat at a right angle to the first wrap. Add two more wraps halfway between the existing lines.
Four complete wraps create approximately eight sections around the pumpkin.
Pull each wrap just firmly enough to indent the stuffing. Keep the lines crossing at the same points on the top and bottom.
Tie the yarn securely at the top, then trim and tuck the ends beneath the fabric tuft.
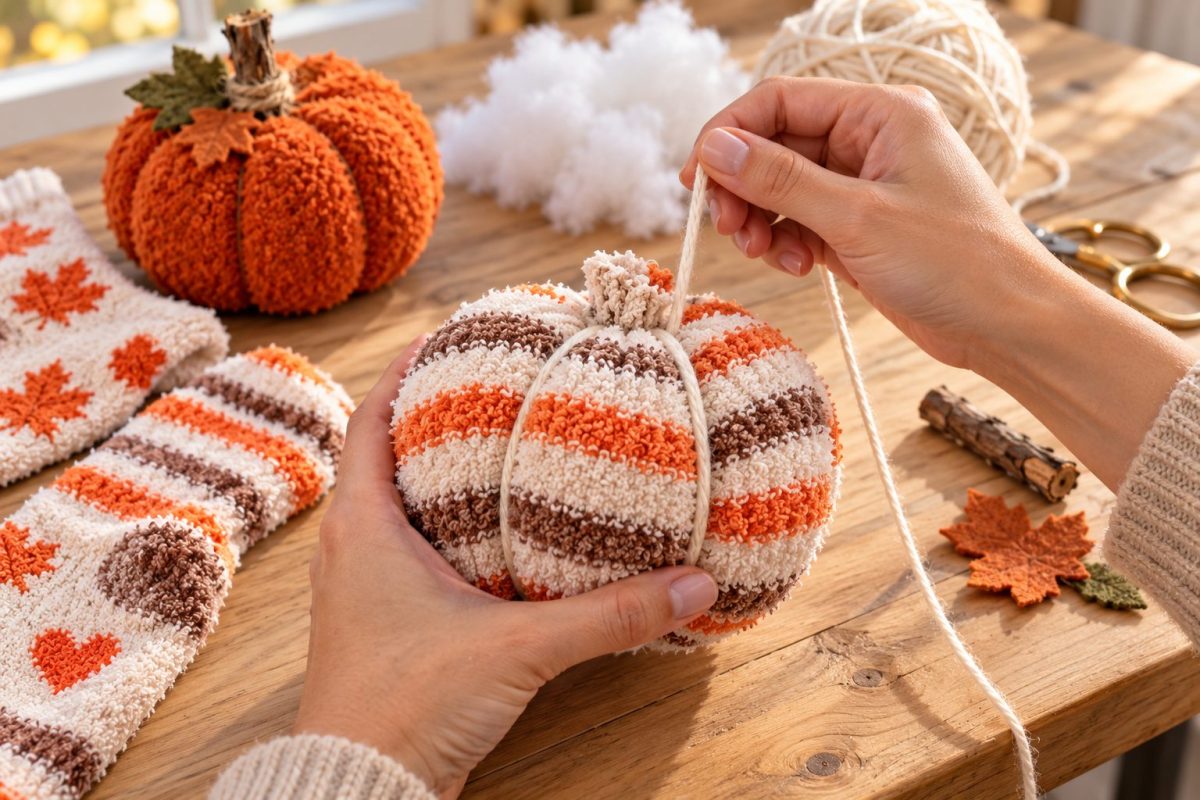
7. Adjust the Shape
Gently squeeze and redistribute the stuffing within each section.
Push the bottom centre inward slightly and check that the pumpkin sits steadily.
The fuzzy fabric may partially hide the shaping yarn, which gives a lovely soft finish. For clearer grooves, gently deepen the wraps without pulling hard enough to damage the sock.
Check that any leaf or heart motifs you want to display face towards the front. The pattern will distort a little as the fabric stretches and gathers.
8. Attach the Twig Stem
Choose a clean, dry twig with a reasonably flat bottom.
Apply hot glue around the folded fabric tuft at the top and press the twig into place, nestling it among the fabric folds. Hold until the glue sets.
Keep the stem short and light so it does not tip the pumpkin over. Avoid piercing a hole through the sock or loosening the gathered closure.
Wrap a little jute twine around the base of the twig if you want to conceal the attachment.
9. Add Leaves
Glue one or two faux or felt leaves beside the stem.
For the patterned socks, keep the extra decoration simple so the hearts, stripes or maple leaves remain visible.
An orange pumpkin looks lovely with a muted green leaf, while the cream pumpkins suit brown, rust or mustard leaves.
10. Style Your Pumpkin Collection
Make several pumpkins using different sock designs and slightly different amounts of stuffing.
Group them on a tray, mantel or shelf with a small vase of dried stems. The combination of orange, cream and brown makes an easy coordinated autumn display.
Keep them away from candles and other heat sources.
Helpful Tips
- Hide the grips: Use the leg section above the heel, rather than the foot.
- Catch the knitted fabric when sewing: Stitching through the fuzzy pile alone will not hold the closure securely.
- Use soft shaping yarn: Rough jute can catch on delicate fuzzy fabric. Save it for the stem decoration.
- Leave room for shaping: A slightly softer stuffed ball is easier to divide into sections.
- Check the motifs before cutting: Choose the section with the pattern you want to show.
- Keep the stems lightweight: Short twigs help the pumpkins sit steadily.
Storage
Store the pumpkins indoors in a dry place. Avoid placing heavy decorations on top, as this can flatten the stuffing and damage the stems.
These are decorative items rather than toys, especially once twig stems and glued leaves have been added.



What do you think of this project? Let us know!