What you need
4-ply worsted weight yarn* (orange)
Small amount of bright green yarn for the stem
Double pointed needles #6 and #8
Instructions
With orange and larger needles, starting with a single loop, which counts as a knit st, double cast on 36 (42, 48, 54) sts in (K1, P1) rib pattern on 3 needles.
Being careful not to twist sts, join by knitting the single loop at the beginning with the tail end of the yarn. This eliminates a bump at the joining.
Change to smaller needles and work rib pattern for 1 1/2 (2″ ,2 1/2, 3″).**
Change to larger needles and work hat pattern:
Rnd 1: [K5(6, 7, 8), P1] around. Repeat this rnd until total length is 3″(4″, 5″ ,6″) from beginning.
Decrease as follows:
Rnd 1: [(Slip the next st onto the tip of the right hand needle knit-wise and return it to the left hand needle, reversing the direction of the st on the left hand needle, then K2tog in back loop = SR2B). K to last 2 sts before P st, K2tog, P1] around 24 (30, 36, 42) sts.
Rnds 2 and 4: K all K, P all P around.
For small preemie only:
Rnd 3: (K2tog, P2tog) around -12 sts.
Rnd 5: K2tog around – 6 sts. Leaving a 6″ tail, cut orange and work stem.
For medium preemie only:
Rnds 3 and 4: Repeat rnds 1 and 2- 18 sts.
Rnd 5: (K2tog, P1) around -12 sts.
Rnd 6: as rnd 2. Leaving a 6″ tail, cut orange and work stem.
For large preemie only:
Rnds 3 and 4: Repeat rnds 1 and 2 – 24 sts.
Rnd 5: (K2tog, P2tog) around -12 sts.
Rnd 6: as rnd 2. Leaving a 6″ tail, cut orange and work stem
For newborn only:
Rnds 3-6: Repeat rnds 1 and 2 twice -18 sts.
Rnd 7: (K2tog, P1) around -12 sts.
Rnd 8: as rnd 2. Leaving a 6″ tail, cut orange and work stem.
Stem:
With green and smaller needles, knitting all sts onto one needle as you go along, K2tog around 3 (6, 6, 6) sts.
Next row: Slide sts to other end of needle. Bring the yarn around the back of the sts to the first st and knit all sts. Repeat for 5 (6, 7, 9) rows** or desired length of stem.
Next row: K2tog 0 (3, 3, 3) times.
Leaving a 6″ tail, cut green, thread on yarn needle and pull through remaining sts, gathering them tightly. (Congratulations! You have just made an I[diot] Cord. Very useful for bonnet and cap ties, purse handles, connecting mittens through coat sleeves, etc.)
Finishing:
Work needle through stem from top to bottom and pull on it gently, making the stem curve.
Secure end firmly.
Snug up orange and green ends tog where them meet on inside of hat to close any gap between the colors and knot them together.
Weave in ends.
Weave cuff end on the inside of the turn up.
Be on the look out for the Great Pumpkin and report any Charlie Brown sightings in nurseries!
* If anybody finds a source for reasonably priced sport weight yarns we can use (not wool), I could work up patterns for needle sizes #3, #5, #4 and #6.
**None of these measurements are carved in stone. Whatever looks right is OK!
This project was contributed by CareWear.org and was created by Cathy Gilroy Copyright 2003 for more volunteer craft patterns visit the Care Wear website.

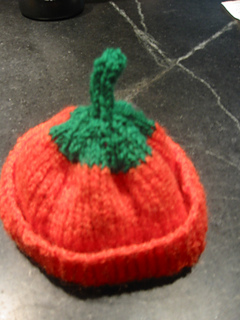
Img by Pumpkin hat by pcentor ![]() Flickr
Flickr


Cute!
Love the pattern. Am working on designing a mitten pattern to match, or similar.
This is a great pattern. I made it for age 4-8 sizes. Sure wish I could find a similar pattern for mittens.