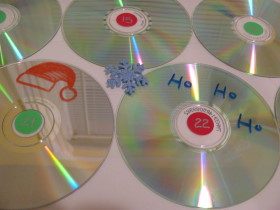
What you need
25 CDs
Round color coding stickers, green and red
Silver marker
Clear packing tape
Foam snowflakes
White glue
Dry erase markers in an assortment of colors
Instructions
This dry erase Christmas Countdown Calendar has just enough shimmer for the holiday season and is the perfect Recycled Christmas Craft Project.
There are a number of ways that you can accumulate the twenty-five disks needed for this project. In my house, no one ever throws out a CD or DVD. They all go into my collection for future craft use. If you’re really patient you can rescue CDs and DVDs from the trash bin by telling your family and friends to save their old unwanted movies, music, and computer programs for you. Another option, if you prefer to be thrifty, is to save them up by gathering free trial CDs from cereal boxes and store countertops where online services offer them free for the taking. If you don’t want to wait, you can buy a stack of brand new recordable CDs for about $5.
You’ll need a good-sized workspace to lay the project out. The good news is this is a no-mess project. A kitchen table is perfect.
Lay the CDs out, shiny side down, in rows to form the tree. Begin at the top with one CD. The second row has two. The third row has three. The fourth row has four. The fifth row has six. The sixth row has seven. And the bottom row has two. It’s helpful to align the top or bottom rows with the edge of the table you’re working on to keep them in a straight line.
Secure each CD to its neighboring CD with a short strip of packing tape. This prevents the disks from “jumping” out of place from the static of the tape when you’re trying to apply longer strips.
Now that each CD knows its place, secure each row with a long strip of the clear packing tape.
After securing every row, horizontally, vertically, and diagonally, flip the calendar over, shiny side up.
Before applying the round labels to the center of each CD, cut away the packing tape from the hole of the CD at the top of the tree. This will allow you to hang the calendar from a nail or a hook, if you choose.
Now apply a round labels to the center of each CD.
Using a silver marker, number each round label, beginning with number one at the top of the tree.
Use glue to apply a few decorative foam snowflakes to the tree.
Now you’re ready to hang your reusable, Christmas countdown calendar on the wall. You can simply hang it from a nail or a hook, or use Command adhesive strips for no-mess hanging.
Now all that’s left is to unleash your artistic flare. As you count down the day until Christmas, family members can draw something seasonal (a candy cane, holly leaves, a snowman, etc.) on each CD until they reach the top of the tree on Christmas.


What do you think of this project? Let us know!