
What you need
See article below.
Instructions
This is the second part of the Hemp cord Jewelry article that was first published here.
Part 3: The two main stitches
There are two main stitches used when making hemp jewelry, along with tons of different variations on those two stitches, which you will learn later. For now, we’ll just focus on figuring out the two main stitches. If you’ve seen hemp jewelry before, chances are you’ve seen both of the two main stitches.
The first stitch is the flat stitch. It’s used often in tight fitting jewelry, such as bracelets, anklets, choker necklaces, etc., because of how well it fits the skin when attached tightly.
The other main stitch is the spiral stitch. It looks great when used on a necklace in particular, as well as with many other kinds of jewelry.
The two stitches both follow the same general idea, and once you learn how to tie one, you pretty much know how to tie the other. Keep that in mind as you work through this guide, so you don’t have to go back and re-read instructions.
There’s also one other thing you should keep in mind before we begin. A tight stitch is a right stitch, if a rhyme helps you remember things better. If rhymes don’t help you remember though, just remember to tie your stitches tight. If they are loose they will be inconsistent and your jewelry won’t look very good.
Hemp is strong material; don’t be afraid to tug on it when necessary. The only time you have to worry about ripping the hemp string is if you’re using the 20lb stuff. There have been a couple times when I pulled too tight when tightening a stitch and snapped the cord in two. Other than that, pull the hemp tight, and your jewelry will look great.
Step One
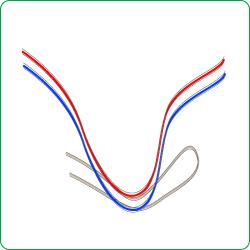
Grab the knotted Strings
First you will need to grab the knotted strings that we got all measured and prepared in the last section.
Step Two
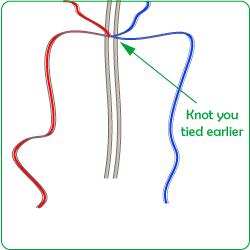
Line the strings out
Line the stings out on whatever surface you are using so that they are all traveling straight away from you. This will make it easier to tie the stitches.
Step Three
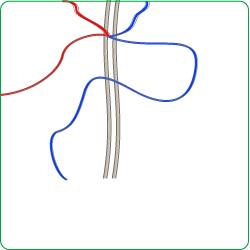
Tie the Strings
Now that you’ve got the strings all lined up, it’s time to tie. Grab one of the working strings, in this example, the one labeled in blue, and pull it over the two base strings, but make sure to leave a gap for later.
Step Four
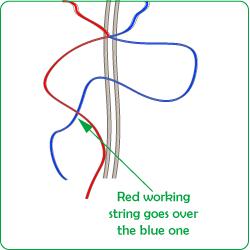
Overlap the strings
Grab your other working string (red) and make sure it is on top of the first working string (blue)
Step Five
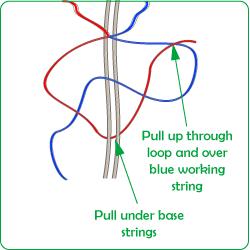
Pull the red string under
Pull the red working string under the two base strings and up through the loop made by the blue working string earlier.
Step Six
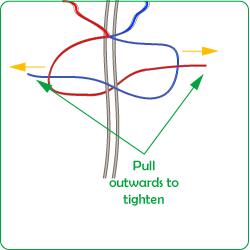
Pull tight
Pull tight, making sure you are tightening by stitch by pulling the working strings outwards, not towards you.
Before we can move on, there are some things you will need to keep in mind while tying the rest of your stitches.
The first thing to remember as you continue to tie your stitches is which side the stitch is going to be on. The best way to determine this is to look at the working strings. The working string that’s on the top of the base strings will indicate the direction the stitch is going to be on by pointing at it.
Take a look at the diagrams above as a reference. In these examples, the stitch will end up being on the left side, because that’s the direction the top working string—the blue one—is pointing.
Keeping that in mind, you can now take the necessary steps to tie either the flat stitch or the spiral stitch. Luckily for you, the two are practically the same thing.
The only difference between the two is the rotation that you tie the knots. For the spiral stitch, you keep tying the stitches in the same direction, whereas for the flat stitch you alternate.
Spiral Stitch
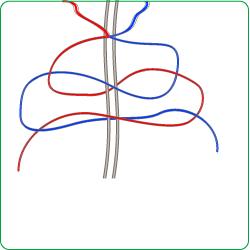
Spiral Stitch
For the spiral stitch, you will always start on the same side, resulting in you switching off with the “color” string you are grabbing. For example, if you tie your first stitch with the blue working string on top, your next stitch will be tied with the red working string on top.
If you’re making a necklace, or anything with a centerpiece, and you decide to use the spiral stitch, you should remember that it ties in two different spiral directions. So, instead of having the spiral go the same direction throughout the whole piece of jewelry, you can have it reverse at the middle, creating a symmetrical, mirrored kind of look.
Flat Stitch
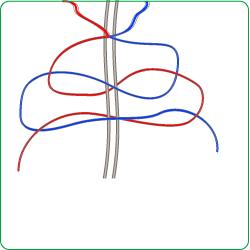
Flat Stitch
For the flat stitch, you switch off with the side you start on, resulting in you always grabbing the same “color” string. Look at the example on the right, the blue working string is always on top of the base strings.
Now that you know the two stitches, it’s up to you to decide how you want to use them! Don’t be afraid to use both in one piece of jewelry, variety is what makes each hemp necklace interesting and unique.
Part 4: Adding Beads
Considering how much of a role the beads play in the overall look of the necklace, it’s surprisingly easy to add beads to your jewelry. All you have to do is run the two base strings through the bead, and continue your stitches like normal. Careful not to accidently stitch the same side twice if you’re doing a flat stitch, it’s easy to get confused about which side the stitch is actually on with a bead because it doesn’t produce the visible stitch that you get with a “bald” length of hemp jewelry. With spiral stitched pieces, add the bead when it looks like there’s one more stitch for the spiral to have turned a full 360 degrees. If you add the bead after the spiral has already completed the full turn, the bead will end up either facing a little bit too much up, or a little bit too much down, depending on which direction you were stitching.
Part 5: Ending It
To end your awesome new piece of hemp jewelry you have a few options. You can either tie it, or if you want it to be removable you can end it using clasps or the bead and loop method. Tying it is probably the longest lasting of the three, but they’re all durable and long-lasting to begin with.
For removable jewelry I recommend using clasps. This method is more cost effective, keeps a lower profile, and you also don’t run the risk of having the end piece take the place of the centerpiece because it weighs the most, causing the piece of jewelry to spin until the ending bead is where the centerpiece should be. This generally isn’t a problem with standard necklaces, but I see it happen often with bracelets and chokers.
To assemble the clasp ending apparatus, you will need some small split rings (about a quarter inch), some end connectors, I use the crimp style ones, and a clasp setup, I prefer the barrel clasps. Once you work half of the clasp and one of the end connectors into the split ring, do it again with another end connector and the other half of the clasp and you’ll be ready to move on.
On each of the unfinished ends of your piece, tie an overhand knot about an inch from the last stitch. The gap between the last stitch and the knot is where you’ll crimp one of the halves of your ending apparatus. After you’ve done this on each side, make sure they’re crimped on tightly, then you can trim the excess hemp beyond the knot and…. YOU’RE DONE! Wasn’t so hard after all was it? For supplies and free instructional materials including bonus stitches, maintenance tips, instructional videos, shopping guides, and more, visit the website at hempwork.com!
Questions? If something was unclear in the tutorial, feel free to shoot me an email at contact@hempwork.com and I’ll be happy to help you out with whatever it is that you might be needing help out with!
Missed the first part? Get it here.
©2008 Zach Swinehart hempwork.com



Thanks for your great instructions. I’m planning
on making my son a few for his birthday. He
loves these necklaces.
great instructions! Thanx!
I Knew How To Do This- Thats Why I Thought It Looked Familiar! There Are 2 Other Designs Ya Kno. I Made Them Mi Self! I Took The Flat Stitch 5 Time Ad Then The Swirl Stitch 2 Timen Then Repet That Until It Fits Your Neck Or Wrist I Thought It Looked Really Kool:))
sorta hard 2 tell difference in spiral stich
It’s hard to tell if we start at the middle of the red and blue strings or the tops. And I had to tie the end to my big toe, to keep the strings straight, because the hemp is kind of stiff, doesn’t lay flat. like some thread may. I ended up starting at the middle of the red/blue and the top of the base string, or i’d have a short choker. Thanks for the info!
great instructions!!!!!!!!
great for a beginner
even though i already know how do do it, it showes you how very well.