
What you need
See article below.
Instructions
I start out by covering the supplies you will need to make Hemp cord jewelry (there aren’t very many of them), then move on to the actual stitching. I’ve broken the stitching technique into four parts: starting the piece of jewelry, learning the two main stitches, how to add beads, and how to end it. To make the whole learning process much easier and fun for you, I have included diagrams and easy to follow, step-by-step instructions for the stitching sections. With that, read on and you’ll be making your own hemp jewelry in no time!
Let’s get hempin!
Part 1: Supplies
Before we can get started on the stitching, there are a few supplies you will need. They can either be purchased individually or in a kit, whatever works best for you; I’ve got some great supplies and starter kits for sale on the website, (hempwork.com) I encourage you to take a look if you’re looking to buy supplies.
The first thing I’ll list, because it’s the most obvious, is hemp. Hemp can be purchased in many different weights and lengths, but for a good all around use hemp cord, I’d recommend a 48lb. ball; they usually come in 400ft. lengths and don’t cost much. If you go for the bigger or colored hemp, you’ll probably end up paying more money for fewer feet, and that’s no way to get started out!
You’ll need a good pair of scissors; you probably have some lying around the house, just use those. While hemp is quite strong, you shouldn’t have any trouble cutting it with a good pair of scissors household scissors. All I ask is that you don’t try to cut with safety scissors, if for whatever reason you were thinking you wanted to.
With those two supplies you can successfully make a piece of hemp jewelry. However, there are a few more things you’ll need if you want to make a great looking piece of hemp jewelry, so I’ll list those next. (I’m assuming you prefer a beautiful piece of jewelry to a mediocre one)
Beads are the most important of all of the “optional” supplies, because of the huge effect they have on the overall look of the piece. When buying the spacer beads—the beads that aren’t the centerpiece—be wary of the size of their holes. If you get a bead with too small of a hole, you can theoretically string fishing line through it and make it work, but it doesn’t look as good in the end, and I would strongly advise against it. There are millions of different beads out there; you’re bound to find some that you like that also have big enough holes. For centerpieces, murano foil glass beads, or other hand-blown glass beads look great with hemp jewelry. These beads can get expensive though, so make sure to shop around before buying. And hey, if you are looking for centerpieces, you always can find a wide range of beautiful and affordable centerpieces at hempwork.com!
Assuming, of course, that you are going to be using beads, I’d recommend a bead box. They’re inexpensive and they keep your beads safe. As much as we might like to tell ourselves that glass is really sturdy, the truth is that it’s not, and a bead box is a great way to prevent accidental drops or bumps of those fragile glass beads.
The last “set” of supplies that you have the option of using is the clasp ending apparatus. To assemble it, you will need a couple of split rings, a clasp of some sort, and a of couple end connectors. It might seem like a hassle at first glance, but it’s an inexpensive way to end your jewelry when you want it to be removable.
If you’re going to go with the clasp ending method, you’re also going to need some pliers, I’d recommend needle nosed pliers. You will be working with a small amount of metal, and normal pliers are a little bit too bulky for the task.
Part 2: Starting It
At first it’s kind of tough to get the thing started, but after you do it a few times it will become second nature. Just follow the steps and diagrams and you’ll be fine! Consult the chart at the end of the section if you want a general guideline on lengths of hemp to cut for various pieces of jewelry.
Step 1
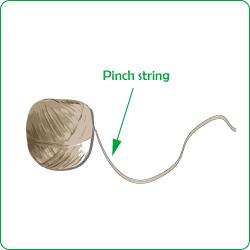
Measuring the Hemp
Measure a length of hemp that is appropriate for whatever project you are making. For example, if you are making yourself a necklace you would wrap the hemp around your neck and mark the spot where you want it to hang by pinching the string with your thumb and forefinger; if you wanted to make a bracelet you’d want to do the same thing, but on your wrist—you get the point.
Step Two
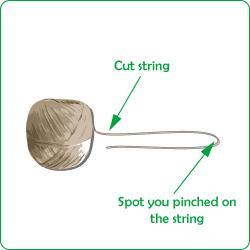
Cut the String
Double the length of the piece you measured out and add about one inch to the total length. Once you’ve done that you can cut the string and set it aside for now. This string will serve as the foundation for you to wrap all of the other strings around later. (Referred to as the base string)
Step Three
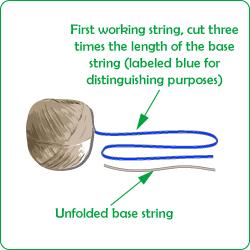
Cut the Working Strings
‘
Now that you’ve got the base string cut, it’s time to cut the working strings. The working strings are the pieces of hemp that you will be wrapping around the base strings to form the stitches.
Grab the base string you cut a minute ago and line it up with the slack from your ball, spool, or whatever source of hemp you may have. Once you’ve done this, measure a length of hemp from your source that is about three times the total length of the base string and cut; for smaller jewelry like bracelets and key chains, you may want to cut a length that is four or five times that of the base string, just to be safe.
Step Four
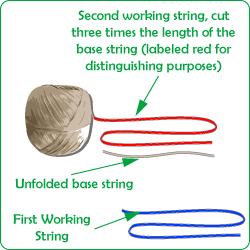
Repeat the Process
Repeat the process once more so that you have one base string and two working strings, each of which is three times the total length of the base string.
Step Five
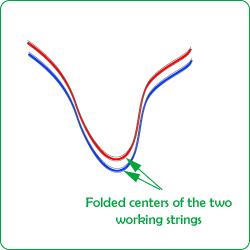
Line up centers
Now that we’ve gotten everything cut, we need to line them up at the center. The first thing to do would be to find the centers of the working strings. Since they are the same length, you can find the centers of them both at once to save yourself some time. Once you’ve done this, fold them in half and set them somewhere safe where they will be able to stay somewhat folded.
Step Six
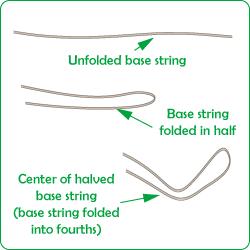
Folding into Fourths
As for the center string, we are technically going to be folding it into fourths. If you’re wondering why, remember back to when we doubled the necessary length. This was so we could have essentially two base strings for our jewelry; this provides a better foundation to work around.
Step Seven
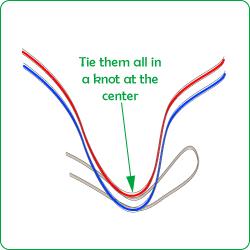
Tie them up
Once you’ve found the center of the doubled over base string, pinch it, and with your other hand grab the two working strings at their center. Line up all the centers of the strings and tie them in a knot so you don’t have to hold on to all of these strings anymore.
Feel free to consult the following chart as a guideline for how much hemp to use when making your jewelry. Note the part about it being a guideline; not everyone has the same sized limbs; it’s usually a good idea to have people measure out their own initial length of hemp to avoid disappointment. Think of this chart as something good to go off for the hemp jewelry that you’d sell on the spot at a booth in a craft show, as opposed to custom pre-ordered jewelry.
| Jewelry Type | Length of finished Jewelry | Base String Length | Length of Each Working String | Total Hemp Needed |
| Average Necklace | 17″ | 35″ | 105″ | 245″ a.k.a 20’5″ |
| Over-The-Head Necklace | 26″ | 53″ | 159″ | 371″/30’11” |
| Average Choker Necklace | 15″ | 31″ | 93″ | 217″/18’1″ |
| Average Bracelet | 7″ | 15″ | 75″ | 165″/13’9″ |
| Average Key Chain | 4″ | 9″ | 45″ | 99″/8’3″ |
| Average Anklet | 9″ | 19″ | 95″ | 209″/17’5″ |
In Part 2 of this Project, we will look at the two main stitches, adding beads and finishing it all off!
©2008 Zach Swinehart hempwork.com



Can any one give me easy to follow instructions on how to learn Macrame????
complicated, but you learn right(well sort of learn…)? that’s the point isn’t it