
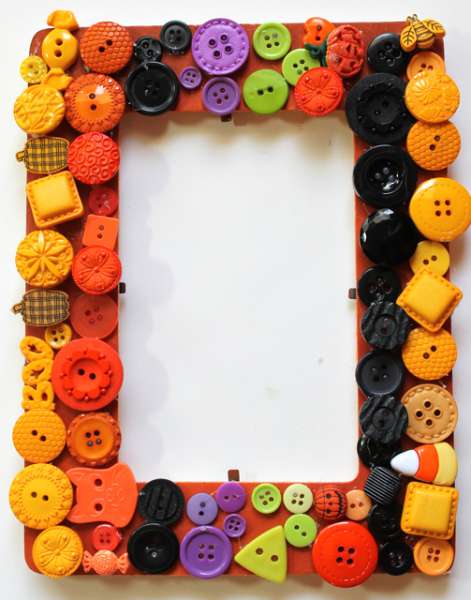
The wooden frame is painted orange before the entire front is covered with ordinary and novelty buttons. Creating separate colour bands gives the busy design a sense of order while still allowing plenty of texture and personality.
Add a favourite autumn photograph, Halloween costume picture or Thanksgiving memory when the frame is finished.
Get more details about this project
What you need
1 unfinished wooden picture frame designed for a 4 × 6-inch photo
Pumpkin-orange acrylic craft paint
Paintbrush or foam brush
Assorted orange buttons
Assorted yellow buttons
Assorted black buttons
Assorted purple buttons
Assorted lime-green buttons
Autumn or Halloween novelty buttons, optional
Hot glue gun and glue sticks
Low-temperature glue gun, recommended for supervised family crafting
Strong tacky craft glue, optional child-friendly alternative
Tweezers, optional
Wax paper or a protected work surface
Paper towel or clean cloth
4 × 6-inch photograph
Instructions
Buttons are ideal for decorating picture frames because their different shapes, sizes and textures create interest without requiring complicated techniques.
For this fall version, a plain wooden frame is painted pumpkin orange and covered with bands of colourful buttons. Orange and yellow provide the main autumn colours, while black and purple add a Halloween feel. Lime green keeps the finished frame bright and playful.
Standard sewing buttons work perfectly, but you can also include a few fabric-covered buttons or novelty shapes such as pumpkins, leaves and candy corn.
Instructions
Step 1: Prepare the frame
Remove the glass, backing board and any paper insert from the wooden frame.
Set these pieces aside in a safe place.
Check the frame for rough areas or splinters. Lightly sand them smooth if necessary, then remove all sanding dust with a clean cloth.
Protect the work surface with wax paper or a reusable craft mat.
Step 2: Paint the wooden frame
Apply an even coat of pumpkin-orange acrylic paint to the front and outer edges of the frame.
Use a small brush to reach the inner edge around the photo opening.
Allow the first coat to dry before applying a second coat if needed.
Paint the back only if it will be visible when displayed.
Step 3: Allow the paint to dry completely
Leave the frame until the acrylic paint is completely dry and no longer feels cool or tacky.
Do not rush this step. Hot glue applied over damp paint can soften or lift the painted surface, causing the buttons to pull away.
Follow the drying-time instructions on the paint container.
Step 4: Sort the buttons
Separate the buttons into colour groups.
Create piles of orange, yellow, black, purple and lime-green buttons. Set aside any novelty buttons you would like to feature.
Mix several sizes within each colour group. Larger buttons cover the frame quickly, while smaller buttons fill the spaces between them.
Remove buttons with sharp metal shanks unless you can safely cut off or flatten the shanks.
Step 5: Plan the colour bands
Lay the frame flat without applying glue.
Choose where each colour band will sit. You might place yellow across the top, followed by orange, black, purple and lime green around the sides and bottom.
The bands do not need to be perfectly straight, but each colour should form a visible group.
Place a few larger buttons first to establish the layout. Move them around until the colour distribution feels balanced.
Keep every button outside the photo opening.
Step 6: Attach the first row
Begin with one colour along the longest section of the frame.
Apply a small amount of hot glue to the back of the first button and press it onto the painted wood.
Continue adding buttons across the section. Place them close together and vary their sizes so the arrangement does not look too uniform.
Work with only one or two buttons at a time because hot glue sets quickly.
Step 7: Add the remaining colour bands
Move to the next colour and create another band of buttons.
Continue working around the frame, changing colours as planned.
Position large buttons first, then use medium and small buttons to fill gaps. Slight overlapping is fine and helps create the dense, layered appearance seen in the original project.
Use tweezers to position very small buttons safely between larger ones.
Step 8: Add novelty buttons
Place a few autumn or Halloween novelty buttons among the ordinary buttons.
Use these pieces sparingly so they remain noticeable. A tiny pumpkin, leaf, candy corn or fabric-covered button can become a focal point.
Check that novelty buttons sit securely and do not extend too far over the outer edge or into the photo opening.
Step 9: Fill the remaining gaps
Examine the frame from several angles.
Add small buttons wherever the painted surface looks noticeably bare. You do not need to fill every tiny space, but the border should appear full and balanced.
Make sure no buttons prevent the glass or backing board from fitting correctly.
Step 10: Remove glue strings
Allow all the glue to cool and set.
Carefully pull away visible strands of hot glue. Tweezers can help remove fine strings from between closely placed buttons.
Do not use a heat gun or hair dryer to remove glue strings, as heat may soften the adhesive and acrylic paint.
Step 11: Add the photograph
Clean the glass before returning it to the frame.
Insert a 4 × 6-inch autumn photograph, Halloween picture or seasonal printable.
Replace the backing board and secure it according to the frame’s design.
Stand or hang the frame where the dimensional buttons will not be knocked or crushed.
Child-Friendly Gluing Option
Hot glue provides the quickest and strongest hold, but it should be handled by an adult.
For children completing more of the project independently, use a strong tacky craft glue. The buttons may need to be held in place briefly, and the frame should remain flat until the glue has dried completely.
Avoid ordinary school glue, as it may not hold heavier buttons securely.
Design Variations
Use rust, mustard, brown and olive buttons for a traditional autumn frame.
Create a Halloween version with black, orange, purple and green.
Use only neutral wooden, cream and brown buttons for farmhouse décor.
Arrange the buttons randomly instead of creating colour bands.
Add a family name or short wooden word embellishment along the bottom.
Change the colours to suit Christmas, Easter, birthdays or other seasonal photographs.
Safety and Care
Hot glue can cause burns. An adult should operate the glue gun when children are participating.
Buttons and novelty embellishments are small parts and are not suitable for children under three years old.
Display the frame indoors and keep it away from moisture and direct heat.
Dust the buttons gently with a soft, dry brush. Avoid soaking or spraying the frame with cleaning products.
Check occasionally for loose buttons and reglue them before they fall.
![button_frame_(4)[1]](http://craftbits.com/wp-content/uploads/2013/09/button_frame_41.jpg)
![button_frame_(5)[1]](http://craftbits.com/wp-content/uploads/2013/09/button_frame_51.jpg)
![button_frame_(7)[1]](http://craftbits.com/wp-content/uploads/2013/09/button_frame_71.jpg)



What do you think of this project? Let us know!