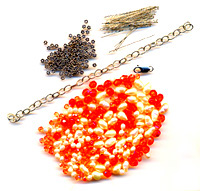
What you need
7-8″ large link sterling chain
1 large lobster clasp
1 100pc package of 1 1/2″ thin headpins
Assorted beads: 200-300, including spacers
Tools required:
Chain-nose plier
Round-nose plier
Wire cutter
Instructions
Step 1 – Attach clasp to one end of chain.

Step 2 – Add 1/2″ of beads to headpin.

Step 3 – Grip headpin wire with the tip of the chain-nose plier just above the beads and bend to a 90ý angle.

Step 4 – Using the round-nose pliers turn the wire up and around to form a loop, bringing the wire back to a right angle.

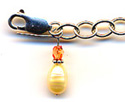
Step 5 – Slip the loop into the link of the chain.
![]()
Step 6 – Using the chain-nose plier, hold loop and wrap the wire several times around until it reaches the base of the bead. Remember to keep the wire at a right angle while wrapping. This will ensure an even coil.

Step 7 – Trim excess wire, and tuck the end down with the chain-nose plier. This can be tricky – use the tip of the plier on the tip of the wire and gently press into the direction of the coil.

Step 8 – Repeat the process until desired fullness is achieved. Usually 2 dangles from each chain link.


This project was contributed by Beadstudio.com Visit their website for beading supplies, projects, classes and articles


What size chain did you use for your sample? In other words, what size in milimeters is each link? What mm size lobster clasp? I’m just getting started doing this type of work and have a hard time judging sizes yet. Just what is “large” in this case?
Looks lovely and would love to try it!
Thanks!
the instructions are soooooo easy to follow!!! mine was a lot less thick because i was getting inpatient with it! but thats just me, it was so fun! 🙂
the instructions are soooooo easy to follow!!! mine was a lot less thick because i was getting inpatient with it! but thats just me, it was so fun! 🙂
its so unfair!! you make every thing look so easy but when i try it its so hard! Thanx for the great ideas though!!!!!:):):):):) your ideas+my crafting skills=the perfect present!!!!!!!!!!!!
this is >so< pretty... but it took hours to get all the charms on! it is really fun to do with friends because you can talk and it makes the time go faster... but other than that it is really great:)
Thank you. You make it so easy! I have been struggling for quite some time to do this correctly. You make everything very simple and understandable
Wow! this looks so easy! i’m going to make one right now!
omg i love this project!!i’m thinking about making 1 for my mom’s birthday. the supplies seem expensive though…
Very nice but you would need a heap of patiance to make all them charms! Maybe think of a way to get the charms on in one whole movment like snakeing the wire & adding beads as you go. That would make it less fiddly time consuming & complicated
Good tho!
I love it’s looks, but having to make like a million charms would drive me nuts!!!
wow..it is really nice bracelet.i loves the beads!
it looks great and easy too. i luv the colours as well! 🙂
this is beautiful 😀
I love it! The colours are pretty to . Really easy to make
Love the look. a bit complicated.
these are what i call ” busy bracelets” ’cause you can fidget with them for hours! i have a “busy ring” in which i twirl the beads, curl the ring’s colorful ribbons, and shake the maracca-like center. cool project:) thanx
A bit too busy for my taste… neat though.
very nice!
very good. luv it. both stylish and easy.
love it
I am so impressed with how simple this is, yet how involved it looks..can’t wait to try it!
this is really cute!!good stocking stuffer!!love it love josie
I’M NEW AT THIS HOBBY, SO I WOULD LIKE TO MAKE THIS BRACELET. GOOD INFO. THANK YOU