
The finished pattern fits most people. Use a variety of yarn to make this suitable for the person you are knitting for. We have suggested the use of a colorful yarn and the picture that goes with it shows the finished beanie.
What you need
Around 100 yards of bright colored worsted weight yarn or 8 ply (self-striping yarn or make stripes from your stash)
Pair of size 9 US (5.5 mm) knitting needles
Yarn needle for sewing up
Instructions
This basic knitted beanie pattern is the perfect project for knitters of all skill levels, including beginners. It’s a simple and easy pattern that can be finished in just a few hours, making it a great option for a quick and satisfying project.
The finished beanie is designed to fit most adults, making it a versatile and practical accessory.
One of the great things about this pattern is that it can be made with a variety of yarns, which makes it suitable for the person you are knitting for. You can choose a yarn that is warm and cozy for cold winter weather, or a lightweight yarn for milder temperatures.
You can also use different colors of yarn to make the beanie suitable for different occasions.
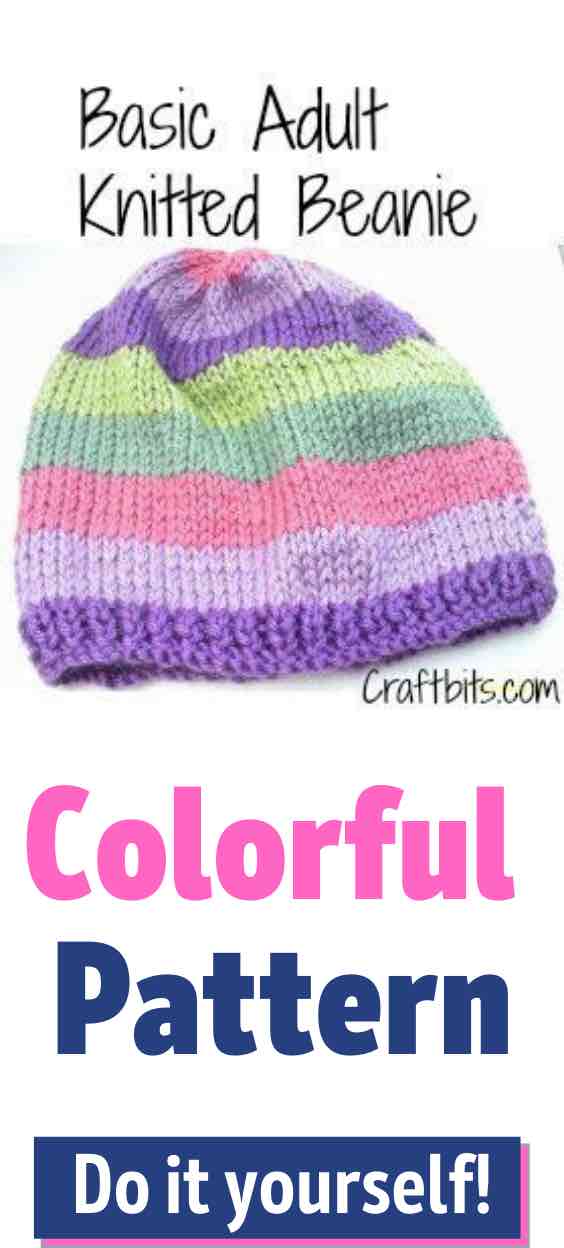
The picture that goes with this pattern shows the finished beanie made with a colorful yarn, but you can use any color or yarn you want.
Things to look out for when knitting a beanie
When knitting an adult beanie, there are a few things to keep in mind to ensure that your finished product turns out just right.
- Gauge: Make sure to check the gauge of your knitting before you start your beanie. Gauge refers to the number of stitches and rows per inch, and it’s important to match the gauge specified in your pattern or to adjust your needle size accordingly.
This will ensure that your beanie fits properly and doesn’t end up too loose or too tight.
- Yarn weight: Choose a yarn that is appropriate for your project. Yarn comes in different weights, from lace weight to bulky weight. For a beanie, you’ll likely want to use a medium or worsted weight yarn that is soft and comfortable to wear.
- Needle size: Use the appropriate needle size for your yarn weight. Your pattern should specify the recommended needle size, but you can also refer to the yarn label for guidance.
Using the right needle size will help you achieve the correct gauge and ensure that your stitches are the right size.
- Ribbing: Many beanie patterns start with a ribbed brim, which creates a stretchy and snug fit around the forehead. Make sure to knit your ribbing tightly to prevent it from becoming too loose over time.
- Shaping: Pay attention to the shaping of your beanie as you knit. Most patterns will instruct you to decrease stitches gradually at the crown of the beanie to create a tapered shape. Be sure to follow the pattern carefully and keep track of your stitch counts.
So, grab your yarn and needles and get ready to create your own cozy and stylish beanie. This pattern is a great way to learn how to knit, or to make a practical and thoughtful gift for a loved one. With this easy and quick pattern, you’ll have a new beanie to wear in no time.
Start here
Cast on 74 sts.
Work in k1, p1 ribbing for 6 rows.
Work in stockinette stitch (knit 1 row, purl 1 row) until piece measures 7 inches (18 cm) from cast on edge, ending with a purl row.
Next row, k2tog across. 37 stitches remain.
P 1 row.
K2tog across, ending k1. 19 stitches.
Cut a 12″ (30 cm) length of yarn and thread it on a yarn needle.
Carefully pull the last row of knitting from the needle and thread the needle through every stitch. Pull tightly then whip stitch the seam shut.
Add a Pom Pom or flower to the beanie if desired and it is complete.
You might be interested in the rest of our Knitting projects.


The same amount of stitches would be used for circulars. I change almost every pattern I can into circular knitting, because I hate sewing the seams!
If I use circular needles do I just keep knitting – not end the row? I would like to avoid seams also so that seems like a good idea – just not sure how to do it. Thanks in advance for any info.
I have the same question
How do you knit this beanie on regular needles?
Don’t you need circular needles?
You are knitting it on straight needles, the finishing instructions say to whip stitch the hat to seam it.
I accidentally cast on 71 stitches instead of 74 can the extra stitches be added pn the stocking stitch section?
Aine, since there are only 3 stitches left out, yes you can add them evenly as you start the stocking stitch section.
Have left a comment. Lost the connection. Just want to leave my email now. Thanks again !
Hi, having a little difficulty knitting. Recently had a stroke . Trying to finish the beanie. Do I actually cut of the 12″ string off?
No, you’re using the 12″ tail to run through the stitches to close up the top of the hat, then you’ll use that tail to stitch up the seam.
Thankyou so very much for sharing !! Love it. Am on my second beanie. Using a variety of yarn, just perfect. This pattern gave me confidence to keep making hats. The children at school will love them , the colours plus it will help to keep them warm. Thankyou for your generosity.
I knitted this hat in the round on circular needles. It was much faster and then you do not have to finish a seam. I finished the top using double pointed needles (dpn’s) to decrease the stitches . Once the last row is finished, cut the yarn about 20 ” long, thread a yarn needle and pull through all stitches left on the knitting needles. Pull securely to close the gap at the top of the hat. Weave the tail of this yarn through the wrong side stitches. Super easy. Made these for a charity project.
Laura, did you cast on the 74 stitches per the pattern on your circular needles? Or did you have to adjust the number of stitches for the circulars?
I have made this pattern any number of times with all colors: solids, stripes, ombres, whatever as chemo caps. As long as the yarn is soft and washable it will do. Color choices will make the difference for male or female. Patients sleep in the chemo caps rather than in scarves or wigs, and that is the reason for the softness and the washability. I then donate the caps to the local hospital or Gilda’s Club. Keeps my hands busy and uses up my bits and pieces of yarn.
Are you all from USA? I’m in the UK so do I use UK 8 (4mm) and can I use DK (double knitting wool)?
The UK equivalent needle is a 5 and your yarn equivalent would be an aran yarn.
Thank you Lisa, I’ll have a go at knitting it when I come back from buying some Aran wool (yarn) 🙂
Yes, we are from USA and U.K. SIZE 5 is EQUAL to our size 9 ( I checked the chart online ) The Aran weight yarn is a little thicker but it would still work out nicely ! Hope that helps ! – Mimi
Yarn in Britain goes from dk to aran weight, so the aran weight would be the nearest equivalent to our worsted weight.
I was thinking of making a version of this hat for my dad, do you think it will fit a grown man, or would you suggest casting on exrta stitches, if so how many? thanks
Nice and easy. Very cute!!!!!
Would these instructions fit a person who has a head with a 24 inch circumference
I am absolutely baffled with the ease of this pattern. Can’t believe I actually made it and it turned out to fit me as well. Will make more for the rest of the family as well. Thank you so much!
When I first started knitting this was the first pattern I ever used, I’ve now made three beanies using this pattern and will continue to make more. I love it! I use 5mm needles and 8ply yarn and it comes out perfect!
I use thicker yarn (bulky or super bulky) with size 13 needles. Cast on 40 stitches and total length is closer to 9 inches tall. It’s so fast and I love that I don’t need circular needles. Everyone in my family got a hat for Christmas this year! Thanks so much for this!
Bigger yarn and needles would be great but I have no idea how to adjust the pattern. Do you have the pattern adjustments for it written down? ?
Pattern is the same, you just cast on 40 stitches instead of 72. When it measures 9″ is when I did the decreasing.
I used size 8 needles and followed the directions exactly. Hat is perfect for my son-in-law. For my granddaughter I used size 8 needles, cast on 66 stitches and started decreasing after 6 inches. Made a 5-petal flower with a cute button in the center and sewed it slightly off-center in front. Adorable! Just finishing a striped one like the picture for my other son-in-law. Thank you for this easy knitted hat pattern.
If you follow the same pattern, can you make this hat with 4 ply wool and 3.75 mm needles? It might be a stupid question but I’m pretty new to this and those are the materials I have.
I’m totally confused…the pattern I’m looking at says K1 P1 ribbing. What is everybody else looking at that indicates K2 P2 K2? The photo with this pattern also clearly shows K1 P1 ribbing. It also says to use size 9 needles – but I see others talking about size 10, size 8.
Are we talking about two different patterns???
Yes Shannon. The pattern was revised.
I began doing what the pattern said, but it didn’t seem right , the ribbing was not looking like it should. So I tried it vice -versa p1 k1 till I made the six rows and the ribbing is like it should be.
That’s definitely K1 P1 for the rib.
I’m a beginner and only have 4mm needles. How many stitches should I use?
Ummm, the pattern sys, k1 p1 for 6 rows. Where are you peopl getting the k2 p2 from?? I’m totally confused.
If you look at the date when the knitters were talking about k2 p2 in the pattern , it was last year they had revised this pattern because whom ever wrote this pattern had too many errors with it ! Hope that helps !
How would I make this child size I’m looking for a hat pattern for my 2 girls on straight needles
If you google Basic child knitted Beanie , there is a child basic pattern on Craftbits.com . The patterns is for 3-9 years old using size 10 straight needles with worsted weight yarn and casting on 60 sts. I would recommend reading the comments that people wrote who actually finished that pattern! Hope that helps !
I’m new to knitting too & need some help with how to get the stitches on the yarn needle & how to whip stitch it together. Any advice would be great as I’m so close to finishing my first knitted hat!! Thanks v much!
You can google, How to remove a hat by Kelly Dolan . She shows you in the easiest way to put your finished hat on a yarn needle . She also has videos to sew up a hat as well !! Very simple, easy to understand ! That’s how I learned to finish my first hat too ! Hope this helps
I’m wanting to knit a shallower beanie it’s for a fancy dress outfit of ABBA do I knit fewer cast on stitches and start decreasing sooner
You are not putting any stitches on the yarn needle. what you will do is thread the yarn needle with the working yarn, and push the yarn on the needle through each stitch as you remove it from the needle, after all stitches are on the yarn, you will pull to secure to gather the hat at the top. Working from the wrong side, you will sew (whip stitch0 the seam together, darn in you ends and you are finished your first hat. Congratulations.
What adjustment would you make if using circulars?
the basic beanie hat is lovly but can i knit it in cotton ladies size on straight needles and how many sts. would i need to cast on.
Would love to try this new pattern but need the directions for a child size-child is 9 years old-any suggestions on how to do this. I would appreciate it very much. Thank You.
Hello are the Kim from southold
I LOVE THIS SIMPLE PATTERN I DID IT WITH A CARRIBEAN WOOL VANNA S WOOL SO PRETTY AND SIMPLE THX
Can you please list a gauge so that the finished size is perfect?
If you use 4 worsted weight yarn , with size 8 straight needles , using 74 stitches it should work out fine. I used red heart with love yarn which made my finished hat fit my head size 21 in a half and my mothers head size which is smaller. I hope that helps!
Bit confused….pattern calls for size 9 and above info on gauge calls for size 8. If you get a chance, I would also like the gauge as I’ve started it and don’t know if it will fit…Thanks so much – love the finished beanie!`
The problem with trying patterns on a site is that every knitter has different tension when they knit ( some knit tighter stitches than others ) and it tends to throw off the gauge . I’m a tighter knitted so I went down a size needle. If you used a size 9 or 8 needle you can’t go wrong with a beanie hat . It’s better for that hat to be a little loose than too tight! Just make sure your careful on how long you make the hat . With the hat still on the needle , measure it against your own head and then you can decide how long you need to make it ! Hope that helps !
I knitted the hand in the round on a 16 inch circ sz 9 needle worsted weight yarn. It turned out perfect!
How did you end it at the top in the round?
Could this pattern be used on round needles? If so, what adjustments would be made?
We have made several changes to this project based on feedback and the issues have been fixed. Thank you to everybody who helped and commented!
I have just knitted this hat and had no problems at all. Easy simple knit that looks fab.
Way too big at 10 inches but easy to do.
How do you decrease? I don’t really understand that part.
Where it says K2 it means knit 2 together, so instead of sliding your needle through 1 stitch you slide it through 2 and knit them together
I just finished making this basic adult beanie hat using worsted weight yarn size 10 needles casting on 72 stitches ( because I started with 74 but the k2 p2 across the row didn’t end with a p2 ) following the directions until hat is 10″ . It came out horrible !! Too big and awful ! I made baby hat – no problem ! I would not go with this pattern ! I will look for another pattern to make!!
It isn’t K2 P2 across. It’s K2 P2 K2, repeated. That leaves you with 2 stitches, and you do those P2. I struggled with this for hours before my Mom helped me figure it out. K2 P2 K2, K2 P2 K2…etc.
So sorry for yet another post..pattern states to k1, p1 for ribbing and above post states k2, p2 for ribbing – which is correct..Thank you!~
I had the same problem sand I redid it a dozen times with the same outcome so I actually add 2 stitches to make it come out right
You don’t need to add or subtract anything. It is {K2 P2 K2}, repeat until there are 2 stitches left, P2. It isn’t K2 P2.
I did cast 74 stitches and followed the pattern going across as follows k2 p2 across the first row and you do end on a k2 stitch! I read the reviews and SLOWLY followed it and that’s what it came out to. I’m going to start again with only 72 stitches so that the pattern will come out right.
I am new to knitting too, wondering how much to decrease also…please help
I haven’t knitted since I was a child, long time ago. Very easy pattern to start me off again. Cheers 🙂
I just did 6 rows and had to undo them as it definitely needs to be either adjusted down to 72 or up to 76 to end up with a ribbed pattern, I wish I’d read everyone else’s comments first 🙁
I have made 4 following thepattern and had no trouble
I think the pattern would be better written as Row 1: *K2, P2, K2*, repeat 11 times, P2.
How many times do I decrease? Until I don’t have any more stiches left. I am new to knitting and reading patterns.
I have made one had to use 5-5 needles as i knit very loose but. It is very good pattern
Just found this pattern and made it this weekend. Super quick, looks great, and an easy hat for beginners 🙂
If you do it as Amanda says… you do alter what the patterns says because you will have 2 K2 next to each other and it doesn’t say that in the pattern.. so if you do follow as the patterns says you will not end on a P2 with 74 sts
If you do it as Amanda says… you do alter what the patterns says because you will have 2 K2 next to each other and it doesn’t say that in the pattern.. so if you do follow as the patterns says you will not end on a P2 with 74 sts
It says K2 P2 K2 across ending in P2. The P2 is the end of the row. Yes, there are knit stitches together, but if you follow the pattern ( K2 P2 K2 across ending with P2), each row is 74 stitches.
I am sorry to disagree with you on the adjusting part. I just plotted it out and you DO need to make an adjustment of 2 stitches. If you count the K2, P2, K2 as 6 and then time by 12 you do end right, however, your next set would be P2, K2, P2 and end at stitch 72 as a P2. You need to be able to make the count divisible by 4. K2, P2 times 18 equals 72 stitches to end correctly with P2. I do love this pattern. Thanks for putting in out available for us to use.
If you do this pattern the way it is written, it is K2 P2 K2 (12 times) which leaves 2 stitches. The pattern states to make the last 2 stitches P2. This pattern is basically done in the round, in that each “row” starts with K2 P2 K2. It is not a continuous thing. EVERY row (rows 1 through 6) starts with K2 P2 K2 and ends with P2. If you do it the way I just said to, it follows the pattern. No adjustments need to be made, no adding or subtracting stitches.
I co 74 sts and did the first row as directed but I end up with k2 instead of p2 what am I doing wrong?
To end a k2p2 row with p2, you need to co stitches at a number divisible by 4, which 74 isn’t. In order to make it work, you need to add or subtract 2 stitches. When I did it, I co 72 stitches and it worked fine. I am unsure why the original pattern says to co 74 when it also specifies ending with p2. Very confusing.
No, you don’t add or subtract anything. If you follow the pattern correctly, the round ends in P2. Think of it this way: *K2 P2 K2*, repeat from * until 2 stitches are left, P2. That is 74 stitches.
But surely that would leave you with p4 at the end?
No, you do 12 sets of K2 P2 K2 (total of 72 stitches), which leaves 2 stitches. Those last 2 stitches are P2. Trust me, I did it (and undid it) so many times I wanted to set it on fire lol. I called my Mom, she did a row and it came out wrong too. She asked me to read the instructions to her, then read them again. I was doing (as I assume everyone was) K2 P2 through the row. It’s K2 P2 K2, 12 times, which leaves 2 stitches for P2, for a total of 74 stitches.
Ohhhh I see now! That makes sense. Nice to see I wasn’t the only one confused haha.
If you guys are having so much trouble with the last 2 stitches.. just knit them or purl them.. or go back to knit one, purl one ribbing.. sometimes you just have to adjust ….not all patterns are perfect.. so you fix them. I have many patterns that I have adjusted for what I need them for and it works for me…
I think the point is that you don’t have to do any adjustments.
What is the gauge for this hat pattern?
why can’t i print it properly without changing download i already have pdf dorothy
Did you knit with size 10 needles?
Would anyone know how to alter this pattern to produce a toddler hat? It’s probably obvious but I’m just starting out and not too sure.
Thanks
MRS G.. I HAVE A PATTER FOR A NEWBORN AND ONE FOR KIDS.. IT IS KNTTED.. IF YOU WOULD LIKE THEM LET ME KNOW AT homelesshazel1@yahoo.com
I knitted this pattern, I used 76 stitches for it to come out at the end of the row p2. The length of the hat from ribbing to end of 10 inches is to long. It makes the hat to big. Will try another one and cut down the length to 7 or 8 inches. It is a very easy pattern to do and I really like it, and will change some of the stitches to make it fit. Thanks
Thank you sissy, I couldn’t figure out how to end with a p2 for the life of me with the 74 stitches. so is 76 stitches to long also? would you have cut back to 72 for instance? any help would be appreciated. Peggy
Actually, it should only be 74 stitches. It’s K2 P2 K2 – K2 P2 K2 – K2 P2 K2 etc, (basically K2 P2 K4 P2) last stitch will be P2. Took me a while to figure it out.
yes I had to undo it a few times till I worked it out
Ugh that was totally confusing lol. I meant basically K2 P2 K2 K2 P2 K2. Sorry.
can not get this pattern
I couldn’t get the one I wanted; kept getting stripe pattern and I wanted the turquoise one.
I’m looking for the pattern for the other hat, too. The knit pattern is more textured.
This isnt the pattern for the hat that is shown on the original page…do you have the pattern for the one shown on the AllFree Knitting page…
When you go to almost the bottom just below the red box that says subscribe in red it says knitting patterns. Click on this and the bluish hat is near the bottom. Just keep scrolling. That is where I found it.
Is this pattern the same as the purple hat shown on the initial page? only the pattern looks different, but when you click on pattern it brings you to this one. Hope this makes sense, but the pattern initially shown before you get here, looks a different pattern. Anyone help please.
not sure what you mean by purple hat. I come up with a picture of a striped hat and the instructions are for that. Have knitted it plain and in stripes. up to you really. Love the pattern its so easy
oops I just seen my answer. Please disreguard.
Is this hat for an adult?
If you’re doing a K2P2 pattern, don’t you need to cast on a number of stitches that you can divide by 4 so you end on P2? I’ve cast on and done the first row and it ends in K2.
have now knitted about a dozen of these plain and striped and it is the easiest pattern you could hope for. six rows of ribbing then stocking stitch ie 1 row knit 1 row plain.. I just caste on 2 extra stitches. very adaptable pattern.
woops that one row knit one row purl (not plain)
Yes, easy. But for those of us not-so-experienced knitters, it would be helpful if the instructions could be changed to read “Cast on 76 stitches.” It would have saved me time. As it was I had to pull everything off, cast the stitches on again and re-do the row.
fair enough but I am not very experienced but have learnt the hard way and had to undo things too. Best of luck with your knitting its a great hobby.
It’s 74 stitches!! It’s K2 P2 K2 then K2 P2 K2, put simply K2 P2 K4 P2 K4 P2 all the way around, it ends in P2.
Yikes…..I said it wrong! It ISN’T K2 P2 across, it’s K2 P2 K2 then K2 P2 K2. You do the K2 P2 K2, 12 times and that leaves 2 stitches which will be P2.
Are the size 10 needles on straights, dpns, or circular needles?
I use straight needles. but you could use circular I I guess. never used them for this pattern though.
I used straight needles 50 stitches with v chunky wool. Goes quicker too. Will try thinner wool 70 stitches too. Very easy to follow, love it loads.
Brilliant Very easy to follow Thank You
Okay don’t be stupid everyone. This is a good pattern. And if you can’t follow it then maybe you need a little more practice. It tells you what exactly to do for every row. Just simply follow it. That’s all.
I used 72 stitches and it came out great! Love the pattern! It gives beginners like me something to be proud of, despite our experience levels prior to attempting this project!
I am fairly new to knitting and this hat looks great! I could really use some further direction on the decrease pattern there. Does that mean I’m knitting two together across the entire row or does that mean I am knitting two stitches together then finishing the row like normal? If someone could help me out that’d be great!
easy as. knit two together all across row to decrease then purl back then knit two together across next row should have about 18 stitches left to thread wool through. have made lots of these always look great especially in stripes. Mix the size of stripes up for added interest
I just finished my first beanie hat following the pattern it came out very well, (I”m a beginner). I am going to start my second one. I’m very excited about it!!
This looks like a perfect hat to knit for adult friends for Xmas. Thank you very much for the pattern … it’s easy and pleasant to knit, I believe.
This looks like a very easy but attractive hat to make. I can’t wait to try it.
Loving the pattern… but need help im only beginner 🙂 the decrease K2 across the row does that mean across the whole row…. wont we be left with no stitches PLEASE HELP….
Ok so I’m a beginner and totally don’t understand this at all.
Did not like this hat. Way too big for me but it will keep me warm.
Actual pattern:
Row 1 k2 p2
Row 2 k
Row 3 p
Knitting this pattern for 10 inches before you start to decrease makes the hat way too big.
How do you start the decrease with the corrected pattern? Please help!! This is my fourth attempt.
Can someone clarify the pattern before I start this project? I am a member of Project Linus and knit blankets but I would like to make these beanies with my left over stash for other charities. Thanks for the great website!
More instrutions for this pattern would have been helpful. I added two stiches to make the pattern come out right. If there are other changes it would be helpful to add them.
Wrong amount of stitches, you need to add or eliminate 2 stitches on the first row. It appears that the main part is done in stocking stitch (according to pattern) How do one get the ribbed effect??
The pattern is really simple, and just what I was looking for! However, the image given does not fit the hat. (Looks nothing like the finished product)
will make lots of this easy pattern .its looks smart as well
hanks for the pattern. I am looking for a pattern that is doubled than sewed at the top
hanks for the pattern. I am looking for a pattern that is doubled than sewed at the top
thanks for the easy-looking pattern. i am a bit confused, though; its an 8 row pattern i think. not 2 , as mentioned in the instructions?
This is a nice website! Thanks so much for the pattern. I have lots of yarn and am excited about making these hats.
I really enjoyed this pattern except I had to add two stitches in order to end with P2. The 2tog was easy except I miss read the instructions and did a row of 2tog and purl until I only had two stitches left then pulled the yarn through it. My hubby did not know I made a mistake and thought my hat was a work of art! 🙂
I can’t wait to start making bunches of them to hand out in these trying times! thanks!!!
This Beanie will be a good way to use up the left over yarn. Some could be quite interesting. Thank you for the pattern.
Just copied the instructions by hand and can hardly wait to get started with this simple beanie. Looks simple enough even for a beginner like me.
Amelia
will try the pattern. Sounds simple enough to produce many for charity. It’s a very kind idea. Thanks
i love knitting..hats, scarfs,mittens .. mostly socks
Thanks for having a great site for us knitters.
the instructions are clear and precise. Love it!!!!!
For the beginning, in order for the pattern to end on with a P2 you need to cast on either 72 or 76 stitches. That seems to be a problem I had anyway.
Great pattern though. Thanks for sharing.
this is the first knitted beanie i’ve made. The Instructions were perfectly simple and the pattern makes a great hat.
Loved it !