
What you need
Fat 1/4 short pile mohair
 .
.Two 25cm discs for the neck, four 20mm discs for the legs and four 15mm discs for the arms and 5 cotter pins
Strong thread/dental tape (for sewing on eyes and securing neck seam.)
Black/gray embroidery thread for nose and a scrap of black felt.
General sewing supplies (thread, glass-headed pins, long & sharp needles, small pointed scissors, etc).
Craft glue & firm card for templates, a fine tipped permanent marker pen.

Instructions
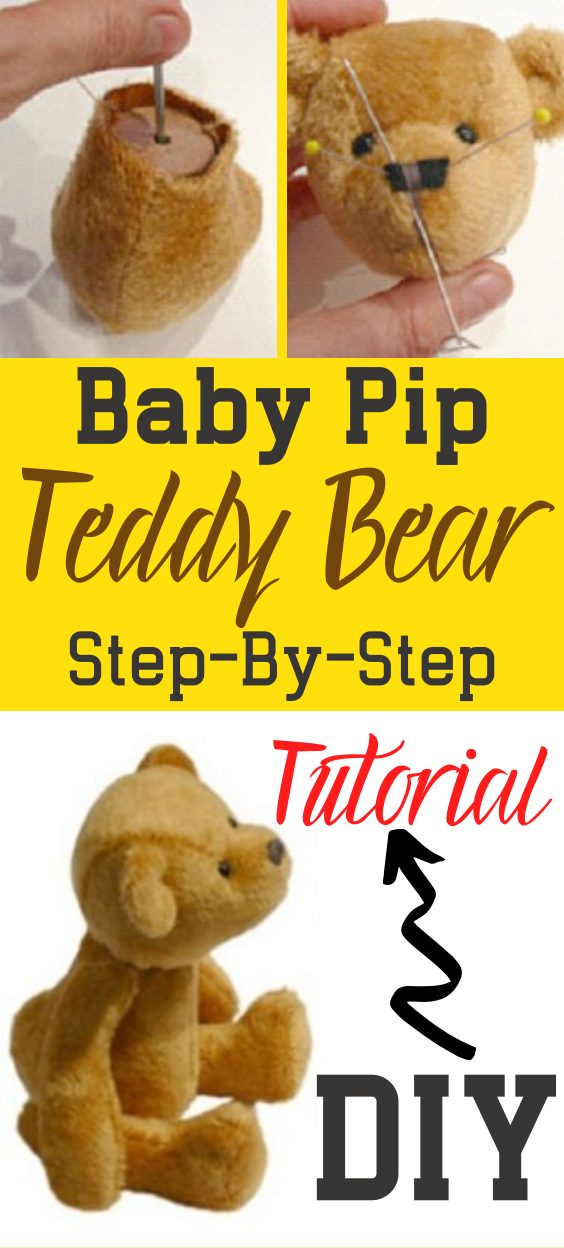
Baby Pip Teddy Bears are a timeless classic that have been beloved by children and adults alike for generations. These traditional style bears are known for their soft fur, adorable features, and huggable bodies, making them the perfect companion for snuggling and playtime.
Creating your own Baby Pip Teddy Bear can seem like a daunting task, but with the right instructions and materials, it can be a fun and rewarding DIY project. This free sewing pattern provides step-by-step directions on how to make your own Baby Pip Teddy Bear, including a list of materials and tools needed.
One of the key elements to making a traditional style bear is selecting the right type of fabric. Plush or minky fabric is a popular choice for teddy bears as it is soft, fluffy, and easy to work with. You will also need stuffing to fill the bear, and thread and a sewing machine to put it all together.
One of the benefits of making your own Baby Pip Teddy Bear is the ability to customize it to your own personal taste. You can choose a fabric in a color or pattern that you love, and add your own personal touches to the bear’s face and accessories.
In addition to being a fun and creative DIY project, making your own Baby Pip Teddy Bear is also a great way to encourage pretend play and imaginative thinking in children. Pretend play is an important aspect of child development, as it allows children to express themselves, practice social skills, and develop their creativity and problem-solving abilities.
This free sewing pattern for making a Baby Pip Teddy Bear is a great way to create a cherished keepsake or gift for yourself or a loved one. With clear instructions and the right materials, you can easily make your own traditional-style bear that will be treasured for years to come.
Follow the picture instructions – you can’t go wrong!
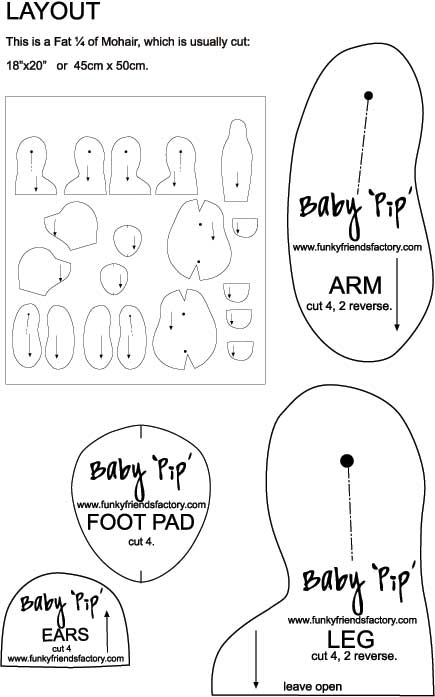
To start, print the pattern sheets. You can stitch by machine or hand, whichever you prefer. Always use a 3mm / 1.8 inch seam and sew right sides together unless directions state otherwise.
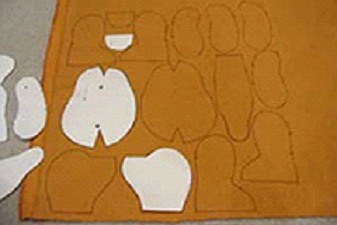
Paste the pattern pieces onto cardboard and cut out to make templates for your pieces. Lay your templates on the wrong side of the fabric, matching the arrows to the pile of your fur. (PILE is the direction in which the fur lies.)
Trace the pieces and transfer all pattern markings to the fabric using a permanent marker. Test your pen first to see that it doesn’t show through to the right side of the fabric.
Using a very fine, sharp pair of scissors, cut out your pieces, remember to cut ONLY the backing material, not the fur!
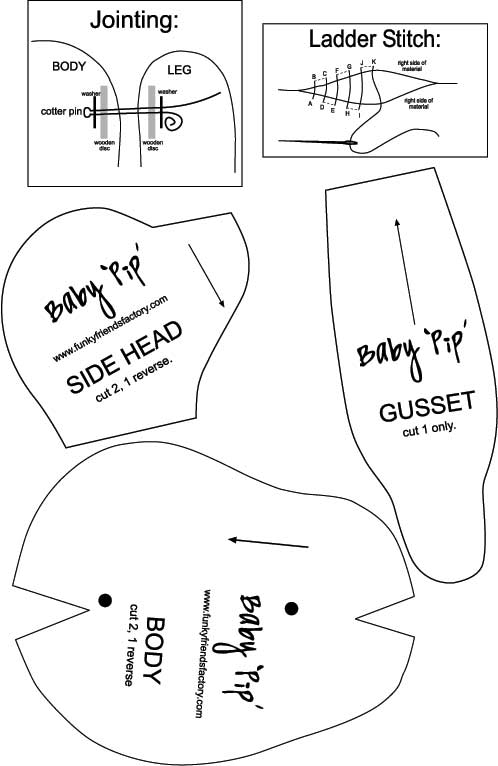
Pin the head pieces together and sew from the nose to the neck.
Pin the gusset in place and sew from the nose to the to the back of the head down the one side. Repeat for the other side, from the nose to the back of the neck on the other side. This keeps your teddy’s face even. (I like to sew the teddy by machine because it goes quicker, but I find I have to sew around the nose by hand when I sew the gusset in place because it’s a bit awkward on the machine.)
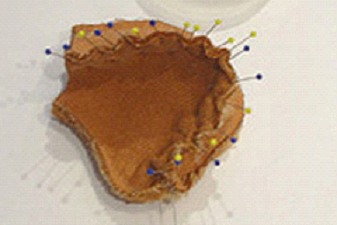
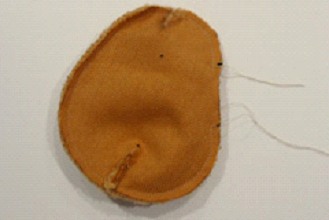
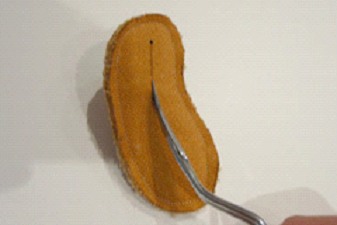
Turn the head right side out fill the head firmly, especially the snout area. This is really important for when you are sewing on the facial features later.
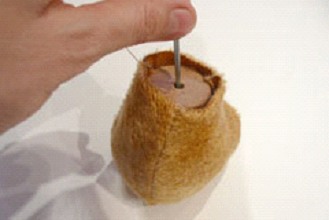
Push a cotter pin and washer through the neck disc and place this in the head opening. Use strong thread, run a gathering stitch around the neck opening. Pull the fabric in around the cotter pin, secure the thread well, tie off and sew threads back inside the head.
Pin and sew the darts on both of the body pieces. Sew the body pieces right sides together, leaving the gap at the back for stuffing your bear.
Pin and sew the ears. Leave the flat edge open for turning. Turn edges under and stitch the ears closed with a ladder stitch.
Use a gathering stitch along the base of the ear to gather it a bit.
Position the ears on the head and sew them in place with a ladder stitch. Position the top and bottom edge of the ears slightly forward to create a curve in the ears.

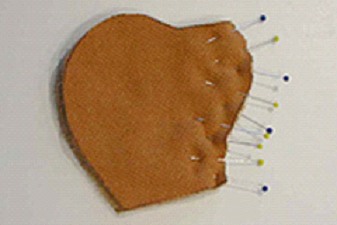
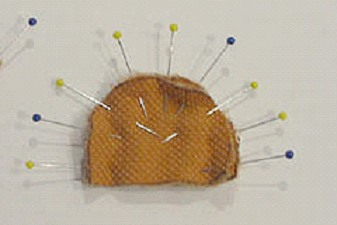
Pins in the Teddy!
Use black-headed pins to experiment with eye positioning. When you are happy with the “look” of the eyes, mark their position with your permanent marker.”
Use dental tape to sew the eyes on. Pass this tape through the wire loop of each glass eye, and then squeeze the loop closed with pliers.
Sew each eye in place using a long needle, pulling the wire loop of the eye through the seam stitching on the head. Make sure both strands of tape come out of the head just above the neck disc, and quite close together. Tie the tape from both eyes together, pulling them tightly so that the eyes are pulled into the head a bit. Tie them securely and sew them back inside the head.
Sew the mouth in the shape of an upside down “Y” then cut a piece of felt the shape of the nose that you want. I find a rectangle ends up becoming rounded at each end as I sew which forms a nice rounded nose shape.

It’s not Teddy Surgery
Start in the center and use satin stitch sewing to the one side first. Go back to the center and sew out to the other side.
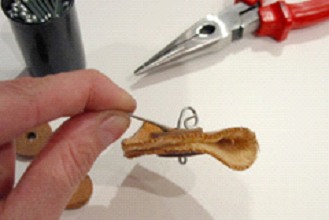
(This photo shows you how to bend a cotter pin open, then how to curl each side back on itself.)
Turn the body right sides out.
Push the extended part of the cotter pin, of the head, into the seam at the top of the body. Slip another disc and washer over the cotter pin, from inside the body, then use your pliers to bend the cotter pin open like this photo.
With right sides together sew the leg pieces together, from the toe around the top of the leg to the heel. Leave the flat edge open!
Pin and sew the foot pad in place, then repeat for the other leg.
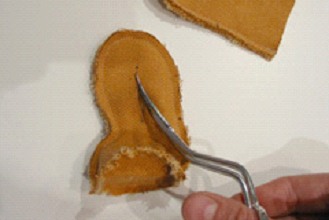
Use really sharp scissors to snip a hole open on the inside of each leg. Turn the leg right side out through this hole. Stuff each leg firmly then Slip a washer and a leg disc onto a cotter pin and place this inside the leg opening.
Making sure the leg is firmly stuffed, tuck in the raw edges of the hole you cut and sew this closed with a ladder stitch. Pull the thread tightly to make the stitches invisible. Tie off the thread tightly and sew the ends back into the leg.
Take the body and push the cotter pin of one completed leg through the leg position marking of the body. (You may need to make a little hole with the sharp scissors first.)
Slip another disc and washer over the cotter pin from inside the body and bend the cotter pin, as before. Do the same with the other leg.
With right sides together sew the arm pieces together, right around the whole arm without leaving a gap. Repeat for the other arm.
Use really sharp scissors to snip a hole open on the inside of each arm. Turn the arm right side out through this hole. Stuff each arm firmly then slip an arm disc and washer onto a cotter pin and place this inside the opening on the arm.
Making sure the arm is firmly stuffed, tuck in the raw edges of the hole you cut and sew this closed with a ladder stitch. Pull the thread tightly to make the stitches invisible. Tie off the thread tightly and sew the ends back into the arm.
Take the body and push the cotter pin of the arm through the arm position marking of the body. (You may need to make a little hole with the sharp scissors first.)
Slip another disc and washer over the cotter pin from inside the body and bend the cotter pin, as before. Do the same with the other arm.

Sewing up the Teddy Close
Fill the body firmly and sew the opening closed at the back with ladder stitching. Pull the stitches tightly to make them invisible.
Your little teddy should look like a million dollars!
This project was contributed by Pauline McArthur of funkyfriendsfactory.com


Hi. I don’t understand how to attach the gusset. Can you please include a picture or a guide on how to do it for this teddy bear?
Hello, the steps are not enough details the ears connect, connecting hands and legs with details.
The steps are meant to be easy not complicated
I think it is awesome. I am making this bear out of jeans and shirt and tie as a keep sake of something that was my husbands for the children and grandchildren.
very nice!
Please can someone tell me what the joint sizes are? Everywhere I go to buy the cotter pins and disks its asking me for the joint size? I am a total beginner so any help is appreciated! thanks
The cotter pin instructions are too difficult….I have been making teddies for years…but still need to use other types of joints….I didn’t understand the cotter pin instructions at all. I do know what cotter pins are…but feel I would need someone to be hands on for me to get it…..
love it
This is a great pattern. I only used 2 of the foot pads though and used button joining (instructions on funkyfriends website) rather than the cotter pins. Super cute.
why are there 4 footpads?
I think it is just a print error it should say only 2 unless your teddies take walks when you are not around it does not need two for each foot.
How big is this bear?
made one from an old jumper…it was fun and easy to do thank you.
Do you need the cotter pins, discs and washers to make this cute bear?
no you can use buttons and heavy thread to make add buttons before you close up seams just like the regular instructions sew buttons threw one hole in the fabric or position for sitting with arms on legs or one raised arm and just sew in place skipping disc and pins altogether.
thank for this pattern from over zee.
I will take care that Pip lives a happy live in Holland.
Nelly
Great project!!! cant wait to make it! Though instructions are a little tough to follow for a beginnner like myself. What are discs????
they are plastic washers that you can buy in hardware stores or online they have a hole to put the cotter pin through from inside one piece to the inside of another piece like from the arm to the shoulder they make a jointed bear that can be posed in different positions. you can use buttons or sew the bear in a seated position, or leave his legs straight a child will be happy either way.
I can’t find joints and pins for bears anywhere. Does anyone know where I can order a bunch for making bears. If I could find a place for joints, eyes and noses on line in bulk it would be great. Any suggestions or info
I really like this idea but, do we have to use the cotter pins??
I loved this project, made the bear for my girlfriend and she loved it nor did she believe that i made it at first lol but non the less it was easyish and my first time making something like this and i was really pleased how it turned out =]
Wow great can’t wait to try and make this!
Hi there, what a lovely teddy, I just can not wait to make him, thank you for sharing
I made this for my three best friends and they thought that it was an absolute winning store bought prize! They kept it to this day and keep it under their pillows. I can’t wait to make another! Hope you enjoy it if you make it!
really cute
So cute!! <3
im going to try making this, looks like a begginer may be able to do so (:
Hi,
Thanks for this tutorial! I have grown a (recent) fondness to all things teddy bear and consider making them…
T
Great and easy to make. 14 years old, made two for my best friends and 1 for my nanna and 1 for my mum. I had to join the legs, arms and head on with stitches because I have no clue how to do the joining, but it looks perfect. Thank you for such an adorable pattern! Made a wonderful Chrissy present!
I am in LOVE and this Christmas I want more than anything to give that special someone a gift, however my funds currently hitting a low point. As I sat in bed pondering what I can give her that would show my Love, I came up with a crazy idea. Ill make her a Teddy Bear! I Googled “How to sew a teddy bear” and came up with this. I must say Thank you so very much. This is Brilliant. The instructions are a little tough to follow but I shall do my best. It might help to post a video of you making one of these. Again Thank you ..PS I became a member of this site just to thank you lol, but I see cool stuff here.
This is a brilliant project, as it is easy for beginners like myself. I will definately be making this bear
Niceeeee…
i haven’t made it,i wanted to make it for my sisters baby. He loves bears
***************wow
This is amazing
i will surely make it
thaks a lot
This pattern makes a cute little teddy and it is definately suitable for sewing beginners.
I managed to finish my first (!) bear I ever sew in under 2 days and it turned out very nice.
Thumbs up for this project
i love it so much!!!
it’s REALLY cute. Bu tit’s looks very hard!
HOTT!!..
To all the people asking what cotter pins are, if you use a google image search you will see pictures. You may have to go to a hardware store to buy them.
I love it. Instructions are clear and the teddy looks wonderful to make.
it is beautiful… but way too hard for me!!!
AWSOME:)
cute and creative but looks a bit hard for my daughter who is 11. otherwise it is adorable!!!!!!!!!!!!!
What is the finished dimensions of this bear?
it looks hard
veeeeery cute! Love it : )
Erm, doesn’t it only need TWO foot pads, not 4?
A little hard to follow but otherwise I loved it!!! Nice job it’s so cute and I’m sure that my little cousin Sophia will love it! I might sew it but I might find something else on the same or a different website. I have also used knitting patterns. :):):)
it is a nice thing i love it
guest :go to a hardware store and ask the guy for cotter pins. It worked for me
thank you for your help i keep trying ideas
very nice
I’m thinking of doing them without cotter pins….unmovable but makes great keychins if you size them. Right?
wow
My first bear is so wonderful!! I couldn’t believe i made it myself – i have boobed every pattern i have ever gotten! Wish you could see it!
What are it’s finished measurements?
this is one of the best patterns ive seen on here, im gonna go do it right now!
A cotter pin is a split pin used in teddy bear making. When you purchase your supplies your craft store will have them.
um sorry to bother you again but i syill do not know what cotter pins are and i was wondering whether someone could help me out
yeah i printed this off cause im like… dude i gota make this for my friends baby sister… but its REALLY tiny… got any clues on how to resize it? i dont really know much about all that stuff.
Take the pattern and copy it with a higher percentage size i.e. 200% would give you a bear twice the size. But that will also mean you have to change the size of he disks and eyes. Good luck!
yeah what are cotter pins?
hey guest…i tried it…thatz why i said that it waz impossible me….but i still like it..
i don’t get it?
excuse me but what are cotter pins im a needlework beginner and i have never come across these before. what are they and where do you get them from?
It doesnt say it is for beginners Chinchilla… And its not impossible just give it ago before you comment.
super cute,but impossible for beginner sewers like me!!!!!
OMG. I love teddy patterns, and this was is especially cute!