
What you need
Gauge: 6 sc = 2 cm
Hook Size: 2 mm
Yarn: All the yarn used in this pattern is 4 Ply 100% Acrylic Yarn (diameter about: 1.5 mm)
Instructions
CHOCOLATE FOUNTAIN
Using dark brown yarn, ch 4, sl st into the first ch to create a ring,
Rnd 1: Ch 1, 6 sc into the ring, sl st into the first sc. (6)
Rnd 2: Ch 1, 2 sc in each of sc around, sl st into the first sc. (12)
Rnd 3: Ch 1, [2 sc in next sc, sc in next sc] repeat 6 times, sl st into the first sc. (18)
Rnd 4: Ch 1, [2 sc in next sc, sc in next 2 sc] repeat 6 times, sl st into the first sc. (24)
Rnd 5: Ch 1, [2 sc in next sc, sc in next 3 sc] repeat 6 times, sl st into the first sc. (30)
Rnd 6: Ch 1, [2 sc in next sc, sc in next 4 sc] repeat 6 times, sl st into the first sc. (36)
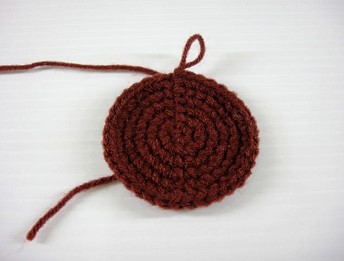
Rnd 7-8: Ch 1, sc in each sc around, sl st into the first sc. (36)
Rnd 9: Ch 1, [decrease, sc in next 4 sc] repeat 6 times, sl st into the first sc. (30)
Rnd 10: Ch 1, [decrease, sc in next 3 sc] repeat 6 times, sl st into the first sc. (24)
Rnd 11-15: Ch 1, sc in each sc around, sl st into the first sc. (24)
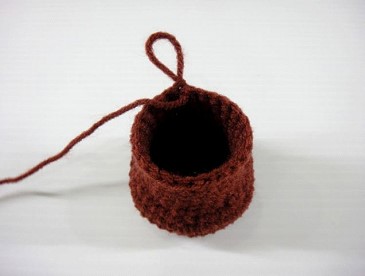
Rnd 16: Ch 1, [2 sc in next sc, sc in next 3 sc] repeat 6 times, sl st into the first sc. (30)
Rnd 17: Ch 1, [2 sc in next sc, sc in next 4 sc] repeat 6 times, sl st into the first sc. (36)
Rnd 18: Ch 1, [2 sc in next sc, sc in next 5 sc] repeat 6 times, sl st into the first sc. (42)
Rnd 19: Ch 1, [2 sc in next sc, sc in next 6 sc] repeat 6 times, sl st into the first sc. (48)
Rnd 20: Ch 1, [2 sc in next sc, sc in next 7 sc] repeat 6 times, sl st into the first sc. (54)
Rnd 21-22: Ch 1, sc in each sc around, sl st into the first sc. (54)
Rnd 23: Ch 1, [decrease, sc in next 7 sc] repeat 6 times, sl st into the first sc. (48)
Rnd 24: Ch 1, [decrease, sc in next 6 sc] repeat 6 times, sl st into the first sc. (42)
Rnd 25-28: Ch 1, sc in each sc around, sl st into the first sc. (42)
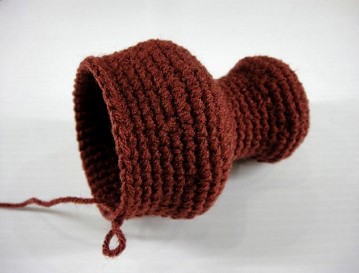
Rnd 29: Ch 1, [2 sc in next sc, sc in next 6 sc] repeat 6 times, sl st into the first sc. (48)
Rnd 30: Ch 1, [2 sc in next sc, sc in next 7 sc] repeat 6 times, sl st into the first sc. (54)
Rnd 31: Ch 1, [2 sc in next sc, sc in next 8 sc] repeat 6 times, sl st into the first sc. (60)
Rnd 32: Ch 1, [2 sc in next sc, sc in next 9 sc] repeat 6 times, sl st into the first sc. (66)
Rnd 33: Ch 1, [2 sc in next sc, sc in next 10 sc] repeat 6 times, sl st into the first sc. (72)
Rnd 34-35: Ch 1, sc in each sc around, sl st into the first sc. (72)
Rnd 36: Ch 1, [decrease, sc in next 10 sc] repeat 6 times, sl st into the first sc. (66)
Rnd 37: Ch 1, [decrease, sc in next 9 sc] repeat 6 times, sl st into the first sc. (60)
Rnd 38-41: Ch 1, sc in each sc around, sl st into the first sc. (60)
Rnd 42: Ch 1, [2 sc in next sc, sc in next 9 sc] repeat 6 times, sl st into the first sc. (66)
Rnd 43: Ch 1, [2 sc in next sc, sc in next 10 sc] repeat 6 times, sl st into the first sc. (72)
Rnd 44: Ch 1, [2 sc in next sc, sc in next 11 sc] repeat 6 times, sl st into the first sc. (78)
Rnd 45: Ch 1, [2 sc in next sc, sc in next 12 sc] repeat 6 times, sl st into the first sc. (84)
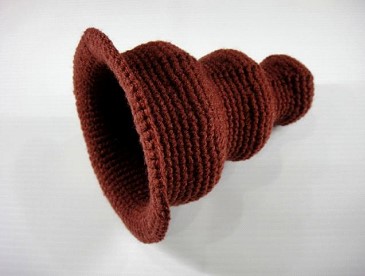
Finish off.
CHOCOLATE FOUNTAIN BOWL
Using red yarn, ch 4, sl st into the first ch to create a ring,
Rnd 1: Ch 1, 6 sc into the ring, sl st into the first sc. (6)
Rnd 2: Ch 1, 2 sc in each of sc around, sl st into the first sc. (12)
Rnd 3: Ch 1, [2 sc in next sc, sc in next sc] repeat 6 times, sl st into the first sc. (18)
Rnd 4: Ch 1, [2 sc in next sc, sc in next 2 sc] repeat 6 times, sl st into the first sc. (24)
Rnd 5: Ch 1, [2 sc in next sc, sc in next 3 sc] repeat 6 times, sl st into the first sc. (30)
Rnd 6: Ch 1, [2 sc in next sc, sc in next 4 sc] repeat 6 times, sl st into the first sc. (36)
Rnd 7: Ch 1, [2 sc in next sc, sc in next 5 sc] repeat 6 times, sl st into the first sc. (42)
Rnd 8: Ch 1, [2 sc in next sc, sc in next 6 sc] repeat 6 times, sl st into the first sc. (48)
Rnd 9: Ch 1, [2 sc in next sc, sc in next 7 sc] repeat 6 times, sl st into the first sc. (54)
Rnd 10: Ch 1, [2 sc in next sc, sc in next 8 sc] repeat 6 times, sl st into the first sc. (60)
Rnd 11: Ch 1, [2 sc in next sc, sc in next 9 sc] repeat 6 times, sl st into the first sc. (66)
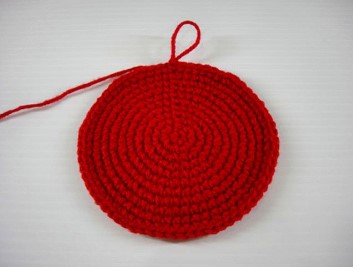
Rnd 12: Ch 1, working on the outer loop, sc in each sc around, sl st into the first sc. (66)
Rnd 13-14: Ch 1, sc in each sc around, sl st into the first sc. (66)
Rnd 15: Ch 1, [2 sc in next sc, sc in next 10 sc] repeat 6 times, sl st into the first sc. (72)
Rnd 16-18: Ch 1, sc in each sc around, sl st into the first sc. (72)
Rnd 19: Ch 1, [2 sc in next sc, sc in next 11 sc] repeat 6 times, sl st into the first sc. (78)
Rnd 20-22: Ch 1, sc in each sc around, sl st into the first sc. (78)
Rnd 23: Ch 1, [2 sc in next sc, sc in next 12 sc] repeat 6 times, sl st into the first sc. (84)
Rnd 24-27: Ch 1, sc in each sc around, sl st into the first sc. (84)
Change to light grey yarn,
Rnd 28: Ch 1, [2 sc in next sc, sc in next 13 sc] repeat 6 times, sl st into the first sc. (90)
Rnd 29: Ch 1, [2 sc in next sc, sc in next 14 sc] repeat 6 times, sl st into the first sc. (96)
Rnd 30-31: Ch 1, sc in each sc around, sl st into the first sc. (96)
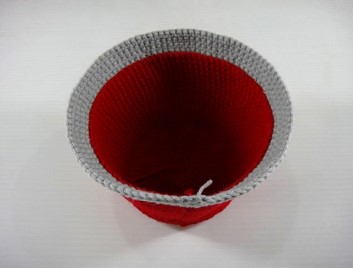
Finish off.
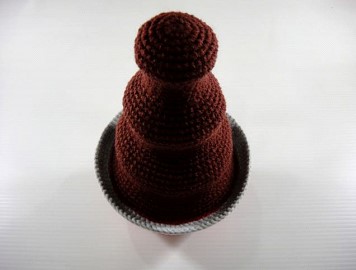
Stuff with fiberfill and sew the bowl (Rnd 27) to the fountain (Rnd 45).
KIWI FRUIT
Using light green yarn, ch 4, sl st into the first ch to create a ring,
Rnd 1: Ch 1, 6 sc into the ring, sl st into the first sc. (6)
Rnd 2: Ch 1, 2 sc in each of sc around, sl st into the first sc. (12)
Change to green yarn,
Rnd 3: Ch 1, [2 sc in next sc, sc in next sc] repeat 6 times, sl st into the first sc. (18)
Rnd 4: Ch 1, [2 sc in next sc, sc in next 2 sc] repeat 6 times, sl st into the first sc. (24)
Rnd 5: Ch 1, working on the outer loop, sc in each sc around, sl st into the first sc. (24)
Rnd 6: Ch 1, sc in each sc around, sl st into the first sc. (24)
Finish off.
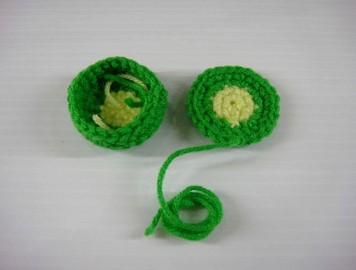
Repeat Rnd 1- 4 to make the bottom cover.
Stuff and sew the bottom cover to the upper part.
Using black yarn, sew black dots on the kiwi.
BANANA SLICES
Using light yellow yarn, ch 4, sl st into the first ch to create a ring,
Rnd 1: Ch 1, 6 sc into the ring, sl st into the first sc. (6)
Rnd 2: Ch 1, 2 sc in each of sc around, sl st into the first sc. (12)
Rnd 3: Ch 1, [2 sc in next sc, sc in next sc] repeat 6 times, sl st into the first sc. (18)
Rnd 4: Ch 1, [2 sc in next sc, sc in next 2 sc] repeat 6 times, sl st into the first sc. (24)
Rnd 5: Ch 1, working on the outer loop, sc in each sc around, sl st into the first sc. (24)
Rnd 6: Ch 1, sc in each sc around, sl st into the first sc. (24)
Finish off.
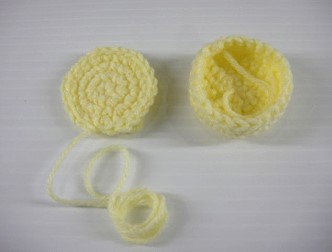
Repeat Rnd 1- 4 to make the bottom cover.
Stuff and sew the bottom cover to the upper part.
Using black yarn, sew black dots on the banana.
STRAWBERRY
Using red yarn, ch 4, sl st into the first ch to create a ring,
Rnd 1: Ch 1, 6 sc into the ring, sl st into the first sc. (6)
Rnd 2: Ch 1, [2 sc in next sc, sc in next sc] repeat 3 times, sl st into the first sc. (9)
Rnd 3: Ch 1, [2 sc in next sc, sc in next 2 sc] repeat 3 times, sl st into the first sc. (12)
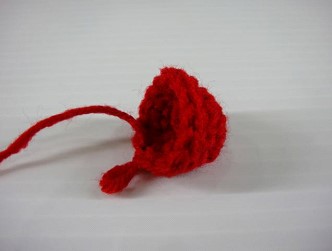
Rnd 4: Ch 1, [2 sc in next sc, sc in next 3 sc] repeat 3 times, sl st into the first sc. (15)
Rnd 5: Ch 1, [2 sc in next sc, sc in next 4 sc] repeat 3 times, sl st into the first sc. (18)
Rnd 6: Ch 1, [2 sc in next sc, sc in next 5 sc] repeat 3 times, sl st into the first sc. (21)
Rnd 7: Ch 1, [2 sc in next sc, sc in next 6 sc] repeat 3 times, sl st into the first sc. (24)
Rnd 8: Ch 1, sc in each sc around, sl st into the first sc. (24)
Rnd 9: Ch 1, [decrease, sc in next 2 sc] repeat 6 times, sl st into the first sc. (18)
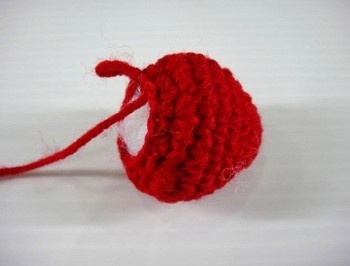
Stuff with fiberfill,
Rnd 10: Ch 1, [decrease, sc in next sc] repeat 6 times, sl st into the first sc. (12)
Rnd 11: Ch 1, decrease 6 times, sl st into the first sc. (6)
Finish Off.
Using dark green yarn, ch 5, sl st into the first ch to create a ring,
Rnd 1: [ch 5, sl st into the ring] repeat 5 times.
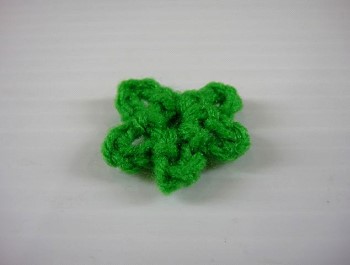
Finish off.
Glue this part onto the wider part of the strawberry.
Instructions abbreviations:
Sl st – slip stitch
Sc – single chain
Dc – double crochet
Hdc – half double crochet
Trb – treble
Ch – chain



my grandaughter just received a little kitchen and I thought this would be cute, but how big is it? am I missing the dimensions?
really good
aww! It lookes reallly really hard when yoou first look at it bur now it is soo much easier
This is so cute!!! I think my grandchildren would love playing with it! Thanks for the pattern.
This project is so cute! I love it and am going to make this for my cousin who couldn’t stay away from the chocolate fountain during my wedding:)
Yummy (but what to use it for..)
Lindo!!!!!!! Super LINDO!!!!!!!!!!! excelente tutorial, muchas gracias!!!!!
🙂 🙂 🙂
Looks yummy! And no calories!!