
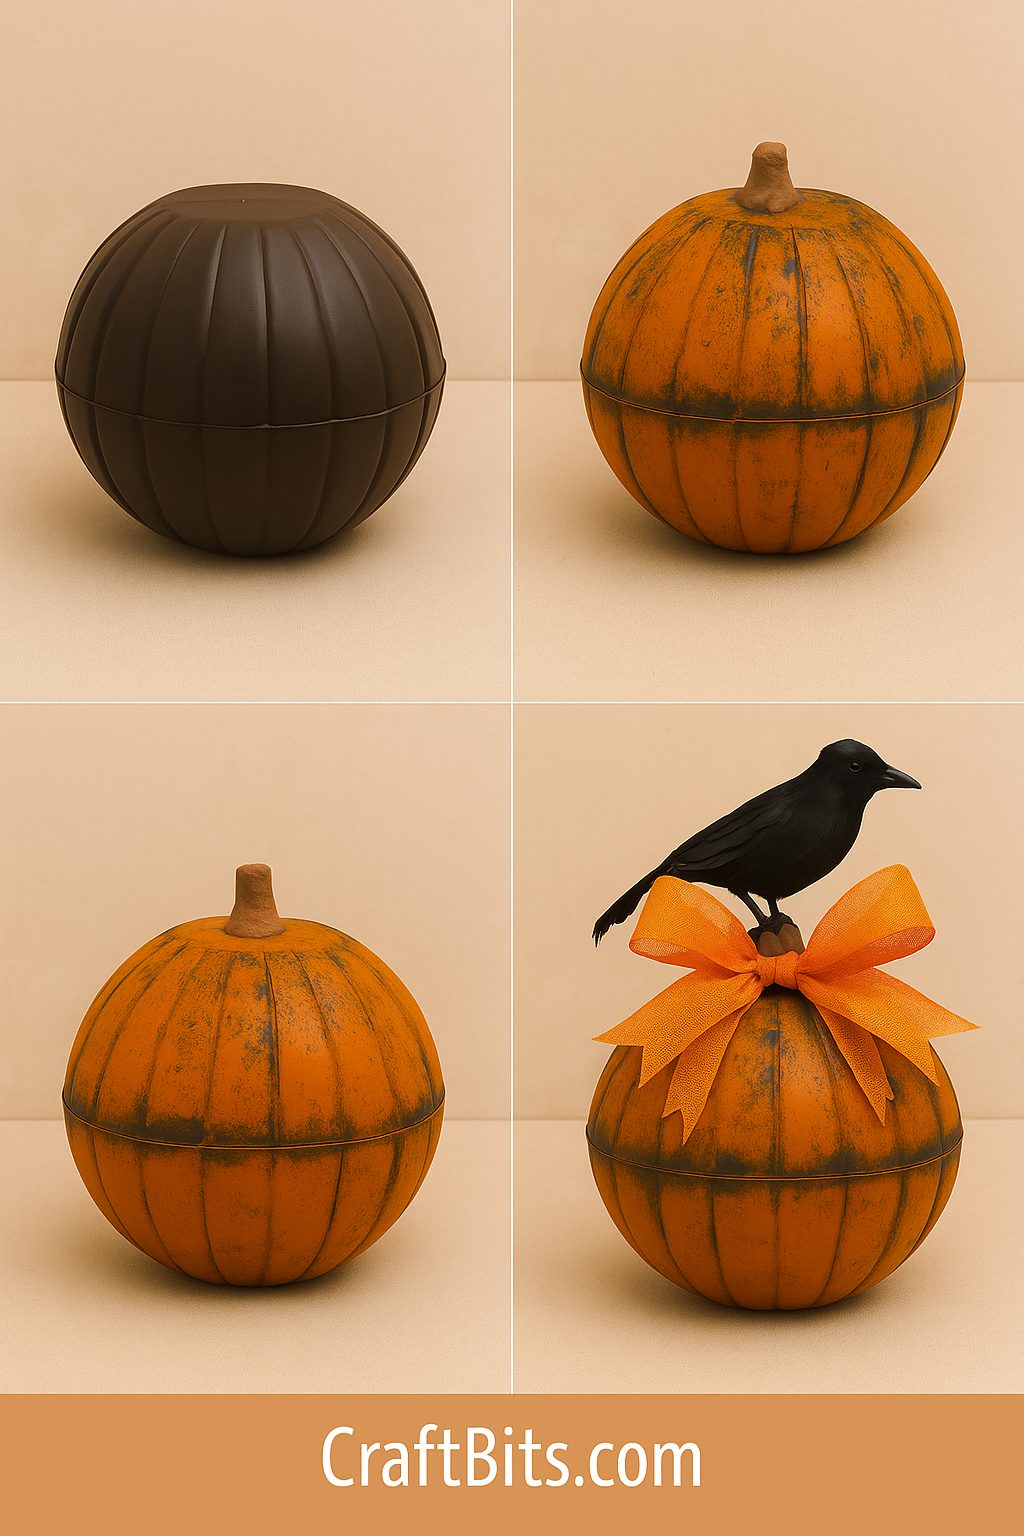
Made from two plastic punch bowls, this project is perfect for porch displays, mantle décor, or as a centrepiece for your Halloween party. The distressed paint technique and bold bow give it a handcrafted charm that feels timeless.
Get more details about this project
What you need
- Two plastic punch bowls – same size, any colour (Dollar Tree or discount store works great)
- Strong glue – E6000 or hot glue gun with strong-hold sticks
- Spray paint – matte black and pumpkin orange
- Optional – copper or dark brown craft paint for extra distressing
- Clay for stem – air-dry or oven-bake, OR a short twig/branch
- Ribbon – bright orange wired ribbon, optional black accent ribbon for layering
- Faux crow – lightweight, small size
- Sandpaper (fine grit)
- Paintbrush (for dry brushing details)
Drop cloth or newspaper for painting
Instructions
Instructions
1. Build the Pumpkin Shape
- Wash and dry your punch bowls.
- Lightly sand the surface for better paint adhesion.
- Place one bowl upside down, then glue the second bowl on top, rim-to-rim. This seam will stay visible, giving the pumpkin a primitive, handmade look.
2. Base Coat the Pumpkin
- Spray the entire piece with matte black paint for the undercoat. Let it dry completely.
- This black layer will peek through once the orange is added, creating depth and shadowing.
3. Add the Orange Layer
- Lightly spray pumpkin orange over the black base coat, letting some black show through along the ridges and seams.
- Build up the orange in thin layers to keep the aged, uneven look.
- Optional: Use a dry brush to lightly streak copper or dark brown paint in spots for an extra rustic touch.
4. Make & Attach the Stem
Clay option:
- Shape a chunky stem from clay (about 2–3 inches tall).
- Add slight ridges or grooves for realism.
- Let dry (or bake, if oven-bake clay) and then paint in brown tones.
Twig option:
- Cut a twig or small branch to size.
- Leave the bark for texture and paint the cut ends brown if needed.
Glue your stem securely to the top centre of the pumpkin.
5. Tie the Bow
- Cut a generous length of orange wired ribbon.
- Optional: Add a thinner black ribbon on top for contrast before tying.
- Tie into a bow, fluffing the loops for fullness.
- Attach the bow at the base of the stem with glue.
6. Add the Crow
- Position your faux crow so it looks naturally perched on the stem.
- Use glue to secure it firmly in place.
7. Finishing Touches
- For outdoor display, spray the entire piece with a clear matte sealant to protect the paint.
Style your pumpkin alongside lanterns, hay bales, or a basket of autumn leaves for a complete Halloween display.


What do you think of this project? Let us know!