
Get more details about this project
What you need
Main fabric for the squid body
Contrast fabric for the underside or second body layer
Fabric for the head
Felt or fabric scraps for the eyes and face
Toy stuffing or wadding
Needle and thread
Scissors
Pins or clips
Fabric marker or pencil
Paper for making the pattern
Glue, optional
Embroidery thread, optional
Instructions
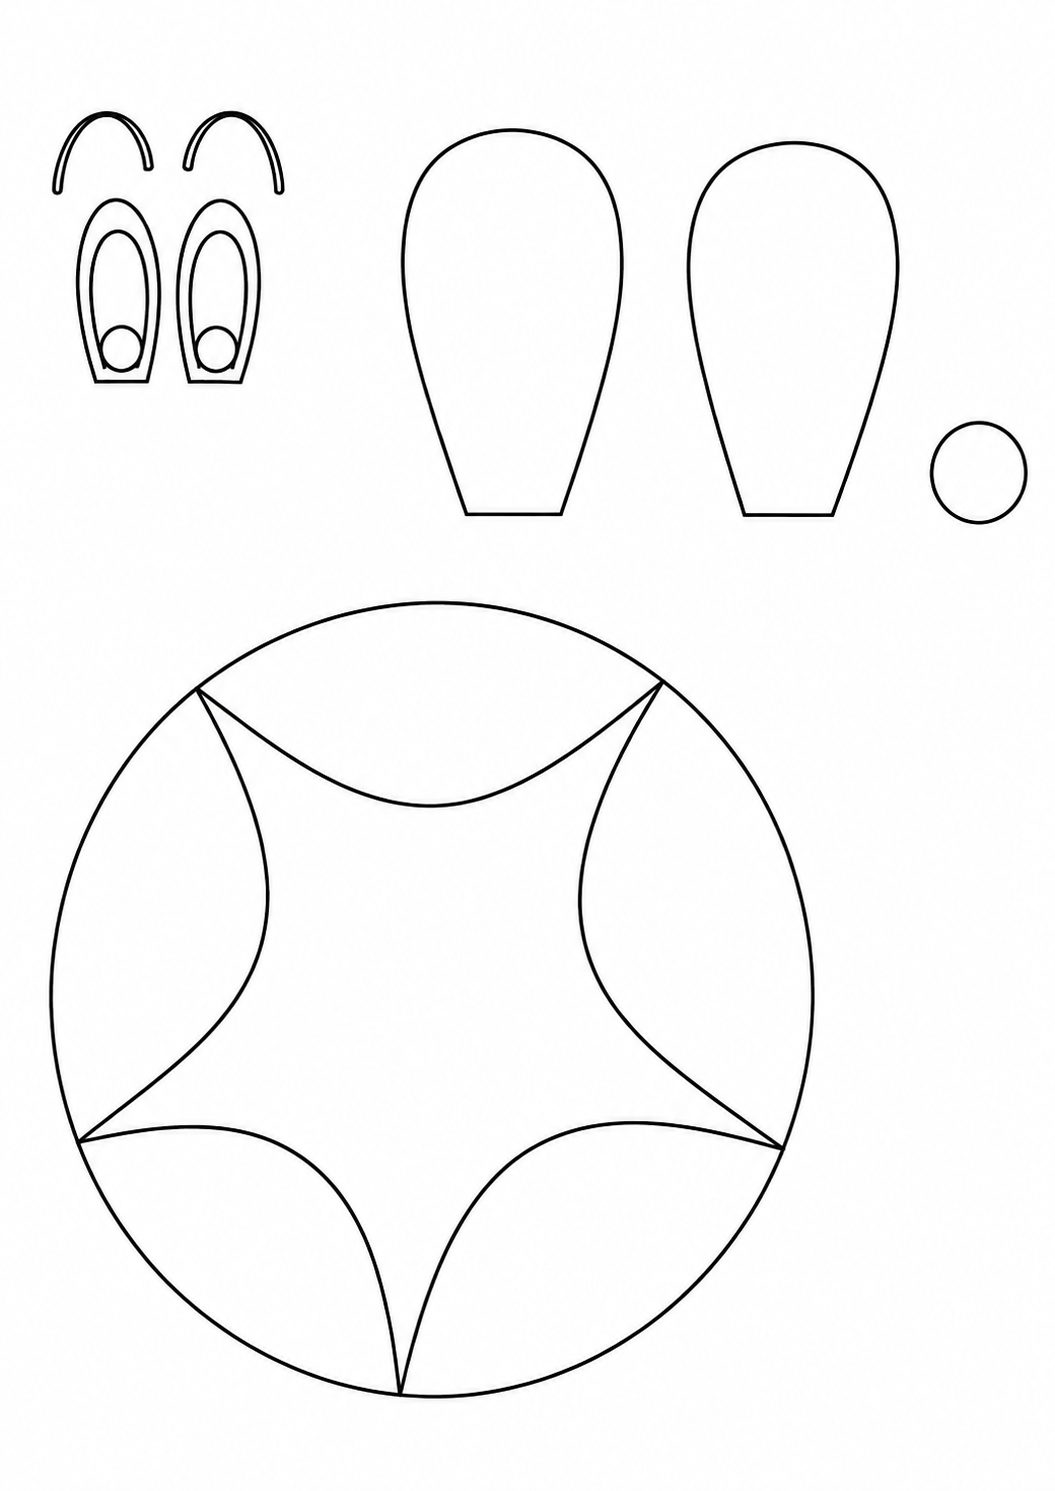
Start by downloading the Plushie Pattern. – Re – size to suit your project.
For the body – Cut 2 circles. Mark out 5 points then scoop from one point to another as shown in the diagram.
Cutting The Body
Start by making the body pattern. Cut two large circles from paper. These will become the squid’s body shape.
On one paper circle, mark out five evenly spaced points around the edge of the circle. These points will form the tips of the squid’s star-shaped body. Once the five points are marked, draw a gentle curved scoop from one point to the next, following the diagram. This will create a rounded five-point star shape rather than a sharp star.
Cut out the star-shaped pattern.
Using this pattern, cut two star shapes from your fabric. Cut one star shape from your main fabric color and one star shape from your contrast fabric. These two pieces will form the top and bottom of the squid’s body.
Cutting The Head
Use the head pattern and resize it to suit your squid body. The head should be large enough to sit neatly in the center of the star body, but not so large that it overwhelms the body shape.
Cut two head pieces from your chosen fabric.
If you are making your own head shape, draw a rounded squid-style head with a slightly narrower base. Cut two identical pieces.
Sewing The Head
Place the two head pieces together with the wrong sides facing, if you are using blanket stitch on the outside. If you prefer hidden seams, place the right sides together and sew around the edges, then turn the head right side out.
Stitch around the head piece using blanket stitch, leaving an opening at the bottom for stuffing.
Fill the head lightly with wadding or toy stuffing. Do not overstuff it, as the head needs to sit neatly into the body opening. Once filled, leave the bottom open for attaching to the body later.
Sewing The Body
Place the two star-shaped body pieces together. If you are using blanket stitch as a decorative edge, place the wrong sides together with the right sides facing out. If you want hidden seams, place the right sides together and turn the body after stitching.
Stitch around the outer edge of the star shape using blanket stitch. Leave a small opening so you can add stuffing.
Lightly fill the body with wadding or toy stuffing. Push the stuffing gently into each of the five points so the squid body has a soft, even shape. Do not overfill the body, as the center will need to hold the head.
Once the body is filled, close the opening with small stitches.
Cutting The Opening For The Head
Choose the side of the body that will be the top. This should usually be the same color as the head, so the head looks like it belongs naturally in place.
Carefully cut a circle in the center of this side of the body. The circle must be the same diameter as the bottom of the head. This is important because the head will slip into the hole and sit securely in place.
Start with a slightly smaller hole and enlarge it gradually if needed. It is easier to make the hole bigger than to fix one that has been cut too large.
Attaching The Head To The Body
Place the stuffed head into the circular opening in the body. The bottom of the head should slip down into the hole so it sits neatly inside the star-shaped body.
Pin or hold the head in position.
Using small neat stitches, sew around the base of the head, connecting it securely to the body. Stitch all the way around the circle, making sure the head is firmly attached and there are no gaps where stuffing can show.
You can use matching thread for an invisible finish, or contrast embroidery thread for a decorative handmade look.
Making The Face
Decorate Sid’s face using felt, fabric scraps, embroidery, buttons or fabric paint.
Cut out two large eyes from white felt and add smaller black or colored pieces for the pupils. You can also add eyelids, eyebrows or a mouth to give Sid a cheeky expression.
The face pieces can be glued on with fabric glue or sewn on with small stitches. Sewing is best if the plushie will be handled often or given to a child.
If making this toy for a young child, avoid small buttons, beads or loose pieces that could become a choking hazard. Use felt and embroidery instead.
Finishing Touches
Once the face is attached, check all seams to make sure everything is secure. Add any extra details you like, such as rosy cheeks, eyelashes, a stitched smile, spots, stripes or little felt decorations.
Sid can be made in bright ocean colors, novelty fabric, felt, fleece or recycled fabric. Try making a whole family of squids in different sizes by enlarging or reducing the pattern pieces.
Sewing Tips
Use blanket stitch around the edges for a cute handmade finish.
Use fleece or felt if you want a soft plushie that does not fray.
Use cotton fabric if you want to feature fun prints or recycled fabric scraps.
Stuff the body lightly so the star points keep their shape.
Cut the center hole slowly and carefully so the head fits snugly.
Sew the face pieces on rather than gluing them if the toy will be played with often.
Safety Note
If this plushie is being made for a baby or young child, avoid buttons, beads, plastic eyes or glued-on pieces. Embroidered eyes and stitched felt details are the safest option.





i love this! i wanted to find a crochet pattern for a squid for my brother!! or ill make this. thanks 🙂