
Many people don't know how to do this enjoyable and addictive craft.
This guide is meant to explain the basics to you and hope those of you that would like to try out can use this information to start a new hobby you will love for a lifetime. Your friends and family will also enjoy all the beautiful handcrafted things you will give as gifts.
What you need
The first thing you should do is practice the basic stitches so you will need a few sheets of 7 count plastic canvas. Buy a couple of yarn needles especially sold for this type of needlepoint.
I say buy a couple because I always lose mine down in the chair cushions. You’ll also need worsted weight yarn and a pair of scissors.
Instructions
Things You Should Know Before Starting A Project
On any pattern you work you will find the plastic canvas grid is either counted out by using the terms lines or threads or by holes or squares. I prefer to count the holes of the plastic canvas because I think it’s easier.
Plastic canvas comes in 4 sizes: 5 holes to the inch, 7 holes to the inch, 10 holes to the inch, and 14 holes to the inch. Check the materials list at the top of any pattern to see what size canvas the pattern call for. I prefer to stitch projects using 7 count plastic canvas.
The plastic canvas sheets also come in different types. The standard clear variety is used on most patterns. It also comes in a variety of colors. Don’t use a colored canvas unless the pattern calls for it, because the yarn might not cover it all and the grid may show through.
The canvas also comes in a stiff variety or a soft type. Again these are not used unless the pattern requires them.
The best type of yarn to use is regular worsted weight yarn. It’s economical, comes in a variety of colors, and can be bought almost anywhere. I never use the type of yarn sold in those little skiens just for plastic canvas. It is expensive and not necessary to do so.
I recommend buying Red Heart yarns it can be purchased at many online stores or at your neighborhood Walmart. Also check garage sales for bargains. I have bought bags of yarn very cheap there.
Washing Of Plastic Canvas Stitched Items
If a project gets soiled it can be washed by soaking it in a sink with warm water and a little dish soap. DO NOT use hot water and DO NOT put it in the washing machine or dryer. Just let it soak in the sink for a little while, rinse and let sit in bath tub to drain and dry over night.
Items like a tote bag that will get a lot of handling can be sprayed with Scotchgard to protect it from soiling if desired.
DO NOT dry clean or use cleaning solvents, it could melt the plastic grid. If an item gets dusty just use your vaccuum to remove the dust.
What You Need To Get Started
The first thing you should do is practice the basic stitches so you will need a few sheets of 7 count plastic canvas. Buy a couple of yarn needles especially sold for this type of needlepoint. I say buy a couple because I always lose mine down in the chair cushions. You’ll also need worsted weight yarn and a pair of scissors.
Now that you have your needle, yarn and plastic canvas let’s practice some stitches. To keep a project neat on the wrong side no knots are used. When starting a row a small end of the yarn or tail is left on the backside when you pull the yarn through to the front.
The first few stitches of the are done over that tail on the wrong side to lock the yarn so it won’t come undone.
Continental Stitch: This is a basic stitch that is used on most patterns. Start the stitch by leaving about a 1 inch tail of yarn on the backside and bring your needle up through the hole marked black dot. Go back down to the backside at the red dot. All stitches are done in a left to right manner.
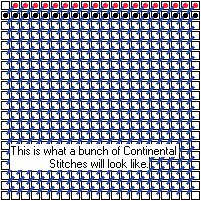
Continental Stitch
Slanted Gobelin Stitch: This stitch really is just a variation of the regular continental stitch but it can be done over 2 or more threads of the canvas at a time. The first stitch of the row is just a continental stitch as before.
The second stitch comes up at the second black dot and down at the second red dot over the first one. Continue across to the left side, flip and start again as before.
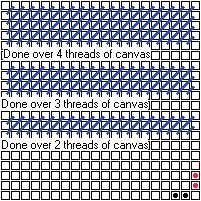
Slanted Goblen Stitch
Gobelin Stitch: Do the stitches up from the back at the black dot and down through the red dot working over the little tail of yarn as before to keep the stitches from coming undone.
The pattern you are going to do will tell you if you should use 1 strand of yarn or 2 . Usually the stitches worked over 2 or more threads will require 2 strands of yarn to cover the grid better.
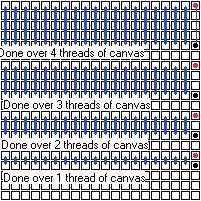
Gobelin Stitch
Overcast Stitch (also called the Whipstitch): This stitch is used to finish off the unstitched edge of a project. When stitching corners I usually make at least 3 stitches instead of the 2 stitches shown.
The whipstitch is used when you are joining 2 pieces of a pattern together such as the sides of a tissue box. Use extra stitches if necessary on the corners or sides if they are required to cover the edge of the grid neatly without showing through. Just the 2 pieces back to back and covercast where they should be joined.
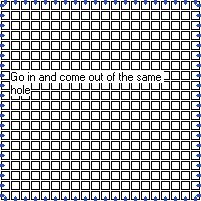
Overcast Stitch
There are tons of other stitches and variations of stitches out there but working with this form of needlepoint is a learning experience and you will learn more tricks of the trade and ways of doing things as you get used to using the basic stitches.
Two Last Tips For You Before You Start Your First Project:
To end off at the end of a row when you are finished. Turn over to the backside of your canvas and run the needle under 4 or 5 stitches then cut the yarn. You will also use this way to start again if you run out of yarn in the middle of a row.
I use 3 feet long pieces of yarn when stitching so you don’t have too many stops and starts. Just run the yarn under a few stitches on the backside and finish stitching across.
That’s It !!! Now You Are Ready To Start Your First Project !!!


Love the content. Can you use worsted ? I have tried using some crochet yarn but a lot of yarns are fuzzy and the cotton yarns I found don’t cover like I want them to. Looking for suggestions
great instructions for a beginner or someone who hasn’t stitched in a while
can anyone tell me what is the best way to stitch a zipper into a plastic canvas project?
I wish more people loved this craft as much as I do!
Thank you! Thank you! Thank you! I needed some simple instructions for a VBS craft and your site provided that.
thanks for all your helpful tips such as the canvas count preference and yarn weight – looking forward to starting a new project
Very good information for anyone new to this craft – well written and illustrated.
This was GREAT for a friend of mine whom I’m trying to teach. Really we’re both learning together!!lol
Great Guide! Thanks