
What you need
Size 6 US or 4mm metric needles
2-50g balls of fluffy brown Fashion yarn
1-100g ball of light/ tan Double Worsted or 8 ply
Small amount of tan /white /black felt
Size 12 inch or 30 cm
Instructions
This adorable knitted Easter Bunny is the perfect addition to your holiday decorations! Meet The Gentlemen, a dapper bunny with a vest and bow tie, ready to impress all your guests. This free knitting pattern is easy to follow, making it a great project for knitters of all skill levels.
Not only is The Gentlemen Easter Bunny cute and cuddly, but he also makes a great gift for kids and adults alike. Knitted in soft and fluffy yarn, this bunny is sure to become a beloved companion for many years to come.
Get your knitting needles ready and download this free pattern today! With just a few hours of work, you can have your very own Easter Bunny to display and cherish.
(Using one strand each of fluffy yarn and the Tan color Double Worsted or 8 ply throughout)
Download the Knitted Bunny Pattern.
Begin at the bottom of the body.
cast on 13 stitches
1) knit into the back of every stitch
2) Knit twice into every stitch ( 26)
3) Knit
4) Knit
5) Knit 2 knit twice into the next stitch ( to the end ) (34)
6) Knit
7) Knit
8) Knit 2 knit twice into the next 2 stitches ( to the end) (50)
9) Knit
10) Knit
11) Knit
12) Knit
13) Knit 2 knit 2 together twice (to the end) (34)
14) Knit
15) Knit
16) Knit
17) Knit
18) Knit 2 knit 2 together ( to the end) (26)
19) Knit
20) Knit
21) Knit
22) Knit
23) This row begins the head knit in a color thread ( to be taken out when your rabbit is finished)
24) Knit 14
39) knit 2 together ( to the end) (13)
40) knit
41) knit 1 knit 2 together ( to the end ) (6)
Thread yarn through stitches and secure.
Draw up your cast on stitches and bring the two edges in this will be your back seam.
Stitch half way up the back then draw up at the top and come down the back seam leave a gap so you can fill with wadding. Before filling the bottom section place a piece of card in the base to give it stability finish filling then close up.
This completes the body.
Ears (make 2)
1) knit into the back of every stitch
2) Knit
3) Knit twice into every stitch ( to the end ) (8)
4) Knit 14 rows
19) knit 2 together knit 4 knit 2 together (6)
20) knit
21) knit 2 together knit 2 knit 2 together (4)
22) knit 2 together twice (2)
23) knit 2 together – thread yarn through stitch and secure.
Make up
Stitch the inner felt ear in place at this stage.
The ears are positioned at the top of the head.
Feet – make 2
With 2 strands of yarn cast on 6 stitches
1) knit into the back of every stitch
2) Knit
3) Inc into first and last stitch (8)
4) Knit
5) Knit
6) Knit
7) Knit
8) Inc into first and last stitch (10)
9) Knit
10) Knit
11) Knit
12) Knit
13) Knit
14) Knit 2 together knit 6 knit 2 together (8)
15) Knit
16) Knit
17) Cast off.
Make up
Stitch the felt sole to the bottom of your feet.
The feet are positioned with the sole facing forwards.
Arms (make 2)
Cast on 4stitches
1) knit into the back of every stitch
2) Purl
3) Knit twice into every stitch (8)
4) Purl
5) Knit 1 knit twice into the next stitch to the end (12)
6) Purl
7) Stocking stitch 15 rows
8) Knit 1 knit 2 together )to the end (8)
9) Purl
Thread yard through the stitches and secure.
Make up
Draw up the cast on stitches and Stitch the two sides together fill with wadding then close the cast off edges now secure in position on your bunny.
Once your rabbit is complete. Use the picture for directions on the face.
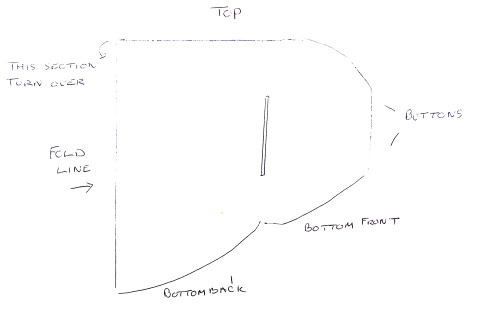
Use your diagram for directions for the felt waste coat and bow tie. Note the waist coat is made in one piece.
That’s it. Finished!


24 knit 14…. i think its knit next 14 rows that makes it right
Interesting thing… goes from (24)Knit 14 to suddenly (39) knit 2 together ( to the end) (13) aren’t there some rows missing… also, nothing about that different color thread… it it to be continued. VERY confusing instructions
I tried to print the gentleman bunny project but there is too much other stuff
on the page so it just can’t be done without having to hand write it
Hi Lyn, to print, you have to register and login and then click print.