What you need
PDF pattern (see below)
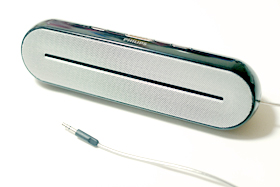
Portable speakers [see image below]
Main fabric (1/2 yard)
Felt for inner (1/2 yard)
Lace (1/4 yard)*
Plastic vinyl
Lace ric rac (1″½ yards) you may mix big and small designs like we did)
Bag straps (2 x 34 inches)
Instructions
Portable speakers are able to enhance and boost the volume of your music from your device, so your friends too can enjoy that awesome playlist you made.
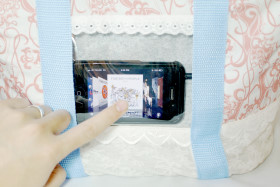
Slide your iPod into the front pocket so you can see what song is currently playing. Swipe to change albums/songs directly through the clear pocket window without the hassle of taking out your device every time you want to skip songs! *
* Tried and tested with iPod & iPhone; feel free to try them out with other music devices!
Ready to make one for yourself?
Notes:
1. Speakers

Close up of portable speakers.
There are many brands of portable speakers in the market. When choosing one for this tote, try to pick the lightest in weight, and slimmest in depth.
2. Lace material
The lace section of the bag (bottom half) is where the speakers sit in. By using lace, since there are perforations in the fabric, the volume of the audio from the speakers is not hindered. So be sure to pick a lace material that is not too dense for sound to travel through (to test, place lace on top of speakers while a song is being played), yet not too delicate to tear with use. Curtain lace and tablecloth lace are good options.
Step 1
Print out iPod Tote Pattern, do not scale. Assemble them together according to the page numbers, ie:
Row 1: 1a, 1b
Row 2: 2a, 2b,
Row 3: 3a, 3b,…. etc.
Align them based on the grey circles in the centre, and tape the pages to form a large pattern. Cut out pattern pieces and then cut out fabric pieces according to pattern instructions.
Step 2

Place Body Top A right side down. Place Window (plastic vinyl) onto the opening and stitch around where the plastic vinyl touches the fabric.

Tip: Sewing plastic vinyl can be tricky as it tends to stick to the exterior of the sewing machine, preventing it from moving. Stick some Scotch Magic Tape under your sewing foot to help the material feed through smoothly.

Step 3:
Turn Body Top A right side up. Place 1 x Body Bottom (lace) right side down, matching the ends that meet at the bottom. Sew across.
Take notice of the picture above—the narrower width of the lace should be facing upwards. Once done, fold down that lace. Now for some decoration!
Step 4:

Sew lace ric rac on the top of the window, and also at the bottom of the window (from end to end where the main fabric meets the lace).

Sweet! You’ve finished one side of the body.
Step 5:

Place Body Top B right side up, and repeat Step 3 & Step 4 to join the pieces together and decorate with lace ric rac.

Step 6:

Pin straps onto both sides of the bag.
For the side with the window, make sure the strap overlaps the raw edges of the left and right side of the window.

Mark 1 inch down from the top to indicate where your stitches should stop.

Stitch straps down.
Tip: If your lace material is stretch or not sturdy enough, use a strip of interfacing under the lace (aligned to the strap) to stabilize it.
Step 7:

Place both body pieces right side facing and stitch down the left and right sides where the pieces meet.
Step 8:

Take the main fabric for the Base piece and fold it into half horizontally. Mark the middle point of the fold on both left and right sides.
Now we will sew this base to your body pieces.

Align the mark you made to the edges that you stitched in Step 7. This helps you to distribute the body pieces evenly around the Base’s rectangle shape.

Pin all around the Base, and stitch carefully to join the Base to the body pieces.
Step 9:

Sew on lace ric rac onto the top of Pocket piece.

Place Pocket piece face down (with the lace trim at the bottom) onto Body Inner A, meeting the edges under the square cut-out. Baste across where the edges meet, and fold Pocket piece up.

Fold under on all 3 sides of the Pocket piece (except for the top with the lace trim because that will be the opening of the pocket), pin, and top stitch.

Step 10:

Slide your speakers into the slit on Body Inner A. Extend the slit upwards if needed to accommodate the size of your speakers.
Step 11:

Place Body Inner A and Body Inner B right sides facing and join the pieces together on the sides as you did in Step 7.
Step 12:

Pin the Base (felt) piece to the body (felt) pieces in the same way as Step 8, but this time leaving an opening of approximately 6 inches.
This opening will be used to turn the bag inside out later. Stitch to join the pieces.
Step 13:

Face both bags (inner and outer) towards each other mouth-to-mouth, with the window & pocket sides up.

Pin the edges of the inner and outer bags, going all round the opening of the bag. Stitch down.
Tip: When stitching through thick layers, use a size 13 or 14 needle to handle the thickness. Going slow will also prevent needle breakage.
Step 14:

From the opening in the inner felt bag, carefully pull out the bag from inside out.

Ta-da!

Top stitch the opening shut.
Step 15:


Now for some final top stitching to hold everything together. Using the guides in the picture above, top stitch the following:
a. All round the opening of the bag—this neatens the opening.
b. On the lace ric rac that is on top of the window—this is to secure the felt flap down.
c. On the bottom lace ric rac – this tacks down the pocket so that the iPod doesn’t slide past this stitch.
d. On both sides of the straps — this tacks down the sides of the pocket, again so that the iPod does not slide away from the window opening.
Be careful to only stitch on this side of the bag so that the needle doesn’t accidentally catch the other side and stitching both sides down together.

Top stitch around the base (stitch in the ditch) to tack down the fabric and felt pieces together.
And you’re done!

Simply turn on the speakers, slide it in through the slit…

… plug it into your music device and have fun!

You can even play the music through the slit!


I love this bag, and would like to make this, but i was wondering if the speaker is removable once the bag is complete, or if you can make the bag and then put the speaker in.