
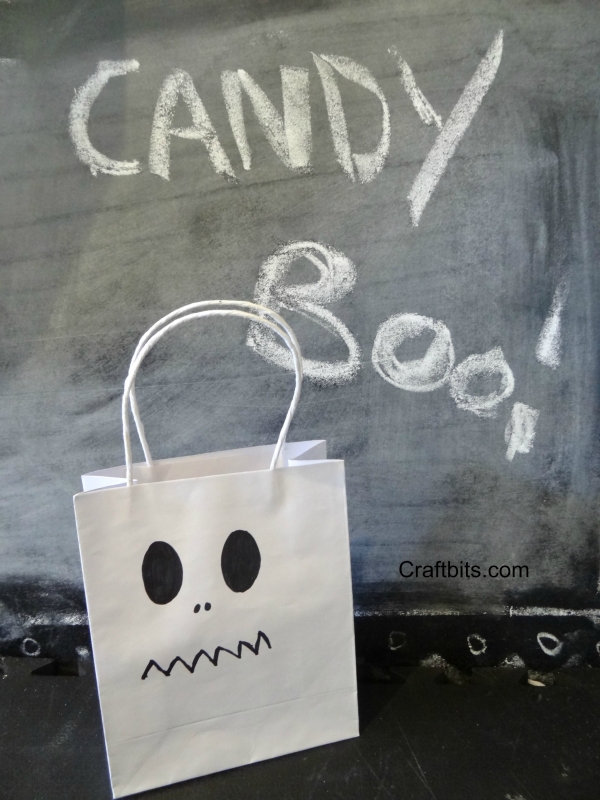
Children can invent their own ghost expressions, from surprised and silly to sleepy or slightly spooky. Because every face is drawn by hand, no two bags will look exactly alike.
Get more details about this project
What you need
White paper gift bags with handles
Black permanent marker
Scrap paper or thin cardboard
Pencil, optional
Halloween candy, small toys or party favors
Tissue paper, optional
Instructions
Step 1: Protect the inside of the bag
Place a piece of scrap paper or thin cardboard inside the paper bag.
This prevents the permanent marker from bleeding through the front of the bag and marking the back panel.
Smooth the front of the bag so you have a flat drawing surface.
Step 2: Plan the ghost face
Decide what expression you would like your ghost to have. You can draw a traditional spooky face or create something funny and friendly for younger children.
Try combinations such as large oval eyes, tiny nostrils, a wobbly smile, a zigzag mouth or a surprised round mouth.
If necessary, lightly sketch the face in pencil before using the marker. Avoid pressing too firmly because pencil lines can dent thin paper.
Step 3: Draw the eyes
Use the black permanent marker to draw two eyes near the upper-middle section of the bag.
The eyes do not need to match perfectly. Slight differences make the ghost look more playful and handmade.
Fill the eyes with black ink, taking care not to oversaturate the paper.
Step 4: Add the nose and mouth
Draw two tiny dots for the nose if desired.
Finish the face with a zigzag, curved or open mouth. Encourage children to experiment with different expressions so that every ghost has its own personality.
Step 5: Allow the marker to dry
Place the bag somewhere safe and allow the marker ink to dry completely.
Keep the scrap paper inside until the ink is dry. This is especially important when children have heavily colored the eyes or mouth.
Step 6: Fill the treat bag
Remove the scrap paper and fill the bag with wrapped Halloween candy, small toys, pencils, stickers or other party favors.
Add white, orange, black or purple tissue paper for a more decorative presentation.
Do not overfill the bag, as too much weight may tear the paper or pull the handles away from the top.
Step 7: Display or give away
Arrange the finished ghost bags on a Halloween party table or hand them out to trick-or-treaters.
You can also write each child’s name on the back and use the bags as personalized classroom or party favors.
Creative Variations
Create a complete collection of ghosts with different facial expressions.
Use orange bags to make jack-o’-lantern faces or green bags for friendly monsters.
Add paper bows, hats or glasses, provided the decorations do not cover the handles or make the bag difficult to carry.
For a classroom activity, give each child a bag and let them design an original ghost character.
Safety Information
Permanent markers can stain skin, clothing, furniture and work surfaces. Protect the table and supervise young children throughout the activity.
Follow the age and safety recommendations printed on the marker packaging. Washable black markers are a more child-friendly alternative, although the finished drawings may smudge if they become wet.
Only place wrapped food inside the bags. Do not allow loose candy or unwrapped food to touch marker ink, glue or decorative craft materials.
Keep small candies and party favors away from children for whom they may present a choking hazard.



just adorable!