
What you need
8 ply wool (worsted weight) in 2 colors for body and mouth
small 6-8 mm safety eyes or small buttons
small amount of polyfill toy stuffing
ribbon, bells, collar or other decorations
Instructions
Starter ring used for all pieces : 3 chain join loop, 2 chain, 5 sc into loop, join to 2nd chain at beginning (6st)pull little tail to make ring snug.
Add marker and start to follow pattern.
Make pieces in the correct order.
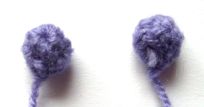
BUNNY EARS
Starter ring *1sc, inc* (x3)(9st) Sc 6 rounds. Finish and cut end with long tail to sew to head.
HEAD
Starter ring *inc all* (x6)(12st) *inc all* (x12)(24st) *1sc, inc* (x9)(27st) Sc 1 round *2sc, inc* (x9)(36st) Sc 3 rounds *3sc, inc* (x9)(45st) Sc 3 rounds *3sc, dec* (x9)(36st) Sc 2 rounds *2sc, dec* (x9)(27st).
Do not end wool just loosen last stitch so you can put on the face.
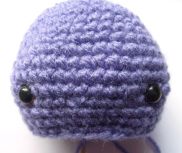
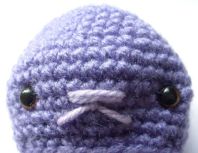
Put in your eyes a couple of rounds up. Make sure your eyes are 1.5″ to 2″ apart. Don’t put on backs till nose is stitched and you’re happy with the face.
BUNNY NOSE STITCHING
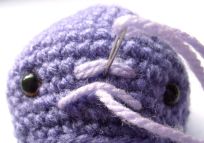
Make a couple of horizontal stitches between the eyes. On the last stitch take the needle down and come out where you want one side of the mouth. Pull wool through.
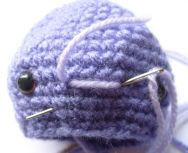
Now go down where you want the other side of the mouth and back out around the middle of the nose.

Do not pull the wool tight instead hold the loop with your finger.
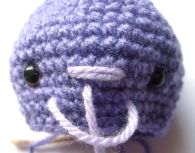
Now pass the needle under this loop and start to pull the wool tighter to make the mouth. Go back down under the nose and finish off inside head.
Start stuffing the top of the head.
Continue with the pattern *1sc, dec* (x9)(18st) *1sc, dec* (x6)(12st).
Finish and cut end short and hide inside body. Finish stuffing the head.
The hole gets covered by the body later.
ARMS
Starter ring Sc 1 round. Do not stuff. Finish and end with long tail to sew to body.
LEGS
Starter ring *1sc, inc* (x3)(9st) Sc 2 rounds.
Finish and cut end with long tail to sew to head .JPG) .
.
BODY
Starter ring *inc all* (x6)(12st) *1sc, inc* (x6)(18st) Sc 1 round *2sc, inc* (x6)(24st) Sc 3 rounds *4sc, dec* (x4)(20st) Sc 1 round.
End leaving a long tail to sew to head later. Use only a small amount of stuffing in the body. If you over stuff he won’t stand.
FINISHING
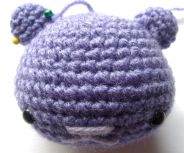
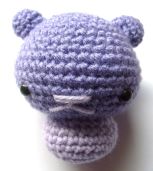
Pin bunny ears (Teddy ears shown in photo) to the head. Make sure you look at the head from all angles so they line up properly.
Use a ladder stitch and sew down both sides of the head.
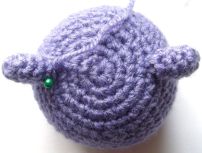
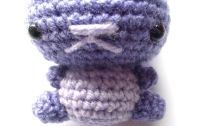
Pin body to the head making sure you cover the hole. Ladder stitch around.
Pin arms on bunnies body close to his head and sew on.
Now flatten the base a little to find where the legs should go on. They should be slightly forward, not at the sides.
Pin and sew.
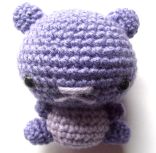
All done!


What are the dimensions of the finished doll?
Absolitly lovely!!!!!
Great pattern!! Although, sometimes it’s a little hard to follow your pattern in paragraph form, I hope it’s okay that I structured it a little…
BUNNY EARS starter ring
*1sc, inc* (x3)(9st)
Sc 6 rounds
*1sc, dec* (X3)(6st)
Finish and cut end with long tail to sew to head
ARMS Starter ring
Sc 1 round Do not stuff. Finish and end with long tail to sew to body.
LEGS starter ring
*1sc, inc* (x3)(9st)
Sc 2 rounds Finish and end with long tail to sew to body.
HEAD Starter ring *inc all* (x6)(12st)
*inc all* (x12)(24st)
*7sc, inc* (x9)(27st)
Sc 1 round 28
*2sc, inc* (x9)(36st)
Sc 3 rounds
*3sc, inc* (x9)(45st)
Sc 3 rounds
*3sc, dec* (x9)(36st)
Sc 2 rounds
*2sc, dec* (x9)(27st) *make the face here and stuff*
*1sc, dec* (x9)(18st)
*1sc, dec* (x6)(12st)
BODY Starter ring
*inc all* (x6)(12st)
*1sc, inc* (x6)(18st)
Sc 1 round
*2sc, inc* (x6)(24st)
Sc 3 rounds
*4sc, dec* (x4)(20st)
Sc 1 round End leaving a long tail to sew to head later. Use only a small amount of stuffing in the body. If you over stuff he won’t stand.
THANK YOU for doing that and sharing it! That is so much easier to follow.
I think it’s supposed to be *7sc, inc* (x9)(27st).
adorkable!
OMG!! This is so cute ><
a ladder stich is like a baseball stich
COOL
I thought this was so cute… But I don’t seem to get it right. The rounds just doesn’t add up on the head. The last round ends up with 33 stitches and that is way too many for joining with the 20 stitches on the torso. Have you counted incorrectly on the head or what am I doing wrong? It starts to get weird when you say “*1sc, inc* (x9)(27st)” on the head directions, because that leaves 6 stitches from the round before that aren’t used at all…
i love it but sadly i don’t know how to crochet..hehhe..still learning
Your just so good and you never seem to stop coming up with great patterns
wow! that is so cute!
so cute! What is a ladder stitch?