
What you need
For two purses:
1 x Exterior fabric W 38 cm (15″) x L 25 cm (9.8″)
1 x Interior fabric W 38 cm (15″) x L 25 cm (9.8″)
1 x Vilene General Purpose Single-Sided Fusible Woven Interlining W 38 cm (15″) x L 25 cm (9.8″)
1 x Vilene Fusible Fleece Single-Sided: Light Loft W 38 cm (15″) x L 25 cm (9.8″) (this is optional – use it if you would like the purse to have a little “puffiness”)
2 x Mini Round Purse Frame
1 x Paper cord for purse making L 30 cm (12.0″)
Instructions
Finished Size
W 9.5 cm (3.75”) x H 6.5 cm (2.5”) (excluding the clasp)
You will need (besides the materials above)
• Sewing machine (you can hand sew it too)
• Matching thread
• Pins
• Iron
• Something pointy (e.g. small flat screw driver or our hand-held purse inserting tool) for inserting the purse into the frame.
• Glue (in this example UHU textile glue was used – It’s great for small purses as you can easily spread the glue in the frame gap using a stick. Also, you can easily clean the frame surface (not the fabric) using acetone. You can use other glue such as Gütterman textile glue.)
• Small piece of waste fabric
Order of Making
1. Preparation
2. Sewing
3. Assembly
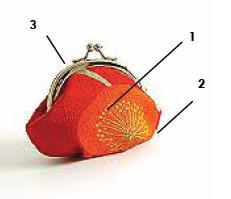
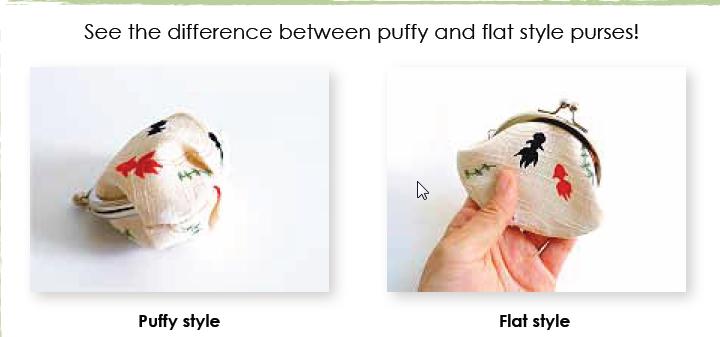
Note 1: The patterns provided are for flat and puffy styles. The image shown above is the puffy style. Later, you can see the differences between the flat and puffy purses.
Note 2:
RS – right side
WS – wrong side
1. Preparation
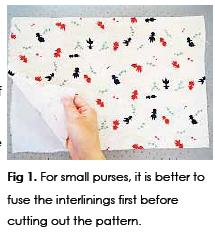
Before you cut the fabrics, Place the general purpose woven interlining with the glue facing up. Place the exterior fabrics with the WS facing down on top of the woven interlinings (fig 1). Using an iron, fuse the interlining onto the WS of the exterior fabrics.
If you are also using fusible fleece:
Place the Vilene light loft fusible fleece with the glue facing up. Place the interior fabrics with the WS facing down on top of the fleece. Using an iron, fuse the interlining onto the WS of the exterior fabric.
*Do not iron the actual fleece as this will melt the fleece and stick to the iron!
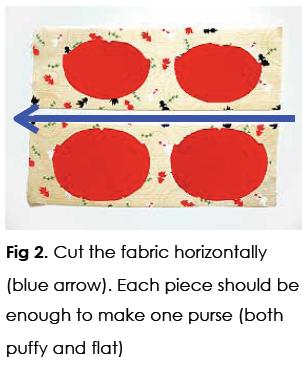
With the mini purse pattern provided, cut out the fabric. Make sure all the notches are transferred as this will make your life easier later! (fig. 2). Use half for one purse and the other for the second purse.
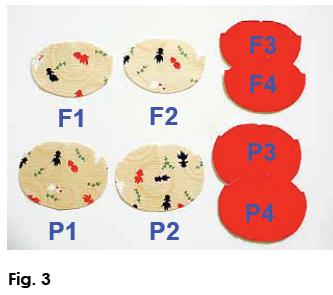
You should now have two exterior and interior pieces per purse (fig. 3).
F1 & F2: Exterior pieces for the flat style.
F3 & F4: Interior pieces for the flat style
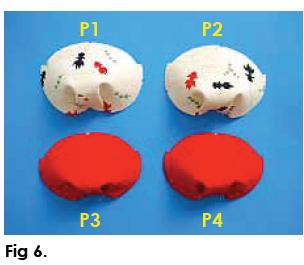
P1 & P2: Exterior pieces for the puffy style.
P3 & P4: Interior pieces for the puffy style.
2. Sewing
Puffy Style Only:
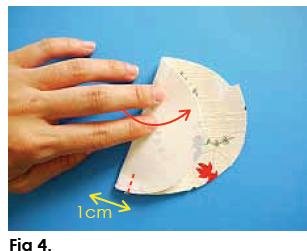
Fold the exterior piece with the RS facing together at one of the notches.
Pin and stitch 1 cm inwards with 1 cm from the edge (fig. 4).
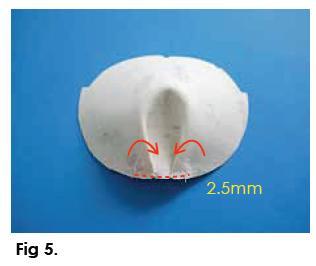
Repeat for the other notch. Fold the two pleats inwards and baste 2.5 mm from the edge (fig. 5).
Repeat this process for all the exterior and interior pieces (P1 to P4) (fig. 6).
Both Puffy & Flat Style
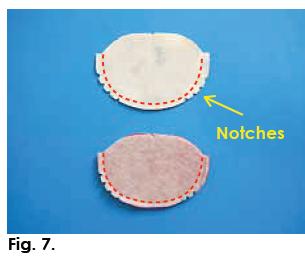
With the RS facing together, stitch the side seams for both interior and exterior (5 mm seam allowance). Make a few notches around the corner. This will make it easier to turn right side out later (fig. 7).
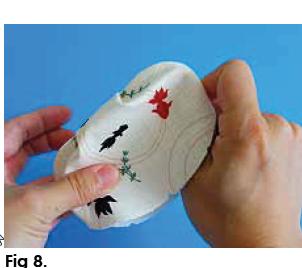
For the best result, turn the exterior piece right side out and finger-press the seam lines to let the piece get used to its shape (fig. 8). Then turn the exterior piece wrong side out once again.
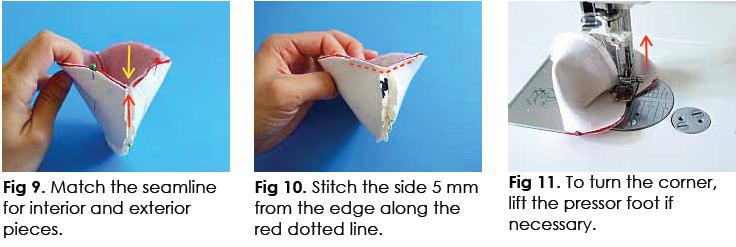
Turn the interior piece right side out. Insert the interior piece into the exterior with the right sides together. Ensure the seamlines are matched (red and yellow arrows) (fig. 9).
Stitch between the two notches via the seamline 5 mm from the edge (red dotted line) (fig. 10).
Lift the pressor foot while the needle is still down to turn the corner at the seamline if necessary (fig. 11).
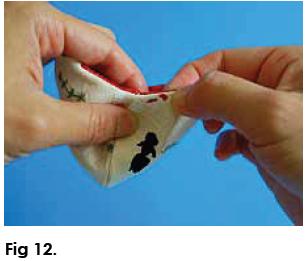
Turn the work right side out. Make sure the seamline is pressed neatly (fig. 12). Trim any excess interior fabric sticking out (if any).
Match the top centre notches for the interior and exterior (yellow arrow) and place pins (fig. 13). Top stitch the raw edge with the interior side facing up (fig. 14) no more than 5 mm from the edge. Repeat for the other side.
This is how your purse should now look like (fig.15).

3. Assembly
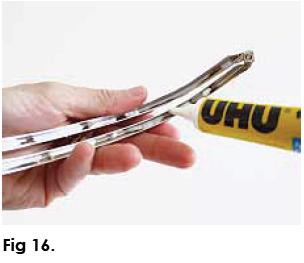
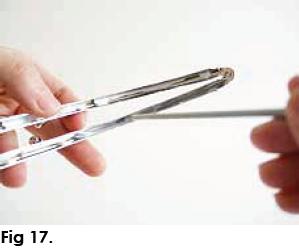
* The frame used in fig. 16 and 17 is larger than the one used in the actual purse to help show the correct method of glueing more clearly.
Apply fabric glue into the gap of the purse frame (fig. 16). Do not apply too much as this may cause glue to overflow. Using something pointy, evenly spread the glue making sure all surfaces are covered (fig. 17).
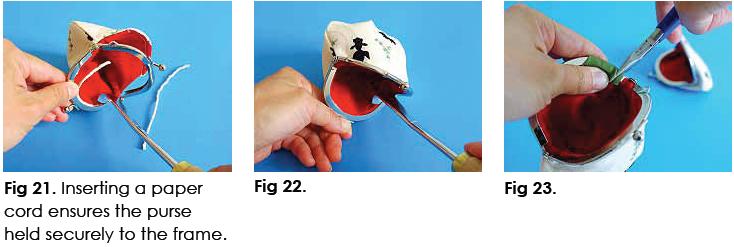
Match the centre of the purse to the frame (fig. 18). Using something pointy (I used a small flat screw driver) push the purse into the frame. Use the sewn line as a guide for where to push in (fig. 19). I find it easier to start from the center and then work both sides as this allows me to adjust the position of the purse more precisely. For the best result, tighten the surface carefully (fig. 20).

Slightly unwind the paper cord and push it into the gap of the frame (fig. 21). Trim the paper cord approx. 0.5 cm before the corner of the purse. Using something pointy, push the cotton thread all the way into the frame (I have use the hand-held purse inserting tool) (fig. 22). Make sure this process is done properly as it ensures bonding the purse to the metal frame.
Cover the corner of the frame with waste fabric. Squeeze gently to secure the purse into place with the pliers (fig. 23).
Your mini purse is now ready. Enjoy!
Reprinted with permission from Kyoko Nakayoshi’s website Cotton and Cloud.


Love it, thanks for sharing!!
Awsome
i word!
AWSOME!
awsome dog
u could just use the end of a sock ??
This is so cute. Where do you get the Mini Round Purse Frame?