
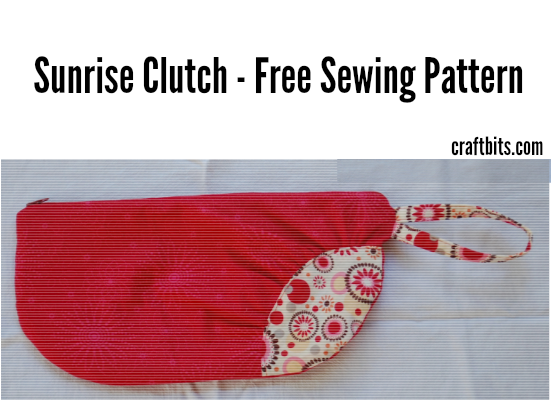
What you need
3/8 yd. fabric for main bag
15″ pocket fabric
3/8 yd. lining fabric
1 yd. 1/4″ rope or cording
2/3 yd. craft wt. fusible interfacing
Compass for drawing 8″ diameter circle
Instructions
1. From main bag fabric, cut one piece 12 1/2″ x 23″ for main bag. Cut two pieces 4″ x 12″ for tabs.
2. From pocket fabric, cut one piece 14″ x 23″. Cut one circle 8″ in diameter.
3. From lining fabric, cut one piece 12″ x 23″ and one circle.
4. Cut interfacing, one piece 12 1/2″ x 23″ and one circle.
…………………………………………………………………………………………………….
1. Iron interfacing to main fabric piece and circle of pocket fabric.
2. Fold the pocket piece in half and topstitch close to fold. Place this piece onto onto main bag fabric, matching the lower raw edges. ** If using a one direction design; make sure picture is upright when pocket fabric is placed on it. Stitch down the pocket fabric to make pockets. Sew at least one down the center and more for additional pockets.
3. Fold this main fabric/pocket fabric piece with right sides together, matching pocket juncture. Stitch down with 1/2″ seam to make tube.
4. Attach bottom circle (pocket fabric) by quartering the circle edge and base of the tubed main edge, clipping along tubed edge to make pieces fit. Sew 1/2″ seam and turn right side out.
5. Make the lining: if desired, pockets can be added to lining at this point. Sew the side edges as above, but leaving a 6″ gap in the middle for turning. Do not turn right side out.
6. Create tabs by sewing the 4″ x 12″ into 12″ tubes using 1/2″ seam. Turn right side out and press. Cut into 3″ segments (8 segments total).
7. Fold the 3″ segments in half to make 1- 1/2 by 1 -1/2″ tabs. Baste these tabs evenly around top of main bag tube, matching raw edges. The tabs will be upside down on the right side of main bag.
8. To finish, place main bag inside lining bag, right sides together. Stitch (1/2″ width) all around top edge, stretching the inner to fit.
9. Turn right side out through opening in lining.
10. Stitch opening in lining closed with either machine or hand stitching.
11. Press the top edges neatly and topstitch close to upper edge.
12. Thread cording through tabs and tie a knot. You now have a beautiful bag!


I made some beautiful designer Halloween pail bags for my granddaughters. This projects allows for fun creativity!