
What you need
Various pieces of sea glass (pieces smaller than ½-inch square are difficult to work with)
Up to 6 yards of 16-gauge copper or silver wire
Small needle-nose pliers (square-end and round-end if possible)
Drill and 5/64 drill bit
Drift wood or dried seaweed pod
Instructions
OK, it doesn’t actually “chime” in the traditional sense but if you look at this sculptural sea-glass decoration long enough you may just hear the ocean’s salty roar. Hang it near the entrance to your garden or in a sunny window – just be sure to place it somewhere within close visual range because the light shining through the glass is so beautiful you won’t want to take your eyes off of it.
Arrange rows of sea-glass in an attractive pattern. Working in odd numbers usually creates a more interesting design. For example, 3 rows with 5 pieces of sea-glass each or 5 rows of various lengths as pictured here.
Estimate how long you want each row to be and cut at least three times that much wire. For example, if you want a row to be 12 inches cut at least 36 inches of wire. It’s difficult to know exactly how much wire you’ll need because some pieces of glass require more wrapping than others. For this project I opted to work directly off the main spool without cutting rather than be caught short.
Begin wrapping the first piece of glass approximately 5 inches from the end of the wire. The extra wire will be used later to thread through the driftwood when all the rows are complete. There’s no exact science for wrapping the glass, simply follow the contours of each piece, wrapping and tightening the wire as you go. Use your pliers to pull and twist the wire securely around each piece of glass.
Wrap the wire around a pen or pencil to create the curls between each piece of sea-glass. Continue wrapping until you’ve finished a row. Use needle-nose pliers to shape the spiral at the end of each row. Round-end pliers make better spirals than square-ends, but aren’t absolutely necessary. Complete all the rows.
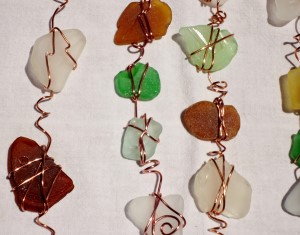
Hint: If you’re not 100 percent confident with your wrapping, place a small dot of Super Glue gel on each piece of glass to hold it securely on the wire.
Drill holes in your wood or seaweed pod, spacing them evenly according to how many rows you wired. Thread the unused end of the wire through the hole and twist it around a pen to create a curled “stop” that will hold the wire in place.
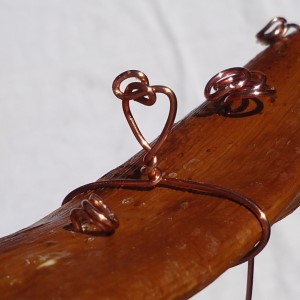
Cut a length of wire (6 to 10 inches depending on the size of your driftwood) and wrap it around the center of the driftwood. Tighten the wire around the wood with your pliers and twist a loop for hanging at the top of the driftwood. Before tightening down the wire, test your piece to find out where the gravitational center is so the chime will hang evenly when displayed.


Looks lovely and easy. I’ve collected bits of old blue and white china from my garden and have been wondering what to do with it. Think I’ll use it with some bits of sea glass from the beach. X
I love it and me being a little uncrafty doesn’t seem to be to hard. I am going to give it a try, Thanks