
What you need
Card stock
Ruler
Pencil
Scissors
Wool fabric-tan and red
Tailor’s chalk
Straight pins
Black embroidery felt
Embroidery needle
Stencil brush
Red acrylic paint
Paper towel
New pencil
Black acrylic paint
Sewing machine
Craft glue
Sticks
Pruning shears
Instructions
Gift cards have become incredibly popular, especially for those hard-to-shop-for-names on your Christmas list, but let’s face it, the little paper envelopes that come with the cards are boring.
Made using recycled wool clothing and sticks from your backyard, this cheer little pocket does double-duty as an ornament. Set up a crafting assembly line and you can have your Christmas shopping done in an afternoon.
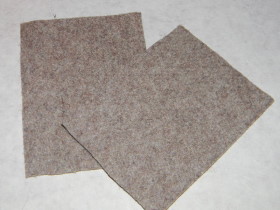
Preparing Wool Clothing: Wash like-colors with like-colors in hot water using your washing machine. This will clean the fabric, and in the case of knitted items, it will begin the felting process. Dry the garments in the dryer. Cut everything apart at the seams so that you have flat pieces to work with.
Step 1
On card stock, trace a 3-inch-wide by 4-inch-long rectangle for the pocket pattern, a 1-inch square with rounded corners for the nose pattern, and a 1-inch-wide by 2-inch-long leaf shape for the ear pattern. Cut out the shapes.
Step 2
Lay the pocket pattern and the ear pattern on the wool fabric you are using for your reindeer head. I used a beige/gray color, but tan, camel or light brown will also work. Trace around each shape twice using tailor’s chalk. Cut out the wool pieces. Cut a 1/4-inch-wide by 8-inch-long strip for the handle from the same wool. Trace the nose pattern on red wool and cut out.
Step 3
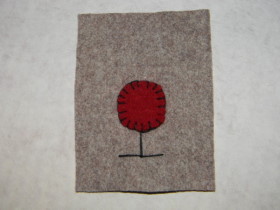
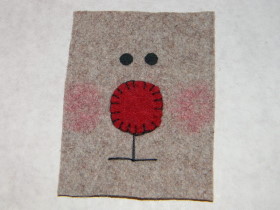
Place one wool pocket shape on your work surface with the short ends at the top and bottom. Center the nose between the long sides and slightly lower than halfway down the rectangle. Pin the nose in place.
Step 4
Using three strands of embroidery floss, stitch around the nose using a blanket stitch. At the bottom of the nose stitch a 1/2-inch vertical line, and a 1/2-inch horizontal line extending from each side on the end of the vertical line.
Step 5
Dip a stencil brush in red acrylic paint. Scrub the bristles into a paper towel to remove most of the moisture. Pounce a 1-inch cheek on each side of the nose.
Step 6
Dip the eraser end of a new pencil in black acrylic paint. Dot two eyes 1/2 inch above the nose and 1/4 inch apart. Allow the paint to dry.
Step 7
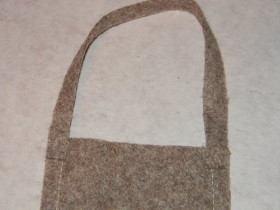
Place the two pocket rectangles together with the reindeer face facing up. Pin the long edges and the bottom edge together. Sew the pinned edges using matching thread and a 1/4-inch seam allowance. Note: The raw edges will remain on the outside of the pocket.
Step 8
Lay the pocket face down on your work surface. On one side of the handle, apply craft glue to the ends. Place one end on one top corner of the pocket and the remaining end on the other top corner. Allow the glue to dry.
Step 9
Flip the pocket back over to the front. Position the length of the ears horizontally, and spaced approximately 1 inch apart at the top of the reindeer face. Secure the ears with craft glue.
Step 10

Gather sticks from your yard. Using pruning shears, cut 2 1/4-inch “Y” shaped lengths. Place the sticks on the ears and angle them slightly outward. Secure to the pocket with black embroidery floss. Note: Secure the sticks to the front of the pocket. Do not stitch through to the back or your gift card will not fit in the pocket.
This project can also be constructed using purchased craft felt.


What do you think of this project? Let us know!