
What you need
Base fabric–wool is best
Feltable bits–unspun wool roving, yarn, silk, mylar, etc
Felting needles and a block of dense foam or felting brush
Instructions
The process uses a barbed needle to mesh layers of fiber together into one piece. You stab the needle through all the layers of material over and over again. The barbs cause the fibers to tangle and eventually they are so tangled that the layers become one piece of fabric.
You can embellish with wool roving, yarn, ribbon, silk fabric, and lots of other materials. There’s no need for thread, a bobbin, or any previous sewing experience. And it only takes a few seconds to learn this simple technique.
CAUTION: This is not a craft for kids! The needles are extremely sharp and have little barbs like fishhooks. Use extra caution when needle felting by hand.
How to needle felt:
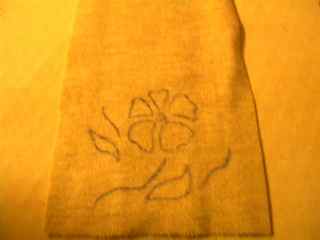
Step 1: Draw out your design on your base fabric. Some people like to freehand their felting to create abstract patterns. But if you are going for a specific look, it’s best to draw the design onto the fabric. I hate to draw, so I use stencils, printouts, tracings, even cookie cutters to make my designs.
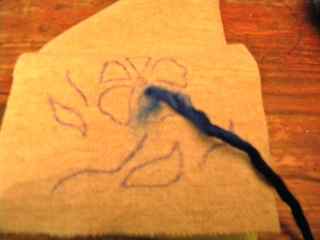
Step 2: Place the base onto the block of foam or brush with the “right” side facing you. Lay the wool roving or yarn onto the design and start stabbing it with the felting needle. The fibers will start to catch on each other and the roving will shrink down into felt.
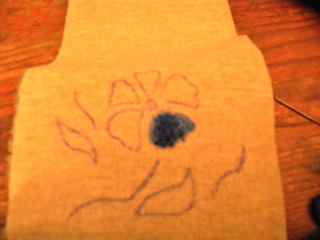
Step 3: Continue stabbing until the felt is suitably hard and stuck to the base. Then add your next color or feature. Repeat until your entire design is filled in.
Bonus Step: For extra points, add details with embroidery or beads.
Step 4: Step back and admire your work. Maybe take a picture and post it online.
Helpful Hints:
1) My favorite felting fiber is Lamb’s Pride Bulky yarn. (Any 100% wool yarn will work) It’s cheaper than buying roving. It’s pure wool, so it felts beautifully. All you have to do is “untwist” it to get useable loose wool.
2) Try using variegated yarns and wools to add dimension and texture to your project.
3) As you felt, your piece will stick to the brush or foam underneath. So, periodically you should pull it up off the brush.
4) The back of your piece will look fuzzy when you’re done. If this bothers you, just flatten it with a steam iron and you’ll have a reversible design.
5) The longer you felt, the more the design is going to shrink. Just keep adding more fiber until you have the entire design filled in. Don’t worry, it takes more fiber than you think.
6) You can needle felt directly onto garments like wool coats, sweaters and mittens. Or you can felt the design on the fabric pieces before you sew the garment together. It’s up to you!
NOTE: Needle felting does require a lot of repetitive motion. If you have a large area to felt, or have wrist/hand problems like arthritis or carpal tunnel syndrome, you may want to use a needle felting machine like the Janome FM-725. This way the machine does all the work and you simply guide the fabric where you want it felted, and there’s no need for the foam block or brush. Felting machines also have finger guards, so you’re less likely to stab yourself.


What do you think of this project? Let us know!