
What you need
Wood plaque
Paints
Brushes
Tack cloth
Instructions
Paints Used
Delta Ceramcoat
White 0202
Black 2506
Empire Gold 2412
Bright Yellow 2027
Straw 2078
Tangerine 2043
Lt. Foliage Green 2537
Med. Foliage Green 2536
Black Green 2116
Periwinkle Blue 2478
Tompte Red 2107
Charcoal 2436
Hammered Iron 2094
Quaker Grey 2057
Spice Brown 2049
Burnt Umber 2025
Delta Ceramcoat is the brand used by this artist and is provided to you as a guideline however you can use any craft paints to complete this project.
Brushes
3/4″ or larger flat glaze brush
1/2″ flat shader
assorted small flat shaders, sizes 2-8
#2 script liner
#3 round
1/4″ mop brush
Scarecrow Line Drawing Pattern
Right-click (or click and hold for Mac users) on the line drawing above and save it to your hard drive. Open the image in any browser or graphics program and print. This should print out the correct size for the above plaque. If using a different sized plaque, either re size the image to desirable dimension in your graphics program and then print, or use the reduce/enlarge function on a copy machine. Repeat the same procedure to print the image of the finished plaque. Click here to print only the text on this page.
Lightly sand the wood to remove any minor imperfections. Remove dust with a tack cloth. It’s not necessary to seal the wood, but do so if you prefer it.
Transfer just the moon onto your wood and base coat with Empire Gold. Base coat the remainder of the plaque with Black. Double load a 3/4″ glaze brush (or larger if you have one) with Tangerine and Empire Gold. Use several thin layers with the Tangerine facing the outside line of the moon. Hint: The more layers you use, and the thinner they are, the better they blend and the more realistic and 3-dimensional your moon will appear. Now using the same technique and the same brush double loaded with Bright Yellow and Empire Gold, create the highlight in the center of the moon. Do this with the Bright Yellow facing the inside of the moon using a pivot type stroke. When dry, transfer all but the scarecrow’s face of the pattern onto your wood.
Scarecrow Shirt
Base coat the shirt with Medium Foliage Green. Shade around the outside of the shirt, in the creases, along the cuffs, above and below the belt, down the button opening and around the pocket with a light float of Black Green using a small flat shader. Fill in the buttons with Black Green using a small (#3) round brush.
Belt, Patch, Hat Band, Ropes around neck and wrists:
Base coat with Tompte Red.
Bluejeans
Base coat the bluejeans with Periwinkle Blue and shade around the outside, along the creases and around the patch using a small flat shader with a light float of Black.
Scarecrow Head and Gloves
Base coat with Straw and shade around outside perimeter of the head and in the folds and creases of the neck with Spice Brown using a small flat shader. Accentuate with Burnt Umber.
Hat, Boots, Cat:
Base coat with Charcoal. Shade around the perimeter of the hat, boots and cat where they are inside the moon with Black and in the areas outside the moon with Hammered Iron. Add the head opening on the hat with Black and shade around the outside of the opening with Quaker Grey and then a light float of white to accentuate. Shade beneath the brim with Black. Shade in the cat’s tail with a float of Black. Add whiskers using Black on a liner brush. Shade the lower edge of the boot cuffs and over the creases in the boots with Quaker Grey. Shade beneath the boot cuffs with Black.
Face and other details:
Transfer the face pattern to the wood. Using a #2 liner, outline and fill in the face details. Paint the eyes white, outline in Charcoal and add the pupils with Charcoal. Use Charcoal to fill in the dark loop of the belt. Use Burnt Umber on a liner brush to add the stitches around the patch and details in the face such as eyebrows and stitching. Also use Burnt Umber to outline the scarecrow’s right-hand glove. Using a #8 flat shader, use White to do a ribbon (or back-to-back) float on the hatband. The straw is done with the liner brush, first using Burnt Umber for each strand and then, directly next to and touching each strand, a strand of Empire Gold. Using a small shader with thin floats, accentuate any dark shading using Black (around and underneath the collar, around the cuffs, etc.). Use Burnt Umber to accentuate the shading in the gloves and around the collar. Add a few Bright Yellow highlights to the gloves. Using your 1/4″ mop brush and a dry brush technique, add a few highlights to the shirt using Light Foliage Green, to the bluejeans using white and add a rosy glow to the cheeks using Tompte Red. Dry brush a few highlights on the kitty with Quaker Grey.
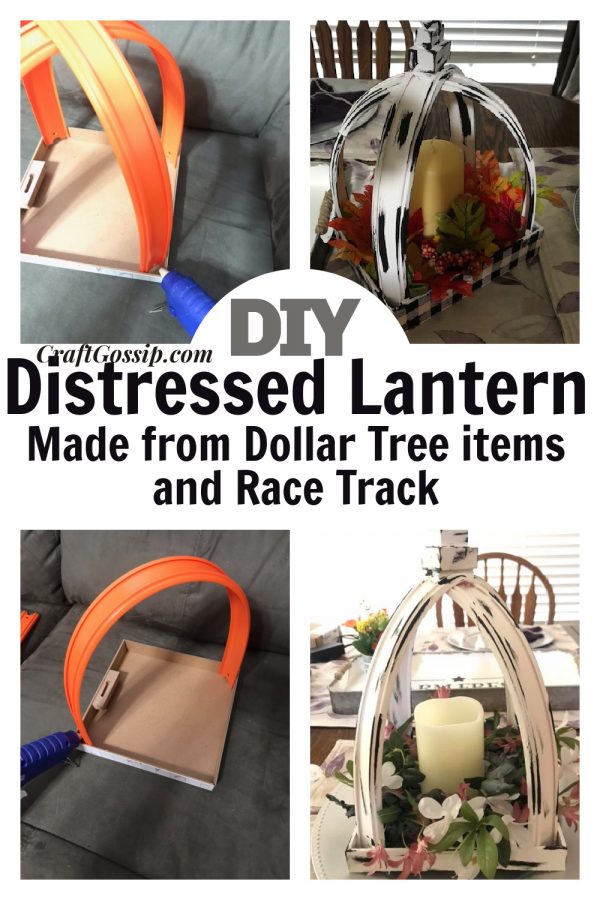
Finishing
Using Empire Gold and Tangerine in a ratio of 6:1, add the strip of gold around the outside of the frame. Sand lightly with a piece of brown paper sack and use a tack cloth to remove any dust. Spray with two coats of satin-finish spray varnish, allowing ample drying time between coats.
This project was contributed by Tole Expressions for more free decorative painting projects and supplies please visit their website.


Charming project .