
What you need
4 ply worsted weight yarn
2 balls tan (MC/ main color)
1 ball each of brown (color A) and off-white (color B).
Crochet hook size F
Two buttons for eyes
2 brass buttons
toy filling
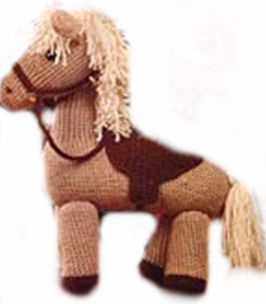
Pony is 17″ (43 cm) high.
Instructions
Head – Rnd 1 – With MC, Ch 2; 6 Sc in 2nd Ch from hook, do NOT sl st to join.
Work in a spiral using a marker at beg of eaCh rnd.
Rnd 2 – 2 Sc in each Sc around. (12 Sc).
Rnd 3 – * 2 Sc in next Sc, Sc in next Sc * repeat from * around. (18 Sc).
Rnd 4 – * 2 Sc in next Sc, Sc in each of next 2 Sc * repeat from * around. (24 Sc).
Rnd 5 – * 2 Sc in next Sc, Sc in each of next 3 Sc * repeat from * around. (30 Sc).
Rnds 6 – 14 – Sc in each Sc around.
Rnd 15 – * 2 Sc in next Sc, Sc in each of next 4 Sc * repeat from * around. (36 Sc).
Rnd 16 – * 2 Sc in next Sc, Sc in each of next 5 Sc * repeat from * around. (43 Sc).
Rnd 17 – * 2 Sc in next Sc, Sc in each of next 6 Sc * repeat from * around. (48 Sc).
Rnds 18-28 – Sc in each Sc around.
Rnd 29 – (Dec 1 Sc in next 2 Sc, Sc in each of next 6 Sc * repeat from * around. (42 Sc).
Rnd 30 – Sc in each Sc around.
Rnd 31 – * Dec 1 Sc in next 2 Sc, Sc in each of next 5 Sc * repeat from * around. (36 Sc).
Rnd 32 – * Dec 1 Sc in next 2 Sc, Sc in each of next 4 Sc * repeat from * around. (30 Sc).
Rnd 33 – * Dec 1 sac in next 2 Sc, Sc in each of next 3 Sc * repeat from * around. (24 Sc).
Rnd 34 – * Dec 1 Sc in next 2 Sc, Sc in each of next 2 Sc * repeat from * around. (18 Sc).
Rnd 35 – * Dec 1 Sc in next 2 Sc, Sc in next Sc * repeat from * around. (12 Sc).
Rnd 36 – * Dec 1 Sc in next 2 Sc * repeat from * around. (6 Sc).
Rnd 37 – * Dec 1 Sc in next 2 Sc * repeat from * around. (3 Sc).
Neck and Body –
Rnd 1 – With MC, ch 24 and join with sl st to form ring; Sc in each Ch around (24 Sc), do NOT sl st to join but work in a spiral as before.
Rnd 2-3 – Sc in each Sc around.
Rnd 4 – 2 Sc in first Sc, Sc in each Sc around. (25 Sc).
Rnd 5 – repeat Rnd 2.
Rnd 6 – 2 Sc in first Sc, Sc in each Sc around. (26 Sc).
Rnd 7 – repeat Rnd 2.
Rnd 8 – 2 Sc in first Sc, Sc in each Sc around. (27 Sc).
Rnd 9 – repeat Rnd 2.
Rnd 10 – 2 Sc in first Sc, Sc in each Sc around. (28 Sc).
Rnd 11 – repeat Rnd 2.
Rnd 12 – 2 Sc in first Sc, Sc in each Sc around. (29 Sc).
Rnd 13 – repeat Rnd 2.
Rnd 14 – 2 Sc in first Sc, Sc in each Sc around. (30 Sc).
Rnd 15 – repeat Rnd 2.
Rnd 16 – Ch 21, Sc in 2nd Ch from hook and in each of next 19 Ch sts, Sc in each of next 30 Sc in Rnd 15, working across opposite side of foundation Ch, Sc in each of next 20 Ch sts, Sc in end Sc (71 Sc), do NOT join but work in a spiral as before.
Rnd 17 – * Sc in each of next 7 Sc, 2 Sc in next Sc * repeat from * 7 times, Sc in each of next 6 Sc, 3 Sc in next Sc. (81 Sc).
Rnd 18 – * Sc in each of next 6 Sc, 2 Sc in next Sc * repeat from * 9 times, Sc in each of next 7 Sc, 2 Sc in each of next 3 Sc. (94 Sc).
Rnd 19 – * Sc in each of next 9 Sc, 2 Sc in next Sc * repeat from * 7 times, Sc in each of next 7 Sc, (2 Sc in next Sc, Sc in next Sc) 3 times. (105 Sc).
Rnd 20 – Sc in each of next 97 Sc, (2 Sc in next Sc, Sc in each of next 2 Sc) 3 times, Sc in last Sc. (108 Sc).
Rnd 21 – * 2 Sc in next Sc, Sc in each of next 9 Sc * repeat from * 9 times, 2 Sc in next Sc, Sc in each of last 7 Sc. (119 Sc).
Rnds 22-25 – Sc in each Sc around.
Rnd 26 – * Dec 1 Sc in next 2 Sc, Sc in each of next 9 Sc * repeat from * 9 times. dec 1 Sc in next 2 Sc, Sc in each of last 7 Sc. (108 Sc).
Rnds 27-32 – Sc in each Sc around.
Rnd 33 – * Dec 1 Sc in next 2 Sc, Sc in each of next 8 Sc * repeat from * 9 times, dec 1 Sc in next 2 Sc, Sc in each of last 6 Sc. (97 Sc).
Rnd 34 – * Dec 1 Sc in next 2 Sc, Sc in each of next 7 Sc * repeat from * 9 times, dec 1 Sc in next 2 Sc, Sc in each of last 5 Sc. (86 Sc).
Rnd 35 – * Dec 1 Sc in next 2 Sc, Sc in each of next 4 Sc * repeat from * to last 2 Sc, Sc in each of last 2 Sc. (72 Sc).
Rnd 36 – Sc in each of next 24 Sc, (dec 1 Sc in next 2 Sc, Sc in next Sc) 5 times, Sc in each of next 23 Sc, (dec 1 Sc in next 2 Sc, Sc in next Sc) 3 times, dec 1 Sc in next 2 Sc. (63 Sc).
Rnd 37 – * Dec 1 Sc in next 2 Sc, Sc in next Sc * repeat from * around. (42 Sc). Fasten off leaving a sewing length. Stuff Body and sew bottom seam closed.
Ear Piece – (make 4) – With MC, ch 15.
Row 1 – (wrong side) – Sc in 2nd Ch from hook, Sc in each of next 9 ch, hdc in each of next 3 ch, 3 hdc in end Ch, working across opposite side of foundation Ch, hdc in each of next 3 Ch, Sc in each of last 10 Ch, turn.
Row 2 – Ch 1, Sc in each of first 5 Sc, hdc in each of next 5 Sc, dc in each of next 3 hdc, 2 dc in each of next 3 hdc, dc in each of next 3 hdc, hdc in each of next 5 Sc, Sc in each of last 5 Sc. Fasten off.
With wrong sides facing and working on back lps, sl st 2 Ear Pieces tog. repeat with rem 2 Ear Pieces.
Tail – Cut 40 lengths of B, 13 ” long. With ends even, tie a separate string of B around centre point. Fold in half and wrap another strand tightly around all strands 1/2″ below fold at centre point and secure. Sew Tail to Body.
Mane – Sew Head to Neck tilting it downward.
Sew Ears to top of Head 1″ apart. Cut B into 6″ lengths and using 2 strands of B for each fringe, starting on forehead 1/2″ in front of Ears and extending to back of Head and halfway down Neck, single knot fringe close closely in a band approx. 1″ wide.
Leg – (make 4) – With A, Ch 2.
Rnd 1 – 6 Sc in 2nd Ch from hook, do NOT join but work in a spiral as before.
Rnd 2 – 2 Sc in each Sc around. (12 Sc).
Rnd 3 – * 2 Sc in next Sc, Sc in next Sc * repeat from * around. (18 Sc).
Rnd 4 – * 2 Sc in next Sc, Sc in each of next 2 Sc * repeat from * around. (24 Sc).
Rnd 5 – * 2 Sc in next Sc, Sc in each of next 3 Sc * repeat from * around. (30 Sc).
Rnd 6 – Working in blp only, Sc in blp of each Sc around.
Rnd 7 – Working in both lps, Sc in each Sc around.
Rnd 8 – * Dec 1 Sc in next 2 Sc, Sc in each of next 3 Sc * repeat from * around. (24 Sc), complete last Sc with MC. Fasten off.
Rnds 9-26 – With MC, Sc in each Sc around. Fasten off leaving a sewing length. Stuff Legs and sew to bottom of Body.
Facial Features –
Nostrils – With A, satin st 2 nostrils centered on top of Muzzle.
Eyes – Sew black buttons in place.
Bridle (Nose Band) – With A, Ch 33. Row 1 -” Sc in 2nd Ch from hook and in each Ch across. (32 Sc). Fasten off. Sew ends of Band tog and slide over Muzzle.
Side Piece – (make 2) – With A, Ch 25. Row 1 – Sc in 2nd Ch from hook and in each Ch across. (25 Sc). Fasten off. Sew one end of each Side Piece to each side of Nose Band and sew rem 2 ends tog under Mane at back of Head.
Reins – (make 2) – With A, Ch 81.
Row 1 – Sc in 2nd Ch from hook and in each Ch across. (80 Sc). Fasten off. Sew ends of Reins to Nose Band where Side Pieces are joined. Sew brass buttons on ends of Reins.
Saddle – With A, Ch 9.
Row 1 – Sc in 2nd Ch from hook and in each Ch across, turn. (8 Sc).
Row 2 – Ch 1, 2 Sc in first Sc, Sc in each Sc across to last Sc, 2 Sc in last Sc. turn. (10 Sc).
Rows 3-8 – repeat Row 2, turn. (22 Sc).
Rows 9-11 – Ch 1, Sc in each Sc across, turn.
Row 12 – Ch 1, Sc in each Sc across, ch 7 turn.
Row 13 – Ch 1, Sc in 2nd Ch from hook, Sc in each Ch and each Sc across, (28 Sc), Ch 7, turn.
Row 14 – Ch 1, Sc in 2nd Ch from hook, Sc in each Ch and each Sc across, turn. (34 Sc).
Rows 15-17 – Ch 1, Sc in each Sc across, turn.
Row 18 – Ch 1, Sc in each Sc across to within last 6 Sc, turn, leaving last 6 Sc unworked. (28 Sc).
Row 19 – Ch 1, Sc in each Sc across to within last 6 Sc, turn, leaving last 6 Sc unworked. (22 Sc).
Rows 20-21 – Ch 1, Sc in each Sc across, turn.
Row 22 – Ch 1, dec 1 Sc in first 2 Sc, Sc in each Sc across to within last 2 Sc, dec 1 Sc in last 2 Sc, turn. (20 Sc).
Row 22-36 – repeat Row 22 (12 Sc at end of last row), turn.
Edging – Ch 1, Sc evenly around entire saddle working 3 Sc in each outer corner. Fasten off.
Cinch – With A, ch 19.
Row 1 – Sc in 2nd Ch from hook and in each Ch across, fasten off. (18 Sc).
Place the Saddle on the Pony’s back and sew into place. Sew ends of Cinch to the stirrups on the sides of the Saddle stretching the Cinch across the Pony’s stomach.
All done!
This pattern is vintage and uses vintage terms. Images used with permission from Chrisellen from Ravelry


The ears don’t look right when made. I’m making more horsey like ears instead.
I just love this perfect pony but row 16 and 17 are a bit confucing. Please can any body help.
On the ears part of the pattern it says “Wrong sides facing”….Wrong sides facing where? Together? to the Outside? Also the picture is clearly a knitted pony, not crochet.
each other
My first try at this horse was a little smaller than 17″, but cute. I really wanted a larger horse, so made this one only with skinny, longer legs in palomino colors. It is adorable. Then made a leather saddle by enlarging a You tube instruction for a Breyer horse. This will be for my niece’s 18″ doll.
The ears are confusingly long, how do they sew together and go on?
I made this for my great-niece. She loves it. Thank you for sharing the pattern.
your photo shows a knitted pony ??
I agree, it makes me hesitate before trying it…
I did the head, but round 16 of the neck & body I’m having a little trouble with, can anyone help?
how did you get the head right
row 15 is 36 sc which I got then row 16 says 43sc I cant get 43 only 42 i don’t know what i am doing wrong
I really want to make this! It is so cute and I love horses and ponies! Has anyone evr done this pattern, and if so, is it hard?
So cute!! My little girl will love this. Can’t wait to try it.
Thanks
so cute!
so cute I cant wait to try it!!!
So cute
WOW! Just what I was looking for – THANX!
looks a little hard!
cool!
wonderful.