
What you need
Leather thread
Needles
Plastic pellets
Leather
Instructions
For making a foot bag or hacky sack, you will need the following items. Once you have these, follow the instructions later on this page for making a four panel leather footbag.
Leather: I collect scraps of soft, thin, Leather scraps as well as synthetic suede’s from various sources including fabric and leather shops, mail catalogues and other crafters. Nice, thin, supple deerskin, pigskin, etc. works best for a basic four-panel bag. For multi-panel bags like the 12 or the 32 panel, use facile or Ultrasuede scrap.
Thread: Use artificial sinew split to its thinnest (comes four ply) width. Sinew comes in a huge spool for about $8.
Needles: For sewing real leather, use a glovers needle, a three edged needle which cuts through leather (or your finger!) like butter. Berman has them. For synthetics, any long, narrow, sharp needle will do. Some folks pre-cut their holes and lace up their sacks with a blunt, stubby needle. For mass production this may be inevitable, but a one-of-a-kind, custom product comes from intuitive placement of stitches.
plastic toy pellets: Even though these suckers come by the boatload, people have trouble finding them. Any factory or fabrication plant that makes plastic bags or injection molded objects starts with raw pellets. They spill huge piles along the railroad tracks when they unload train cars.
Making A Four Panel Footbag:
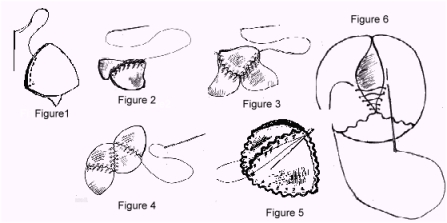
Essentially, you are going to build a sphere inside out, using four “chubby” triangles of soft deerskin or other leather. When you are nearly complete, the bag is turned right side out, filled with plastic pellets and sewn closed from the outside…
1. Thread your needle with a piece of split sinew 3 ft long, double the thread and tie both ends into a beefy (triple) knot at the bottom.
2. Lay two pieces one on top of the other (the sides you like facing inward) and begin sewing one seam with an (in and out) “running” stitch.
3. At the corner add tension to your seam giving it that distinctive “wiggly” look and add piece number three with all (3) corners touching. Sew down the next seam (as pictured).
4. Continue adding equal tension as you sew each seam and at the next corner add the fourth and final piece.
5. Now that the four pieces are attached, continue assembling the sack and sewing up the (6) seams. Remember, every corner should be the junction of three different panels.
6. After your 4th or 5th seam, you will come to a dead end. Don’t panic. When you do, use the head of the needle to loop under several stitches already in place and “hitchhike” your way back to the place that remains undone. Start and sew approx. 1/2 of the final seam and then flip the bag right side out.
7. From the outside, the final seam is closed differently. I call it a “blind” stitch because later, when you pull it closed, you won’t see the thread. First, bring the needle up and out through the lip of leather where the thread is lying, “escaping” it to the outside surface. (From now on, all sewing will be done from the outside. Ie: you won’t put the point of the needle inside the hole again). Now cross over to the opposite lip and pierce (from above) and exit the same piece with one, small bite. Cross back to the other side and do the same. Repeat back and forth until there remains about one finger width of opening (see picture).
Foot Bag Instructions
8. Fill bag to taste. If you can’t locate plastic, lentils, pearl barley, popcorn or rice works for starts (watch chipmonks!). Continue the blind stitch using up remaining space all the way into the final corner. When there remains only one stitch left, plant it so your needle exits using up nearly all remaining space.
Manicure the final seam and pull and adjust your final tension. Construct a bombproof knot directly at ground zero, cut your thread. Now carefully tuck the knot into the seam directly under the placement of the last stitch. If the placement and tension of the final stitch are done correctly, the knot will disappear entirely into the interior of the finished ball. With practice you can magically close every bag.
This project on how to make your own foot bags and Hacky Sacks was contributed by Daniel. Visit http://www.valinet.com/~dbotkin/sew.html visit his website for more information on Foot bags
Original Image courtesy of moises-en-flickr via Flickr


It’s a crochet hacky. Don’t be intimidated because you are a man. The best crocheters and fabric artists I know are men
Just give it a shot! Practice makes perfect!
Loved the instructions. I found the site very helpful. It was exactly what I was looking for.
Wow Weeeeee great stuff going to try it with my scout troop in NY. Thank you! You are going into my favorites now.
Easier to crochet
this is an awesome site. ive been making hacks for a wile with two pieces of fabric 2X6 inches. Ill definitely give this one a try. Thanks for the idea. -Nolan.
Couldnt you use the baseball shape
another GREAT filler is crushed walnut shells.
also, you can make a cube pattern with 1/4″ graph paper easy.
i have made like 6 hacky sacks and i have found it works best if you use suede material with sand but the seams have to be tight and flawless
soobeth,I suppose you could do that, I’d use plastic beads instead of plastic pellets. Good Luck!
i got a bunch of plastic pellets by cutting open beanie babies. Awesome tutorial thanks
i hope this works it looks fun
yea, this process works well. also another material that works well and is easy to get your hands on is a chamois (shammy). you know, that leather thing you use to dry your car after you wash it. i would like more patterns though.
pretty cool
Sounds like something I could try
yes!! this site is perfect for me to start off to make a hacky sack thank you for making it its cool, and very helpful
This is really helpful! I found that Daniel’s website is a bit more helpful, because it has the pictures with the steps. I want to make more of them!
it works like a charm
the crucial part of this was the shape of the “triangles” to make a legit looking ball that will bounce evenly, you’d need to know the right curve of the walls of the triangles…
i did not like it at all
you didn’t give the diminsions of the triangle
im a guy so i realy dont know what im doing here 😛 but i was looking for instructions on how to make a hacky sack… but the hacky sacks that me and my friends use at school are knited out of yarn
The hacky sacks were coooool but none of these people can spell
You could use denim or a strong fabric. And use fine bird seed instead of lentils.
Why not try out the Stress ball instructions on this site that use balloons and birdseed
Can I make them out of a more commenly used material such as cotton and the beads can I use lentils? I do NOT have vinil or suede PLEASE halp me I am only 9!
It’s a disaster! i need to make fourty+ of these in 3 weeks for an assesment and theyre all coming out triangle! what am i doin wrong? i need help and fast!
Thank god for this site! I have to make and sell about fifty of theses things! Some mini keyring ones, ones with elastic, stress balls and hackys! and only 3 weeks to do it! XD
i cant get the panels right i dont understand im following directions there uneven
thank you very much…well done
Your previous post was deleted as it was clearly a mistake as we have permission.
Guest: You will see that this project has been contributed by daniel from the hacky sack website. Please read the projects details before accusing me of stealing content. This site take a great deal of work and your comments is very hurtful.
pretty sweet, man. It took me about 30 min. with cutting and hand sewing and all. It’s a great project. And, a person can fill their hacky sack with beans or sand or anything like that if plastic pellets aren’t available.
I’d like it better if you added patterns for guidance
this is tight. i’m gonna try
this is sweet i luv it It works really good and now i can’t stop playing wit it
sweet this is handy
i like it it works well
sweet website
sweet i alwys needed to know how 2 make a foot bag, i tried a sock, a baloon… they are all bad, i love this
You could use a soft vinyl
this is a great way to make a hacky sack
if this works, i dont think i will ever buy one!