
What you need
100″ 61-200 1mm hemp cord
5-8 23-286 Glass Roller Beads or any beads with at least a 2mm hole
1 82-240 10mm Wood Pony
Bead or any 10mm bead with about a 3mm hole
Instructions
**Hint** A general guide to cord length for macrame projects… Start with about 10 times the finished length of the project.
For example: This project is about 8 inches long. We estimated another 2 inches for knots, so our base measurement is 10 inches. 10 inches x 10 = 100 inches (total cord needed).
This tutorial uses Hemp Cord
We are using a double central (filler) cord, so double the base measurement (2 x 10 inches) to give us a 20 inch center (filler) cord. Also needed is a 10″ piece for the adjustable clasp. This leaves 70 inches, plenty for the remaining (knotting) cord. The more knots in a project, the more cord used; the more beads used, the less cord needed.
Tools:
Scissors or clippers, and Tape (masking tape works well). A clipboard makes your project portable.
Instructions:
Cut cord into the following pieces:
One 10 inch piece
One 20 inch piece
This leaves a remaining piece about 70 inches.
Connect cords.
Find centers of the 20 inch and 70 inch pieces of cord. Place the 2 centers (or loops) of each cord on top of one another and leave all 4 ends dangling free.
Find center of the 10 inch piece of cord.
String the centers (loops) of the 2 cords into the the center of the 10 inch piece. Bring all 4 loose ends back through the center loops and pull tight. This knot is a half hitch.
Make sure cording is even and all ends still match up.
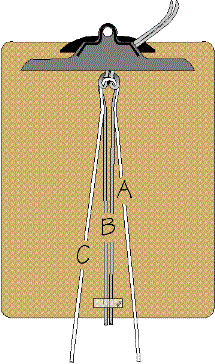
Anchor the project. This helps keep track of what step to do next, and secures the project in place. A clip board works well and allows for movement and storage of an unfinished piece. Secure the 10 inch piece of cord under the clip and let the long pieces of cording dangle. Tape the short pieces at the bottom of the board. Taping the whole project to a table will do the same thing as a clipboard, but is not as convenient if you want to move your project.
Knotting
This bracelet uses one basic knot: the Half Knot. The long (Knotting) piece of cord on the right side will be Cord A, the 2 short (Filler) ones in the middle will be Cords B, and the long (Knotting) piece on the left side will be Cord C.
Start with Cord A and bring behind Cords B, forming a loop with the A cord (about the size of a 50 cent piece) out to the right side.
Now bring Cord C behind the long length of A (now on the left side) and over Cords B. Pull through the loop of Cord A.
Pull tight.
**Hint** The tighter the cord is pulled, the smaller the knot will be. Find the desired size and pull at that tightness through the whole project for consistency.
Repeat step 4, but start on the left side instead of the right.
Alternate sides (one knot starting from the left, the next knot starting from the right) for approx. 20 knots. Be sure it is an even number of knots. Pull knots fairly snug.
**Hint** Keep track of which side you are working on. After a knot is pulled tight, notice that the side to be worked on next is the side with the cord facing forward, not the cord facing the back.
Add Beads
Slide a bead over the Cords B (the fillers). Push up close to the last knot but dont bunch up the knots. If bead is difficult sliding over cord, try twisting bead as it is pushed on.
Go around the beads with Cords A and C. Then make a knot as usuall, with Cord A. (starting on the right side, assuming your last knot before adding the bead started on the left)
Push knot up to the bottom of the bead.
Add 3 more knots (left, right, left).
Add at least 2 more beads the same way (adding 4 knots after each bead).
When you add your third bead, test the length (on your wrist or ankle). Does it go about half way around? If yes, then this is the middle – only add 2 more beads. If no, then you can continue adding beads (with 4 knots after each bead). If you add more than 8 beads, you bead pattern will probably be off-center. Don’t worry if it seems like the project might not be long enough. That piece of cord hanging back at the beginning makes this project any desired length between 6 inches and 12 inches.
After adding your last bead, make about another 20 knots (the same number you made at the beginning).
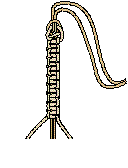
Make the clasp.
After design is finished, slide the 10mm pony bead onto all 4 cords. Pull snug and tie a knot. This bead will go through a loop made on the opposite side.
Trim cords and apply a drop of glue to secure the knot.
Measure bracelet on wrist (or anklet on ankle) to find the desired length needed.
On the opposite side of the bracelet (the 10 inch length of cording) tie a knot at desired length. About of an inch past that knot, tie another knot.
Trim excess cord and apply a drop of glue to secure the knots.
This Jewelry Making Project was contributed by Rings-Things.


love making macrame myself, loved this, absolutely stunning!!!
I love things like this1 they look so cool! I’m ten years old and sell friendship bracelets for a business with my friends. they’re lots of fun to make! Has anyone ever tried boondoggle? It Rocks!
-Awesomegirl32
I make these all the time and I could never describe how to make these as well as she did.
The instructions are slightly confusing but otherwise very good, thanks!
This is so much fun!
i like it.
i love the cool look the knotting gives the bracelet. out of the ordinary.
i love it is soooooo easy i just wish there were more 2 see i’ll come back very some
i love this one!